Introduction
The importance of a well-designed Points of Interest (POI) system cannot be overstated. It encourages a sense of curiosity and discovery, motivating players to actively explore their surroundings and engage with the game world in a more meaningful way. By strategically placing POIs throughout the game, developers create a symbiotic relationship between the player and the environment.
One of the primary benefits of a POI system lies in its ability to provide subtle hints and guidance to players without overtly handholding them. Instead of relying on intrusive tutorials or excessive instructions, the system encourages players to rely on their observational skills and intuition.
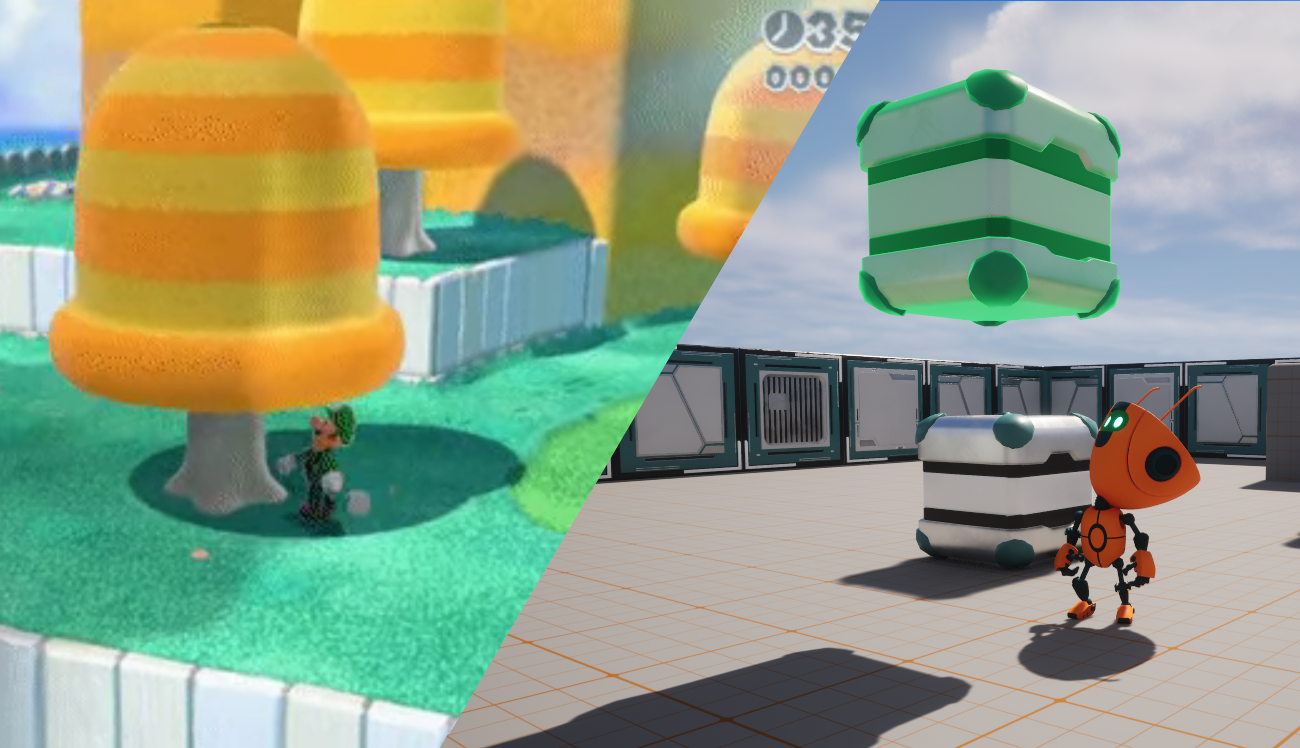
For example, in some Mario games (more specifically, Super Mario 3D World), you can observe that the characters look at “important” things quite often, giving some hints (about hidden items) to the player:
You can also observe similar behavior in the latest Zelda games:
So, in this tutorial, we’ll take a closer look at how a Points of Interest (POI) system works and how it can be implemented in Unreal using Blueprints and C++.
Before You Start
I will use Unreal’s Online Learning Kit Template as a starting point for this tutorial. You can download it from the Marketplace: https://www.unrealengine.com/marketplace/en-US/product/online-learning-kit
The full source code for this tutorial can be downloaded from https://github.com/valentegamedev/ue5-points-of-interest.git
We will start by creating a POI Tracker Component, responsible for keeping track of all the “important” items surrounding the character.
If you are new to C++ in Unreal 5, I always recommend Tom Looman’s Unreal Engine C++ Complete Guide before getting started.
Creating the POI Tracker Component
The Online Learning Kit Template is not C++-ready by default. It’s a Blueprint only project. So, to get started, we need to open the project as a regular Blueprint project and then add our first C++ class.
There is a very straightforward tutorial by Werewolven where he shows how to convert a Blueprint-only project into a C++ one. You can check it out here.
To make things easier, we will use an USphereComponent as the base class. By doing that, we already get a few things for “free”. For example, we can adjust the radius of the tracker visually, making it more designer-friendly (just like setting up the size of the collision sphere) and the overlapping events.
Now, with the Blueprint project open, create a new C++ class derived from USphereComponent to create our POI Tracker Component. In Editor, go to the “Tools” menu and select “New C++ Class“. Choose SphereComponent from the “All Classes” tab as the base class, give your class name “VPOITrackerComponent“, choose the class type as “Public“, and click “Create Class“.
By default, if you compile the project and try to add our new component to the BP_Bot (main character) located at /Content/EOL_Content/Characters/Bot/BP_Bot, it will not be visible:

To see our newly created component in the list, we must add the BlueprintSpawnableComponent metadata to the UCLASS macro right before the class definition. So, the initial code should look like this:
...
UCLASS(meta=(DisplayName="Points Of Interest Tracker Component", BlueprintSpawnableComponent))
class POINTSOFINTEREST_API UVPOITrackerComponent : public USphereComponent
{
	GENERATED_BODY()
};
...
#include "VPOITrackerComponent.h"
//It should be mostly empty for now.Now, if you try to add it once again, it should be visible:

Nice! Now, we also need to create an Interface that should be implemented by all the actors that should be traceable by the system.
An interface is a type of class that defines some kind of contract of functions that other classes can implement. Interfaces are used to establish a common set of methods that multiple classes can adhere to, enabling polymorphism and code reuse. There is a nice introduction to Interfaces in C++ by Dev Enabled here.
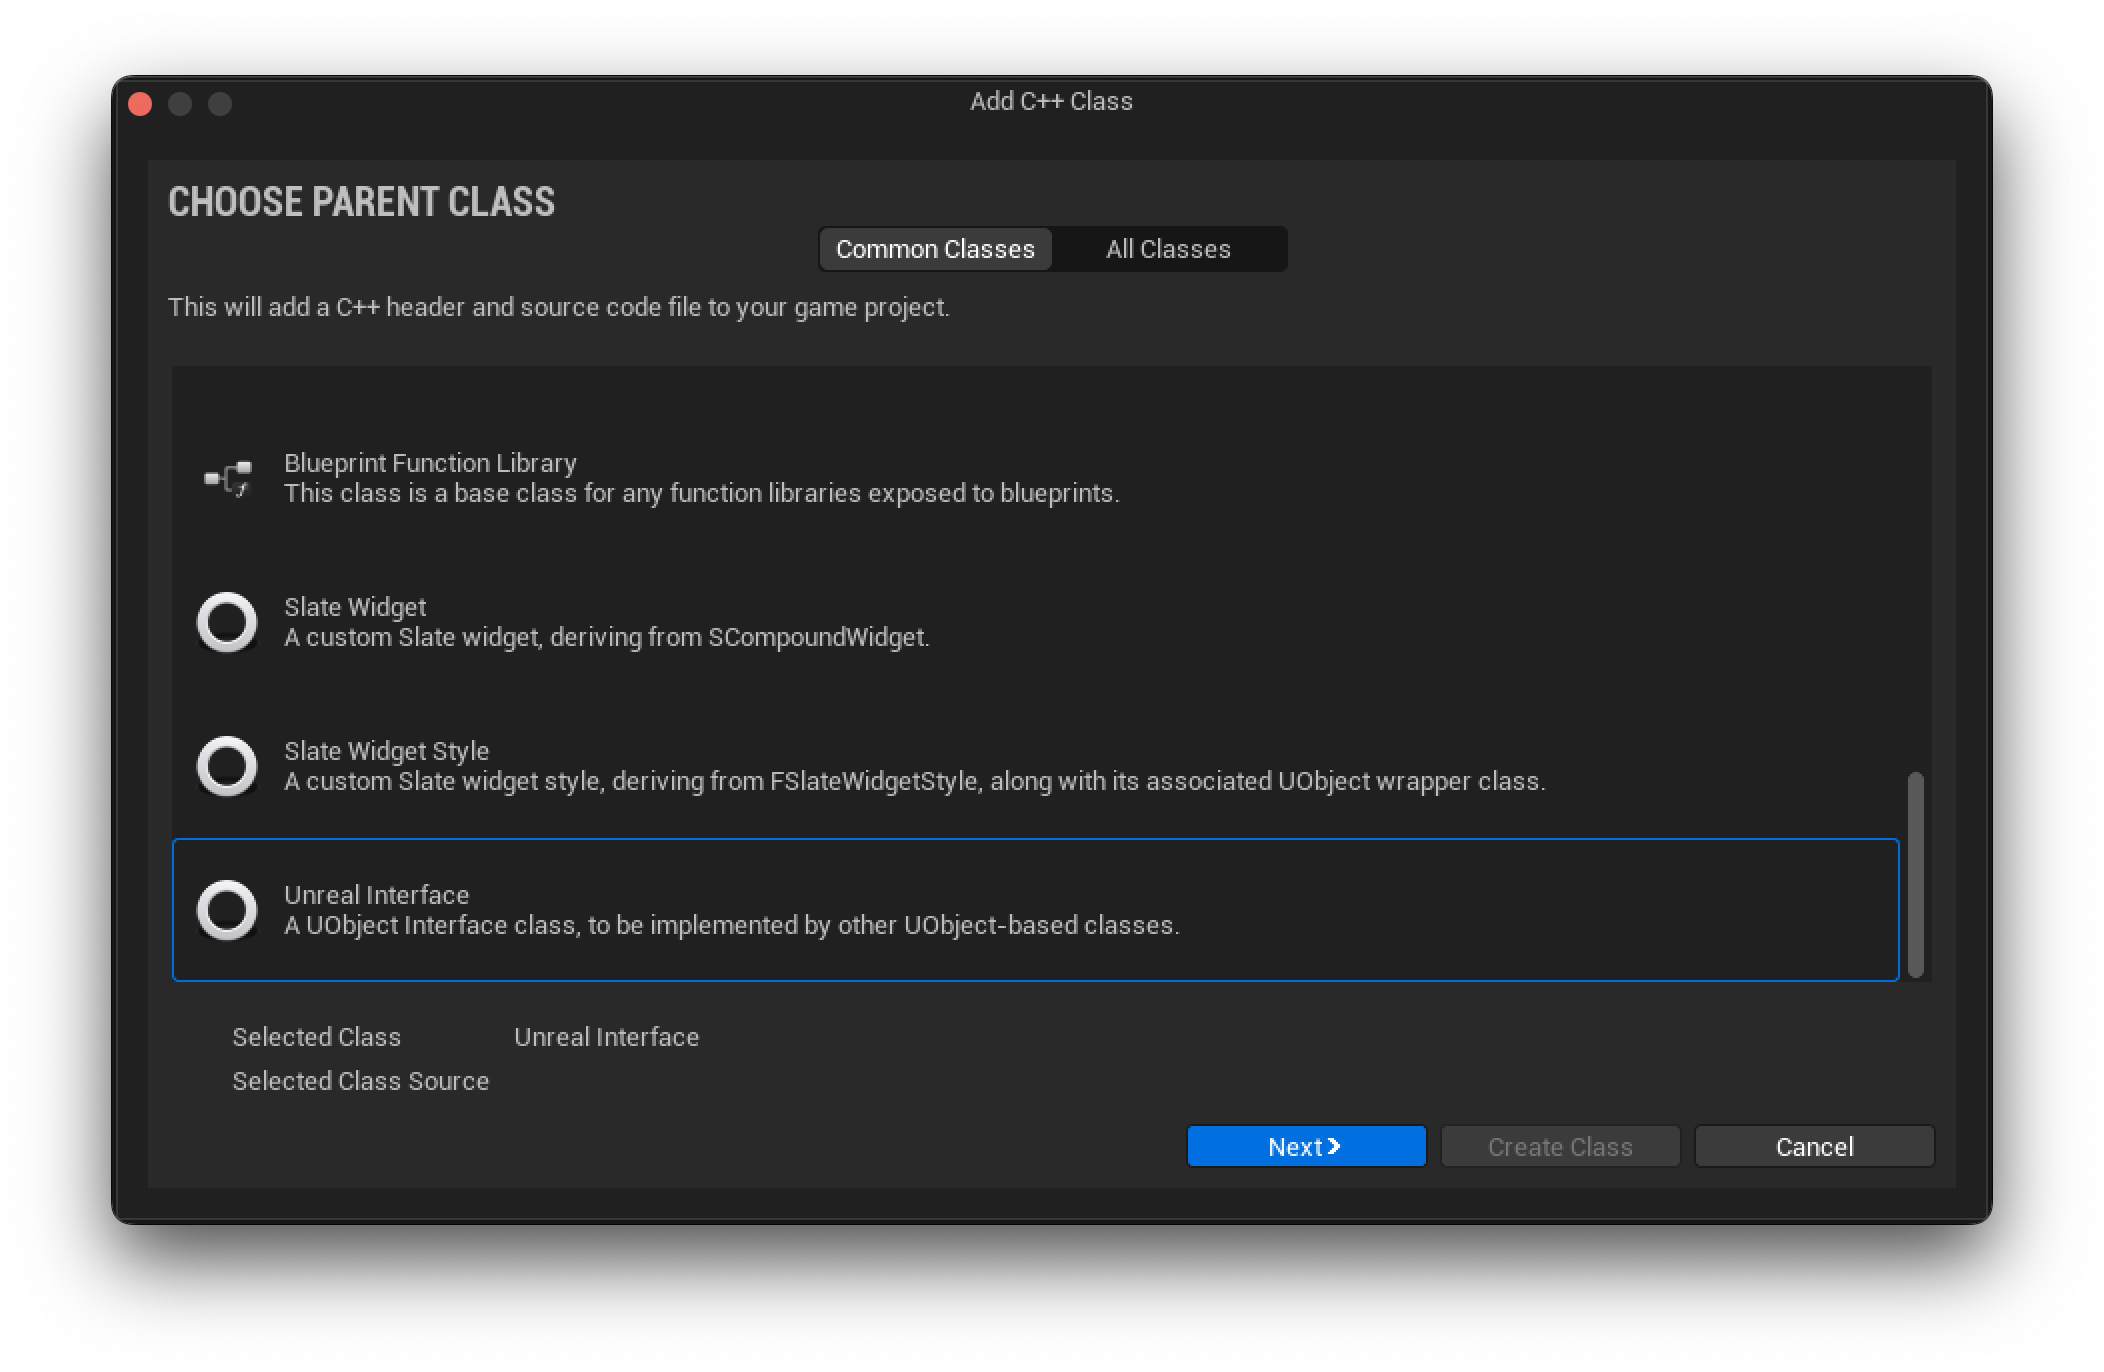
To create one, go to the “Tools” menu and select “New C++ Class“. Scroll down and choose Unreal Interface at the bottom of the list. Give your interface name “VPOIItemInterface“, choose the class type as “Public“, and click “Create Class“.
If you open VPOIItemInterface.h, you will see that Unreal defined two classes by default: UVPOIItemInterface and IVPOIItemInterface. If you read the comments, you will see that we must add our code to the one starting with an I, the IVPOIItemInterface class, and the engine will take care of the rest.
#pragma once

#include "CoreMinimal.h"
#include "UObject/Interface.h"
#include "VPOIItemInterface.generated.h"

// This class does not need to be modified.
UINTERFACE(MinimalAPI)
class UVPOIItemInterface : public UInterface
{
	GENERATED_BODY()
};

class POINTSOFINTEREST_API IVPOIItemInterface
{
	GENERATED_BODY()

	// Add interface functions to this class. This is the class that will be inherited to implement this interface.
public:
};
More specifically, for this POI Tracking System, I want to be able to notify the traceable items whether they are active or not, in other words, whenever I’m looking at them. For that, I want to define two functions these actors should implement: OnBeginFocus() and OnEndFocus(). Later, we are going to use those functions to activate an outline around the active/closest Actor.
Your interface code should look like this:
...
class POINTSOFINTEREST_API IVPOIItemInterface
{
	GENERATED_BODY()

	// Add interface functions to this class. This is the class that will be inherited to implement this interface.
public:
	UFUNCTION(BlueprintNativeEvent)
	void OnBeginFocus();

	UFUNCTION(BlueprintNativeEvent)
	void OnEndFocus();
};
I’ve used the BlueprintNativeEvent specifier for both functions in case we need to use the interface in C++. Otherwise, we could have used BlueprintImplementableEvent for a Blueprint-only solution instead.
Now, let’s get started with our POI Tracker Component. Let’s start the system by keeping track of the POI Items we overlap with.
Later in the tutorial, we will improve it to keep track of the overlapping items and set the closest one as an active item.
The first thing that we are going to do is to add a new property called POIList to our header file after the macro GENERATED_BODY() (by default, everything that is declared after it will be private) and two functions called OnBeginOverlap() and OnEndOverlap() that are going to be used for the overlapping events and the BeginPlay() to hook everything:
...
UCLASS(meta=(DisplayName="Points Of Interest Tracker Component", BlueprintSpawnableComponent))
class POINTSOFINTEREST_API UVPOITrackerComponent : public USphereComponent
{
	GENERATED_BODY()

	UPROPERTY(VisibleAnywhere, BlueprintReadOnly, meta = (AllowPrivateAccess = "true"))
	TArray<AActor*> POIList;

	UFUNCTION()
	void OnBeginOverlap(UPrimitiveComponent* OverlappedComponent, AActor* OtherActor, UPrimitiveComponent* OtherComp, int32 OtherBodyIndex, bool bFromSweep, const FHitResult &SweepResult);

	UFUNCTION()
	void OnEndOverlap(UPrimitiveComponent* OverlappedComponent, AActor* OtherActor, UPrimitiveComponent* OtherComp, int32 OtherBodyIndex);

protected:
	virtual void BeginPlay() override;
};
...
For now, I’m using the specifier AllowPrivateAccess with VisibleAnywhere and BlueprintReadOnly to be able to see the content of the array (which is private) from the Editor. Making it easier to debug.
Basically, we are going to add/remove POI Items to the POIList as soon as we overlap them. For that, the implementation file should look like this:
#include "VPOITrackerComponent.h"
#include "VPOIItemInterface.h"

void UVPOITrackerComponent::BeginPlay()
{
	Super::BeginPlay();
	//Disable ticking for this component
	SetComponentTickEnabled(false);

	//Listen to the overlap events
	OnComponentBeginOverlap.AddDynamic(this, &UVPOITrackerComponent::OnBeginOverlap);
	OnComponentEndOverlap.AddDynamic(this,  &UVPOITrackerComponent::OnEndOverlap);
}

void UVPOITrackerComponent::OnBeginOverlap(UPrimitiveComponent* OverlappedComponent, AActor* OtherActor, UPrimitiveComponent* OtherComp, int32 OtherBodyIndex, bool bFromSweep, const FHitResult &SweepResult)
{
	//Check if the overlapping actor implements the POI Item interface
	if(OtherActor->Implements<UVPOIItemInterface>()) {
		POIList.AddUnique(OtherActor);
	}

}

void UVPOITrackerComponent::OnEndOverlap(UPrimitiveComponent* OverlappedComponent, AActor* OtherActor,
	UPrimitiveComponent* OtherComp, int32 OtherBodyIndex)
{
	//Check if the overlapping actor implements the POI Item interface
	if(OtherActor->Implements<UVPOIItemInterface>())
	{
		POIList.Remove(OtherActor);
	}
}
Adding the Points Of Interest Tracker Component to the Character
Now, compile, and you should be good to go. However, because we started from a Blueprint-only template, we need to add our newly created component from the Editor. So, if you haven’t already, open the BP_Bot blueprint located at EOL_Content/Characters/Bot/BP_Bot and add the “Points Of Interest Tracker Component“:
By selecting the “Viewport” tab, you should see a sphere representing the shape/size of our tracker:
Set the radius to 250 and uncheck the Hidden In Game property to be able to see it while we play the game (we can recheck it later after we are done with the component):

Now, if you compile and play the game, you should be able to see the sphere around the character, but nothing will happen because we still need to add our POI Items (actors that will implement our POI Item Interface) to the scene:
Creating a POI Item
To create our first POI item, go to the folder EOL_Content/Blueprints/, and inside that folder, right-click and select the “Blueprint Class” menu under “Create Basic Asset“. Then, select “Actor” and name it BP_Crate.
Now, with BP_Crate open, add a Static Mesh Component (you can name it “Mesh“), choose the “SM_Crate” as the mesh and drag-n-drop it to the root (so that the Static Mesh Component is the root of the blueprint):
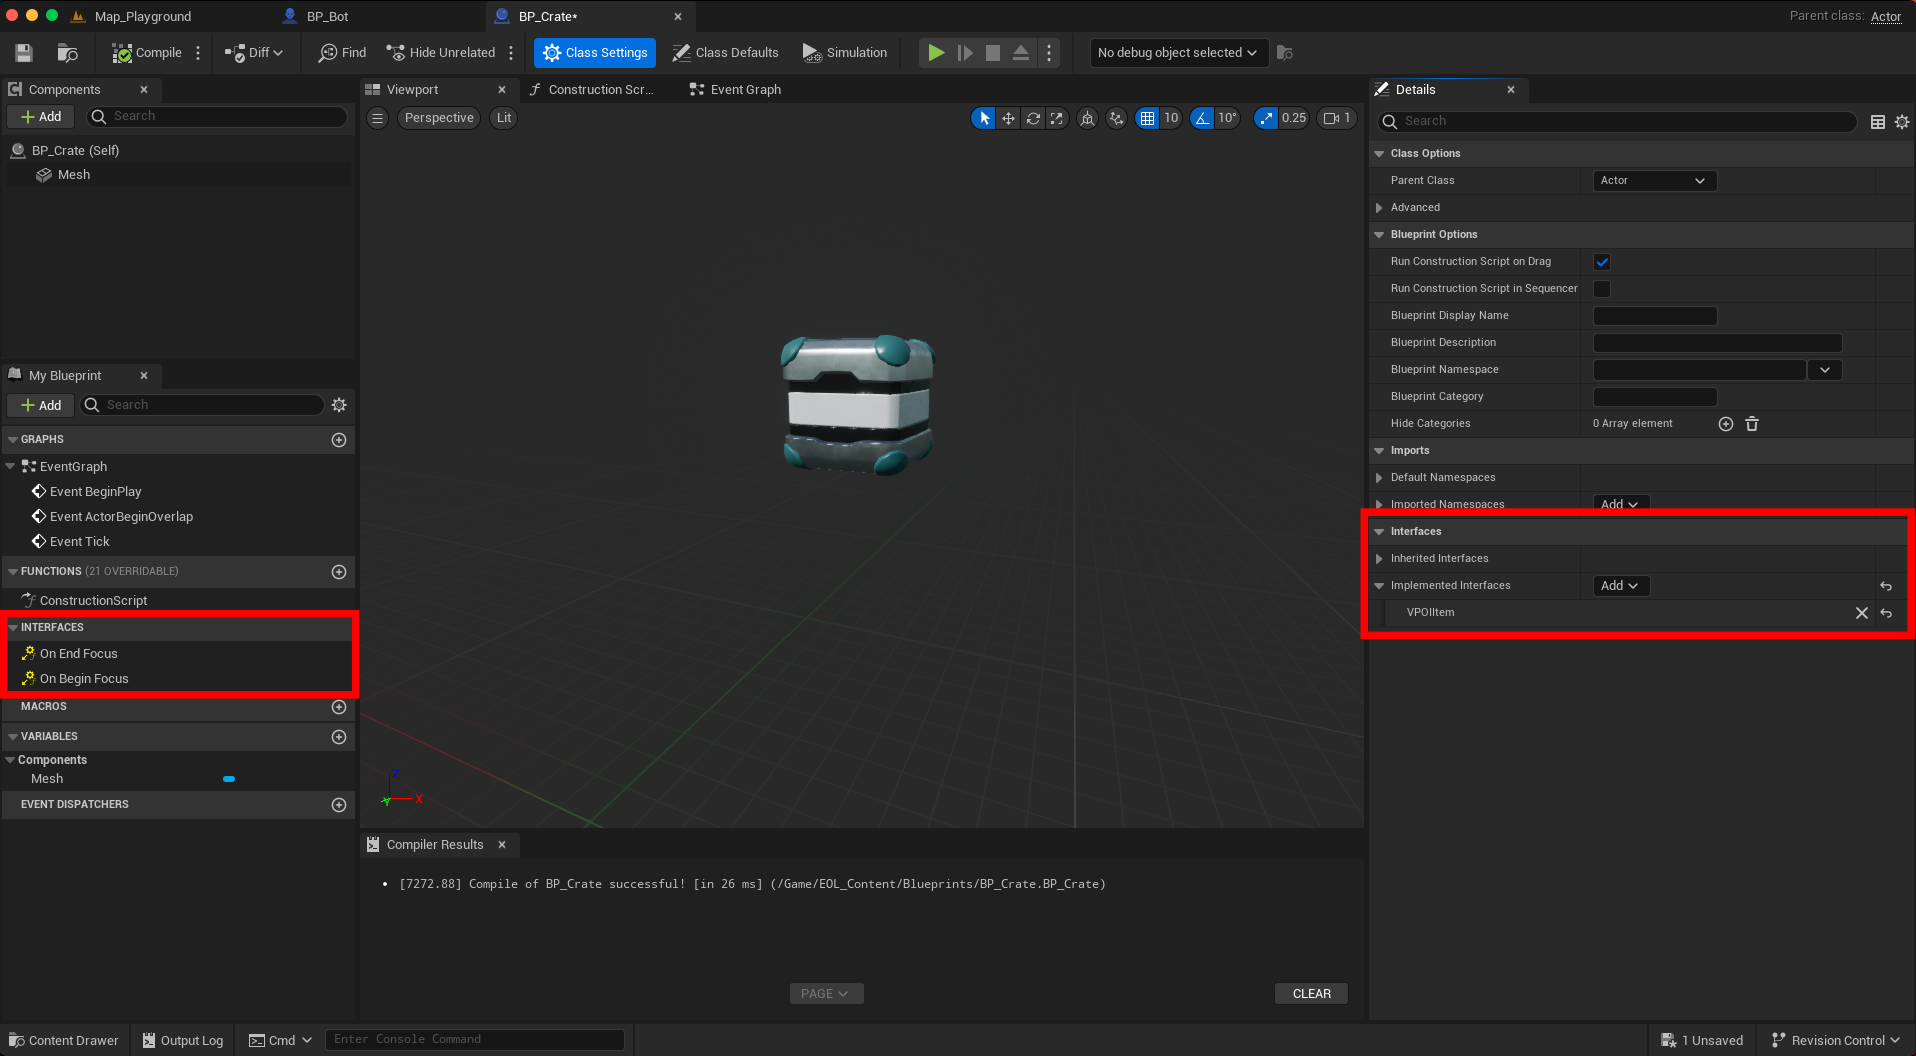
We still need one more thing, which is to add our POI Item interface to it. Go to “Class Settings“, and under “Interfaces” > “Implemented Interfaces“, click the Add button and select our VPOIItemInterface. After doing that, you can observe that we can also implement the two functions (OnBeginFocus and OnEndFocus) that we declared for the interface (in case we want to add a behavior to our object as soon as they become active, for example):
Now, if you drag a few BP_Crates to the level and start playing the game, you should be able to see the crates being added/removed to the POIList as soon as you get closer or further, respectively:
That’s great! Right?
But now we need to improve the system to activate/select the closestPOI Item from the character and not just keep a list with all of them.
Improving the POI Tracker Component
At first, you might think that we can just keep track of the latest POI Item that the character overlapped with and use it as the target. However, this is not always the case if we take a closer look at it:
In this example, the character is walking from left to right, and it will overlap the box number 1 first, then 2 and 3. However, for a moment, box number 1 will be the closest; after moving to the right, box number 3 will be the closest (skipping number 2), and none of them was removed during that walk.
Said that we need to check which one is the closest continuously. We could add this check to the Tick function. However, it would run 60 times per second, which is waaaay more than we need for this 🙂
So, we are going to replace the Tick with a Timer, which the interval can be tweaked and will save some unnecessary calculations.
It is always a good practice to try to avoid the Tick function. To learn more about tick and how to avoid it, please check this live stream from Epic Games.
Now, let’s change that in our code. First, we need to define a Timer Handler, a function called UpdatePointsOfInterest() that the timer will call from time to time to check which POI Item is the closest and a variable to hold the closest POI Item in the header file for the POI Tracker Component:
...
UCLASS(meta=(DisplayName="Points Of Interest Tracker Component", BlueprintSpawnableComponent))
class POINTSOFINTEREST_API UVPOITrackerComponent : public USphereComponent
{
	GENERATED_BODY()

	UPROPERTY()
	FTimerHandle TimerHandler;

	UPROPERTY(VisibleAnywhere, BlueprintReadOnly, meta = (AllowPrivateAccess = "true"))
	TObjectPtr<AActor> ClosestPOI;

	UPROPERTY(VisibleAnywhere, BlueprintReadOnly, meta = (AllowPrivateAccess = "true"))
	TArray<AActor*> POIList;

	UFUNCTION()
	void OnBeginOverlap(UPrimitiveComponent* OverlappedComponent, AActor* OtherActor, UPrimitiveComponent* OtherComp, int32 OtherBodyIndex, bool bFromSweep, const FHitResult &SweepResult);

	UFUNCTION()
	void OnEndOverlap(UPrimitiveComponent* OverlappedComponent, AActor* OtherActor, UPrimitiveComponent* OtherComp, int32 OtherBodyIndex);

	UFUNCTION()
	void UpdatePointsOfInterest();

protected:
	virtual void BeginPlay() override;
};
...
For the implementation file, we need to change the OnBeginOverlap() and OnEndOverlap() functions in a way that we start the Timer as soon as we add the first item to the list and stop the timer when it’s empty, respectively:
...
void UVPOITrackerComponent::OnBeginOverlap(UPrimitiveComponent* OverlappedComponent, AActor* OtherActor, UPrimitiveComponent* OtherComp, int32 OtherBodyIndex, bool bFromSweep, const FHitResult &SweepResult)
{
	if(OtherActor->Implements<UVPOIItemInterface>()) {
		if(POIList.Num() == 0)
		{
			GetWorld()->GetTimerManager().SetTimer(TimerHandler, this, &UVPOITrackerComponent::UpdatePointsOfInterest, .01f, true);
		}
		POIList.AddUnique(OtherActor);
	}

}

void UVPOITrackerComponent::OnEndOverlap(UPrimitiveComponent* OverlappedComponent, AActor* OtherActor,
	UPrimitiveComponent* OtherComp, int32 OtherBodyIndex)
{
	if(OtherActor->Implements<UVPOIItemInterface>())
	{
		POIList.Remove(OtherActor);

		if(POIList.Num()==0)
		{
			//Make sure that we clear the ClosestPOI when the list is empty
			ClosestPOI = nullptr;
			GetWorld()->GetTimerManager().ClearTimer(TimerHandler);
		}
	}
}
...
For now, we are keeping the time interval for the Timer at .01f seconds for testing purposes. Later, we are going to change it to a longer interval.
Also, to learn more about Timers in C++, I highly recommend this tutorial by Tom Looman.
For the UpdatePointsOfInterest(), we are going to sort the POI List in ascending order (based on the distance from the character) and set the POI Item at index 0 to be the closest one:
...
void UVPOITrackerComponent::UpdatePointsOfInterest()
{
	Algo::Sort(POIList, [&](const AActor* A, const AActor* B)
	{
		FVector DistanceToA = A->GetActorLocation() - GetOwner()->GetActorLocation();
		FVector DistanceToB = B->GetActorLocation() - GetOwner()->GetActorLocation();

		return DistanceToA.Length() < DistanceToB.Length();
	});

	ClosestPOI = POIList[0];
}

...
If you compile and run the game, you should be able to see the closest POI Item being constantly updated based on the distance:
Using Draw Debug Helpers
To help visualize which object is the active (closest) one, we are going to use the utility function DrawDebugLine() from the header DrawDebugHelpers.h. By doing this, we are going to see a line being rendered from the character to the closest POI Item for debugging purposes.
So, let’s add this call to the UpdatePointsOfInterest() function:
...
void UVPOITrackerComponent::UpdatePointsOfInterest()
{
	Algo::Sort(POIList, [&](const AActor* A, const AActor* B)
	{
		FVector DistanceToA = A->GetActorLocation() - GetOwner()->GetActorLocation();
		FVector DistanceToB = B->GetActorLocation() - GetOwner()->GetActorLocation();

		return DistanceToA.Length() < DistanceToB.Length();
	});

	ClosestPOI = POIList[0];

	//Draw a line from the character to the closest POI Item
	DrawDebugLine(GetWorld(), GetOwner()->GetActorLocation(), ClosestPOI->GetActorLocation(), FColor::Green, false, -1, 0, 2);
}
...
Then, if you compile and run, you should have this:
If you want to learn more about all the shapes you can draw using the DrawDebugHelpers header, I highly recommend this tutorial by Harrison McGuire.
Cool, right? 🙂
Notifying the POI Items
We are almost done with our POIsystem. However, we still need to notify the POI Items whether they are active (closest) or not and create a delegate in the POI Tracker Component to inform the character whenever a POI Item is focused or if there is none in the surroundings.
First, let’s add the logic to notify the POI Items from the POI Tracker Component by calling the functions OnBeginFocus() and OnEndFocus() from the POI Item Interface. For that, we need to make changes to the functions OnEndOverlap() and UpdatePointOfInterest() from our POI Tracker Component:
...
void UVPOITrackerComponent::OnEndOverlap(UPrimitiveComponent* OverlappedComponent, AActor* OtherActor,
	UPrimitiveComponent* OtherComp, int32 OtherBodyIndex)
{
	if(OtherActor->Implements<UVPOIItemInterface>())
	{
		POIList.Remove(OtherActor);

		if(POIList.Num()==0)
		{
			//If the list is empty and we still have an item as ClosestPOI
			if(ClosestPOI)
			{
				//Notify the OnEndFocus in the item through the interface
				IVPOIItemInterface::Execute_OnEndFocus(ClosestPOI);
			}
			ClosestPOI = nullptr;
			GetWorld()->GetTimerManager().ClearTimer(TimerHandler);
		}
	}
}
...
void UVPOITrackerComponent::UpdatePointsOfInterest()
{
	Algo::Sort(POIList, [&](const AActor* A, const AActor* B)
	{
		FVector DistanceToA = A->GetActorLocation() - GetOwner()->GetActorLocation();
		FVector DistanceToB = B->GetActorLocation() - GetOwner()->GetActorLocation();

		return DistanceToA.Length() < DistanceToB.Length();
	});

	//If we have a new closest item
	if (ClosestPOI != POIList[0])
	{
		//If we already had a closest item before
		if(ClosestPOI) {
			//Notify the OnEndFocus in the old one
			IVPOIItemInterface::Execute_OnEndFocus(ClosestPOI);
		}

		ClosestPOI = POIList[0];
		//Notify the OnBeginFocus in the new one
		IVPOIItemInterface::Execute_OnBeginFocus(ClosestPOI);
	}

	//Draw a line from the character to the closest POI Item
	DrawDebugLine(GetWorld(), GetOwner()->GetActorLocation(), ClosestPOI->GetActorLocation(), FColor::Green, false, -1, 0, 2);
}
...
Now, to test this, we will set an overlay material to the closest POI Item, creating a highlight effect. To do this, we need to implement the functions from the interface in our BP_Crate blueprint:
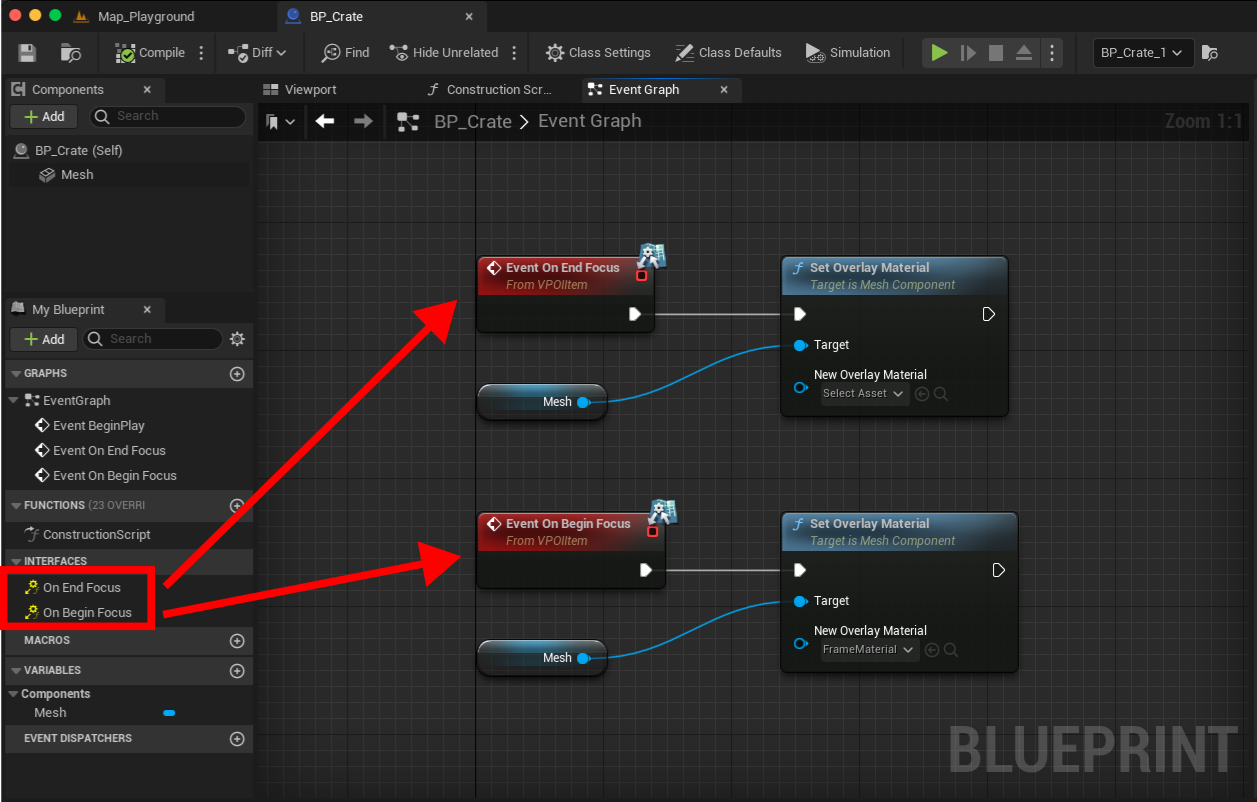
You can implement those functions by double-clicking them.
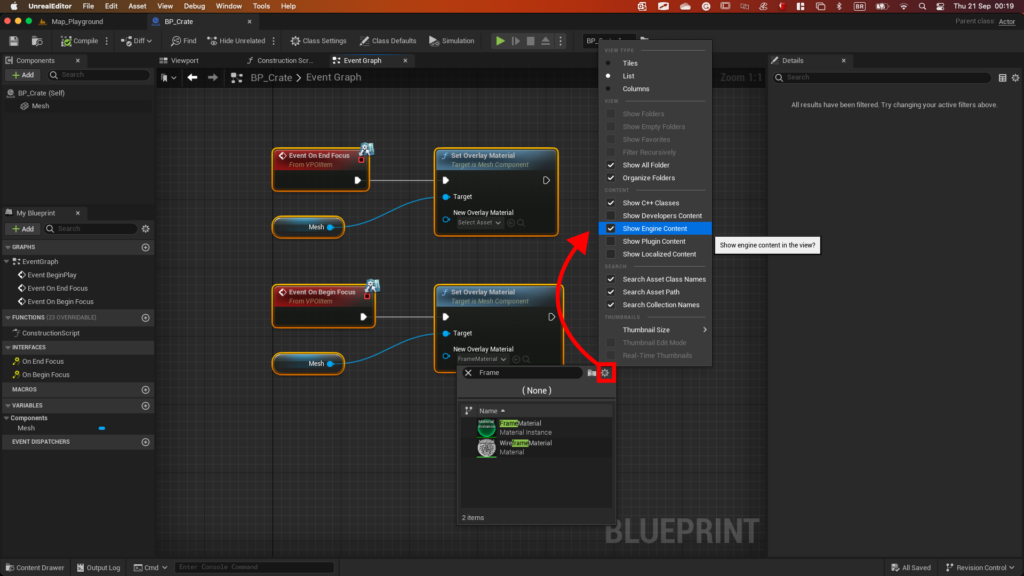
If you can’t find the material called FrameMaterial, please enable the engine content checkbox as shown here:
Now, compile and run, and you should see something like this:
Adding delegates
Now, let’s add the delegates to inform the character whenever a POI Item is focused or if there is none in the surroundings. This will facilitate the process of making the character look toward the closest POI Item later when we modify the Animation Blueprint.
So, declare the FOnPointOfInterestFocused (which will have an AActor as a parameter) and FOnPointsOfInterestCleared delegates at the top of our POI Tracker Component header file and define the in the public section:
...
#include "CoreMinimal.h"
#include "Components/SphereComponent.h"
#include "VPOITrackerComponent.generated.h"

DECLARE_DYNAMIC_MULTICAST_DELEGATE_OneParam(FOnPointOfInterestFocused, AActor*, NewPOI);
DECLARE_DYNAMIC_MULTICAST_DELEGATE(FOnPointsOfInterestCleared);

UCLASS(meta=(DisplayName="Points Of Interest Tracker Component", BlueprintSpawnableComponent))
class POINTSOFINTEREST_API UVPOITrackerComponent : public USphereComponent
{
	GENERATED_BODY()

	UPROPERTY()
	FTimerHandle TimerHandler;

	UPROPERTY(VisibleAnywhere, BlueprintReadOnly, meta = (AllowPrivateAccess = "true"))
	TWeakObjectPtr<AActor> ClosestPOI;

	UPROPERTY(VisibleAnywhere, BlueprintReadOnly, meta = (AllowPrivateAccess = "true"))
	TArray<AActor*> POIList;

	UFUNCTION()
	void OnBeginOverlap(UPrimitiveComponent* OverlappedComponent, AActor* OtherActor, UPrimitiveComponent* OtherComp, int32 OtherBodyIndex, bool bFromSweep, const FHitResult &SweepResult);

	UFUNCTION()
	void OnEndOverlap(UPrimitiveComponent* OverlappedComponent, AActor* OtherActor, UPrimitiveComponent* OtherComp, int32 OtherBodyIndex);

	UFUNCTION()
	void UpdatePointsOfInterest();

protected:
	virtual void BeginPlay() override;

public:
	UPROPERTY(BlueprintAssignable, Category = "Default")
	FOnPointOfInterestFocused OnPointOfInterestFocused;

	UPROPERTY(BlueprintAssignable, Category = "Default")
	FOnPointsOfInterestCleared OnPointsOfInterestCleared;
};
...
We also need to change a few things in the code inside the OnEndOverlap() and UpdatePointsOfInterest() functions to trigger those delegates in the right place:
...
void UVPOITrackerComponent::OnEndOverlap(UPrimitiveComponent* OverlappedComponent, AActor* OtherActor,
	UPrimitiveComponent* OtherComp, int32 OtherBodyIndex)
{
	if(OtherActor->Implements<UVPOIItemInterface>())
	{
		POIList.Remove(OtherActor);

		if(POIList.Num()==0)
		{
			//If the list is empty and we still have an item as ClosestPOI
			if(ClosestPOI)
			{
				//Notify the OnEndFocus in the item through the interface
				IVPOIItemInterface::Execute_OnEndFocus(ClosestPOI);
			}
			ClosestPOI = nullptr;
			GetWorld()->GetTimerManager().ClearTimer(TimerHandler);
			OnPointsOfInterestCleared.Broadcast();
		}
	}
}
...
void UVPOITrackerComponent::UpdatePointsOfInterest()
{
	Algo::Sort(POIList, [&](const AActor* A, const AActor* B)
	{
		FVector DistanceToA = A->GetActorLocation() - GetOwner()->GetActorLocation();
		FVector DistanceToB = B->GetActorLocation() - GetOwner()->GetActorLocation();

		return DistanceToA.Length() < DistanceToB.Length();
	});

	//If we have a new closest item
	if (ClosestPOI != POIList[0])
	{
		//If we already had a closest item before
		if(ClosestPOI) {
			//Notify the OnEndFocus in the old one
			IVPOIItemInterface::Execute_OnEndFocus(ClosestPOI);
		}

		ClosestPOI = POIList[0];
		//Notify the OnBeginFocus in the new one
		IVPOIItemInterface::Execute_OnBeginFocus(ClosestPOI);
		OnPointOfInterestFocused.Broadcast(ClosestPOI);
	}

	//Draw a line from the character to the closest POI Item
	DrawDebugLine(GetWorld(), GetOwner()->GetActorLocation(), ClosestPOI->GetActorLocation(), FColor::Green, false, -1, 0, 2);
}
...
Now, we have everything ready to start working on the robot’s head movement! 🙂
Also, don’t forget to compile!
Moving the head
To move the head, we are going to register the character to the POI Tracker Component delegates, and as soon as it gets notified about a POI Item, we save the POI location and start a Timeline that will update a property called HeadAnimationAlpha from 0.0 to 1.0 that will be used to control the blending of the head animation (which is going to be procedural) with the base one in the Animation Blueprint. And, if the POI Tracker Component notifies that there is no POI Item close by, we reverse the Timeline (from 1.0 to 0.0) so that the blend from the Animation Blueprint will ignore the head animation.
So, let’s open the BP_Bot blueprint and add two properties, one called LookAtLocation (Vector3) and one HeadAnimationAlpha (float), and add the code for both delegates as follows:
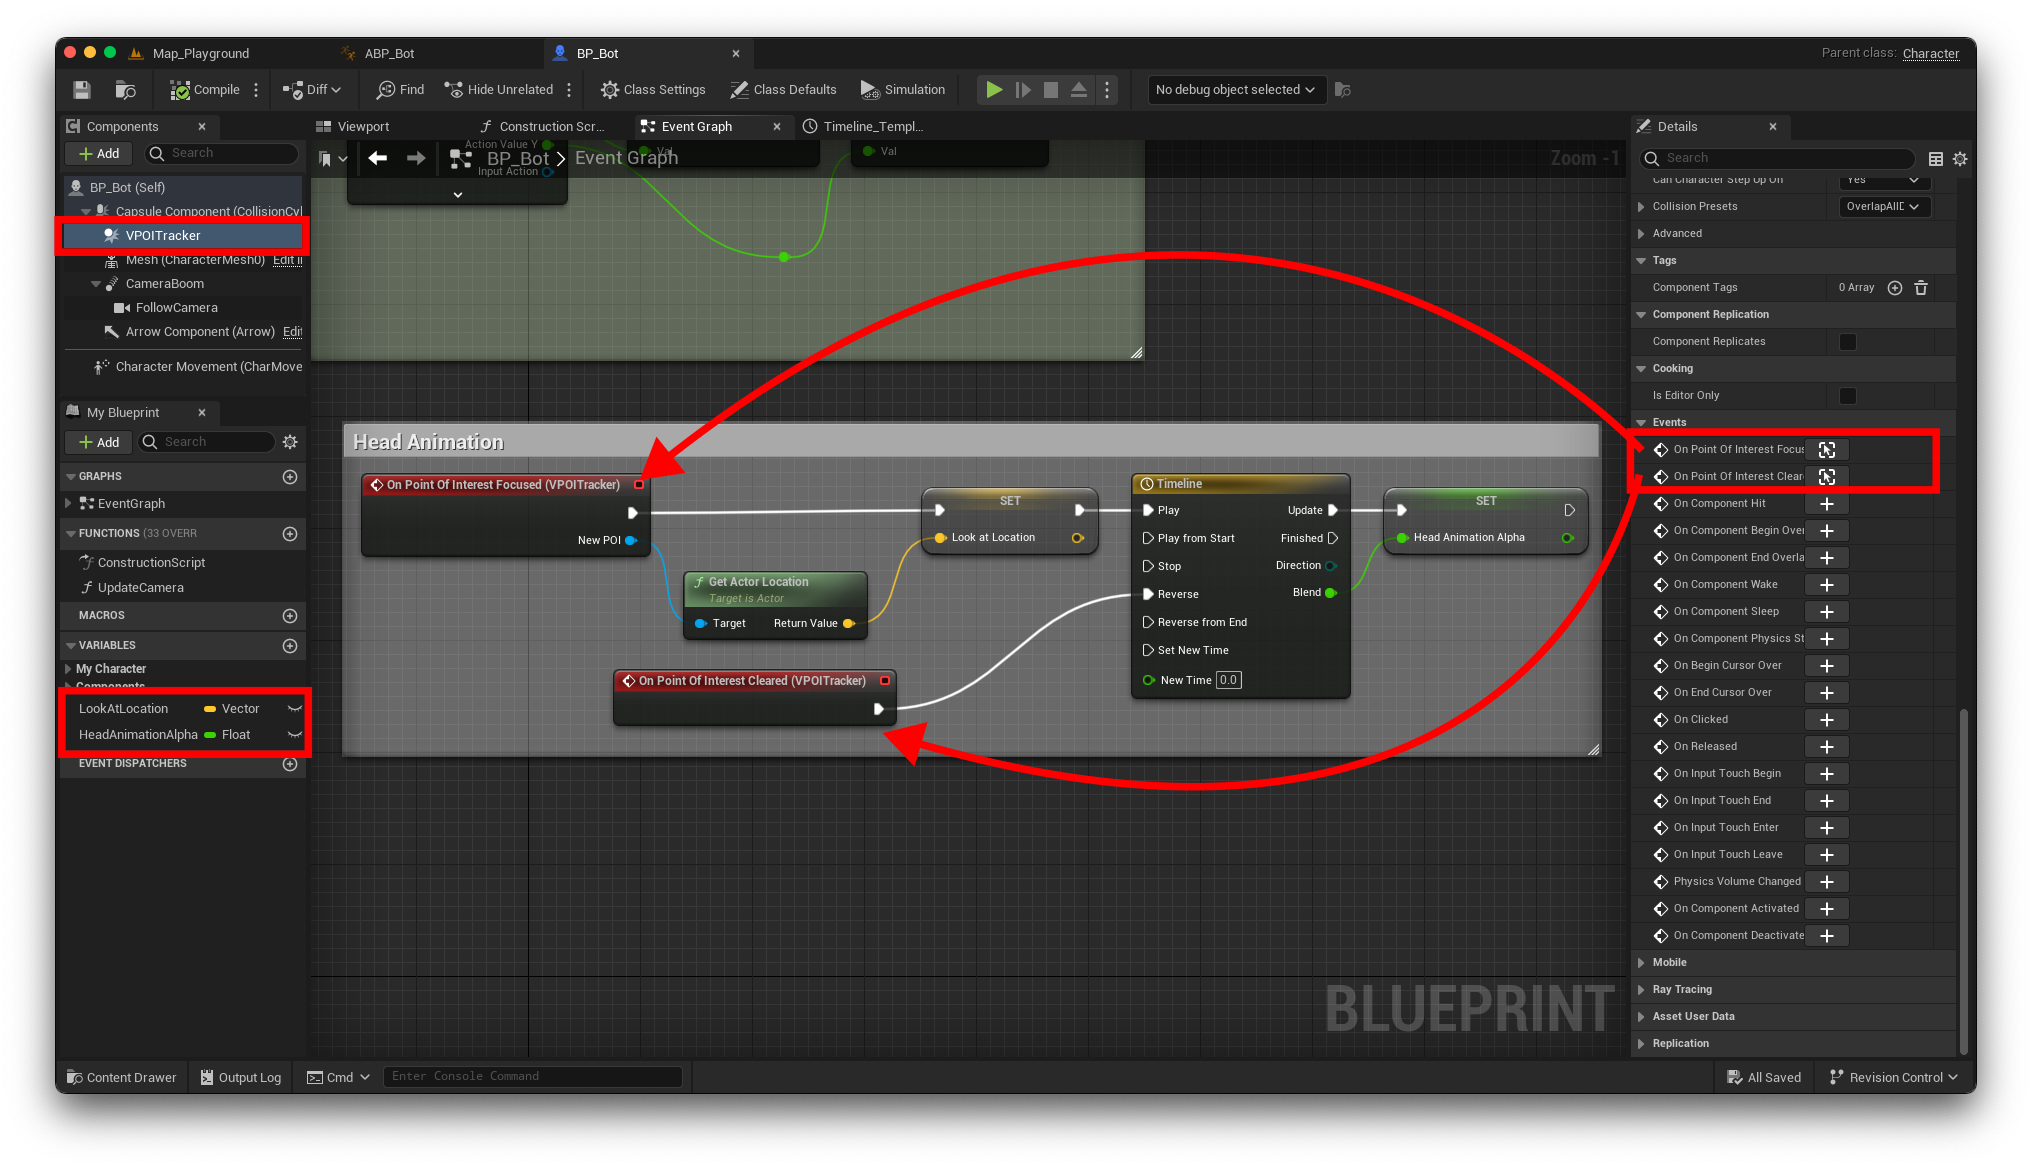
And that’s how the Blend float track from the Timeline looks like:

Now we need to change a few things inside the character’s Animation Blueprint. So, open the ABP_Bot located at Content/EOL_Content/Characters/Bot/Animations/ABP_Bot and open the Event Graph.
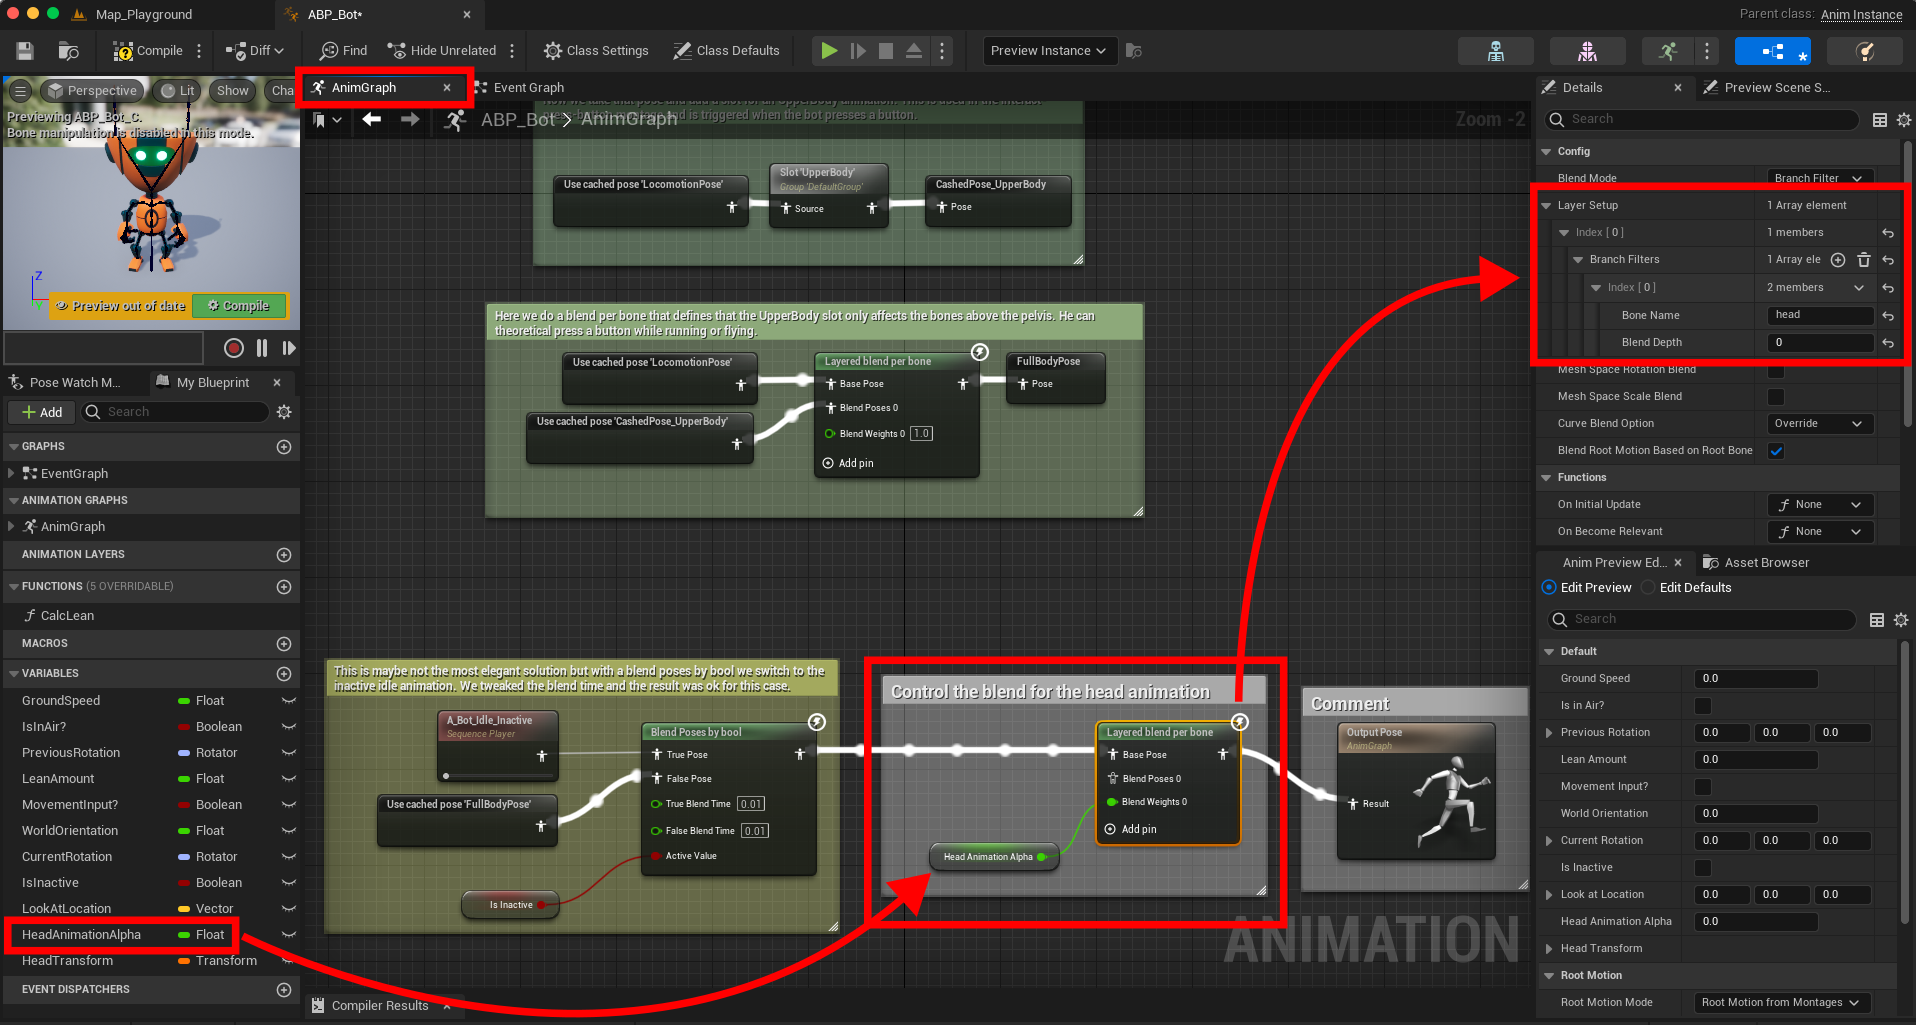
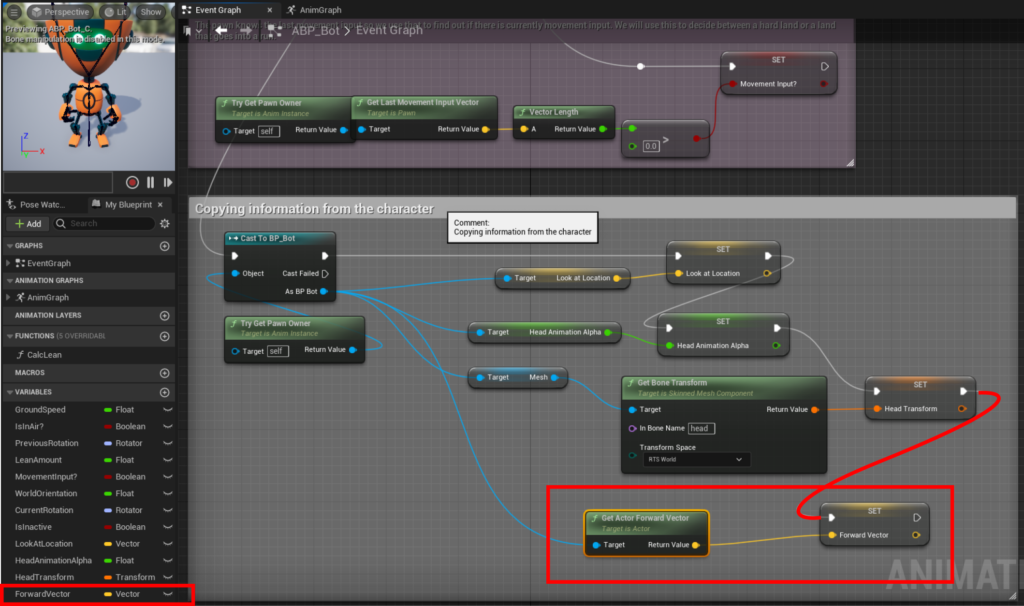
To get started, we need to add three variables to our Animation Blueprint: LookAtLocation (Vector), HeadAnimationAlpha (float), and HeadTransform (Transform). For the animation to work, we also need to copy the values from the BP_Bot to the ABP_Bot Animation Blueprint as follows (make sure that you connect those nodes to the 4th pin from the already existing Sequence node):

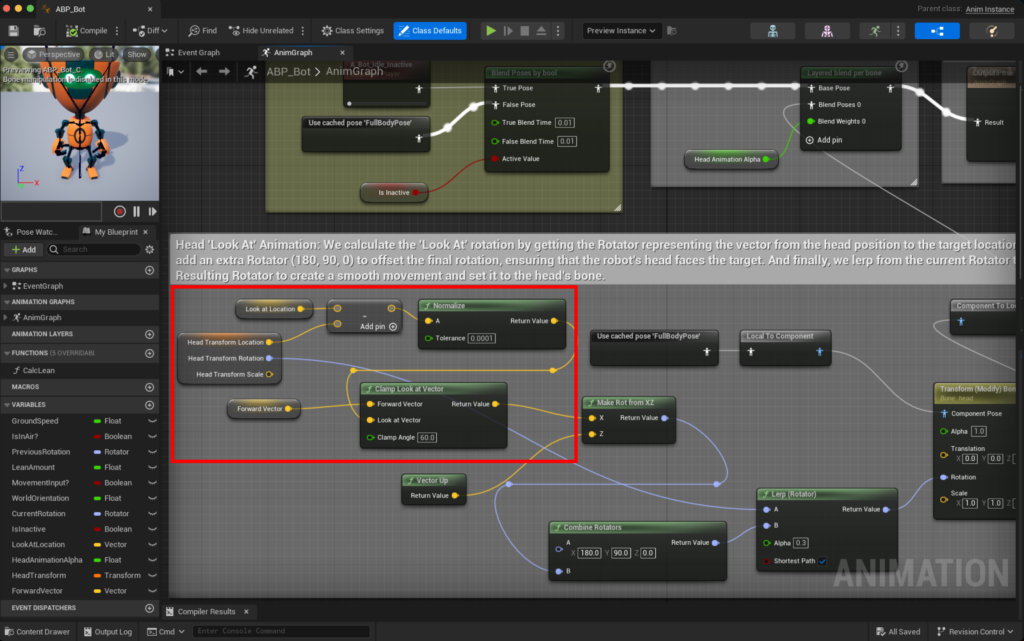
Next, open the Animation Graph. We need to add our head animation on top of the already existing animation in an easy way. To do this, we can add a Layered Blend per Bone Node right before the Output Pose. After adding the node, make sure to connect the variable HeadAnimationAlpha to the Alpha pin and add the “head” bone to the Layer Setup section from the node as follows:
Now, we need to create the head animation. We need to calculate the ‘Look At‘ rotation by getting the Rotator representing the vector from the head location to the target location. Then, we add an extra Rotator to offset the final rotation, ensuring the robot’s head faces the target. Finally, lerp from the current Rotator (from the HeadTransform) to the resulting Rotator to create a smooth movement and set it to the head’s bone transform.
Also, make sure to setup the Transform (Modify) Bone Node properly by choosing the head bone in Bone to Modify, setting the Rotation Mode to Replace Existing and Rotation Space to World Space.
To be able to see the animation, we also need to connect the final pose to the Layered Blend per Bone Node created in the previous step. You can check the final graph here:
Now, if you compile and play the game, you should be able to see the character looking towards the POI Items close by as follows:
That’s awesome! Isn’t it??
However, we still have one issue: when you move away from a POI Item, the head keeps looking at it, twisting the neck! To fix this, we need to clamp the look at rotation so that the head doesn’t rotate more than 60 degrees in relation to the body.
Fixing Head Twist
For this fix (and learning purposes), I’m going to show how to create a BlueprintFunctionLibrary in C++ where we can create handy utility functions (for example, our clamp function) that can be used by our ABP_Bot Animation Blueprint.
Unreal does have a LookAt node, which can make a bone look at a specific location automatically. However, it’s not very flexible, and we don’t have much control over lerping it. So, that’s why we are going to create a utility function to help with that.
In the Editor, go to the “Tools” menu and select “New C++ Class“. Switch to the All Classes Tab, and choose BlueprintFunctionLibrary. Give the name “VPOISystemFunctionLibrary“, choose the class type as “Public“, and click “Create Class“.

Declare a static function called ClampLookAtVector() in the header file, which will have as parameters a ForwardVector (from the character), LookAtVector (vector from the head to the target), and ClampAngle. It will clamp the LookAtVector at the specified ClampAngle and return it:
#pragma once

#include "CoreMinimal.h"
#include "Kismet/BlueprintFunctionLibrary.h"
#include "VPOISystemFunctionLibrary.generated.h"

UCLASS()
class POINTSOFINTEREST_API UVPOISystemFunctionLibrary : public UBlueprintFunctionLibrary
{
	GENERATED_BODY()

	UFUNCTION(BlueprintPure, meta = (BlueprintThreadSafe))
	static FVector ClampLookAtVector(FVector ForwardVector, FVector LookAtVector, float ClampAngle);
};
Also, observe that we’ve added the BlueprintPure and BlueprintThreadSafe specifiers to the UFUNCTION macro. We have to do this to be able to call this function from an Animation Graph. Otherwise, we could only access it from the Event Graph. You can find more details about it here.
Here is the implementation:
#include "VPOISystemFunctionLibrary.h"
FVector UVPOISystemFunctionLibrary::ClampLookAtVector(FVector ForwardVector, FVector LookAtVector, float ClampAngle)
{
FVector ClampedLookAt = LookAtVector;
float RadAngle = FMath::Acos(FVector::DotProduct(ForwardVector, LookAtVector));
float Angle = FMath::RadiansToDegrees(RadAngle);
if (Angle > ClampAngle)
{
FVector DiffVector = LookAtVector - ForwardVector;
DiffVector *= ClampAngle/Angle;
ClampedLookAt = ForwardVector + DiffVector;
}
return ClampedLookAt;
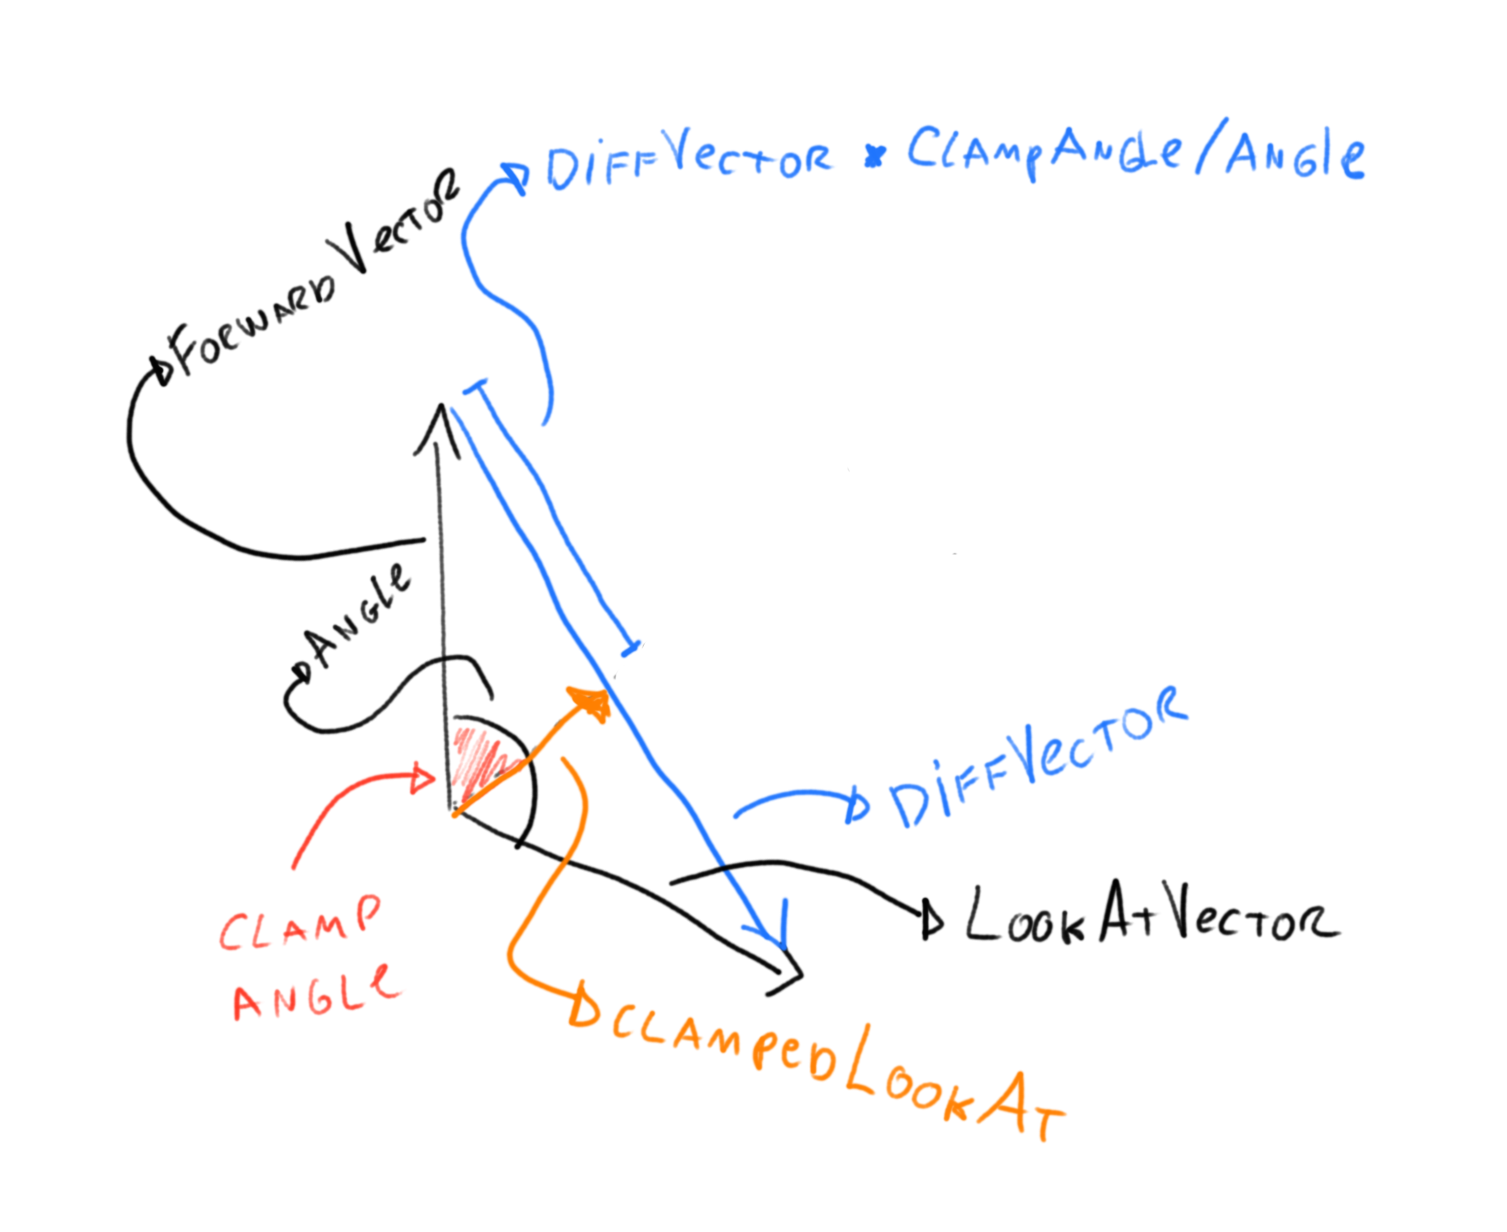
}Here is a drawing I did that might help you understand what the ClampLookAtVector function is doing:
Compile and reopen the Editor.
Now, we need to modify our blueprint logic a bit. Let’s create a new property called ForwardVector (Vector), and in the Event Graph, let’s update it with the character forward vector:
Next, go to the Anim Graph and add our newly created function to clamp the resulting Look At Vector (normalized) right before converting it to a Rotator:
Now we should be done with it! Compile and run the game to check the results!! If everything goes well, you should have something like this:
Also, remember to remove all the debugging info that we kept in the code, for example, the DrawLine; recheck the POI Tracker Component to be hidden in-game, and you can also reduce the Timer frequency to something like 0.1 or 0.2 seconds:
Wow! The tutorial ended up being longer than I expected. However, I enjoyed the end result 🙂
Once again, thank you for reading, and I hope to have you back in the next tutorial!
Be First to Comment