Last updated on October 18, 2023
Reading Time: 7 minutesIntroduction
In video games, one persistent challenge is ensuring that players can always see and interact with their in-game characters, even when positioned behind obstacles such as walls or structures. This issue, known as character occlusion, can lead to frustrating and immersion-breaking experiences for players as their characters become hidden from view.
One common approach to address this problem is adjusting the camera position to reduce occlusion by moving the camera closer to the character (right after the blocking object). This way, it’s possible to maintain the visibility of the characters when they are behind objects. However, it might lead to weird camera positions, breaking the gameplay experience.
Another solution is to make the occluding objects, such as walls, partially transparent. Adjusting the transparency or opacity of these objects provides a visual aid of what’s happening behind them, ensuring that characters remain visible.
Highlighting the character’s silhouette is yet another effective method for addressing occlusion. By outlining the character with a contrasting color or glow, players can easily locate their character even when obstructed by walls or objects. This technique ensures that players always have a clear sense of where their character is within the game.
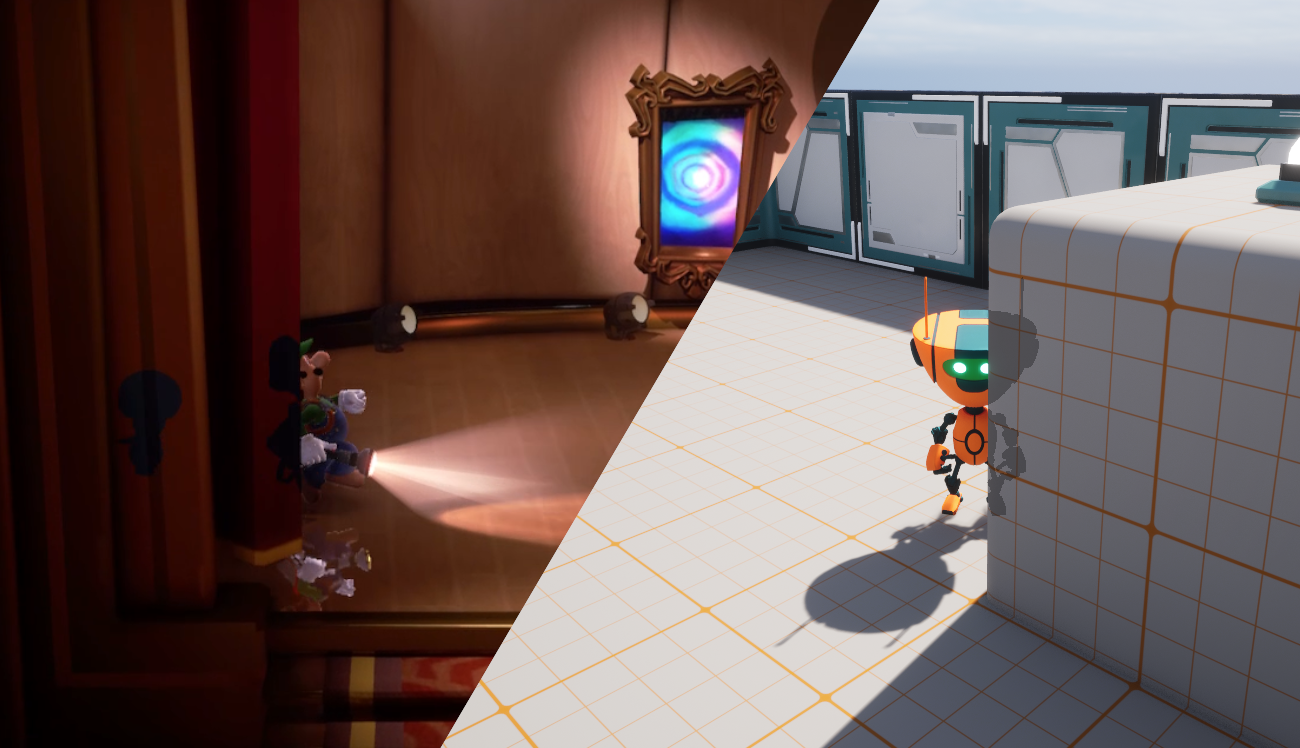
If we check a few Nintendo games, like Luigi’s Mansion 3 and Super Mario 3D World, they address occlusion using the last technique:
So, in this tutorial, we’ll create a similar effect in Unreal by using a custom stencil buffer together with a custom post-processing effect.
I highly recommend this talk by John Nesky (from Journey) if you want to learn more about handling cameras in games.
Before You Start
I will use Unreal’s Online Learning Kit Template as a starting point for this tutorial. You can download it from the Marketplace: https://www.unrealengine.com/marketplace/en-US/product/online-learning-kit.
The full source code for this tutorial can be downloaded from https://github.com/valentegamedev/ue5-see-through-walls.
What is a Custom Stencil Buffer?
Before moving to Unreal, I think that it is important to mention what a custom stencil buffer is. A custom stencil buffer is an extra render target available to us in Unreal, often used to mask pixels in an image to produce special effects (portals, outlining, see-through, etc). For example, the generated mask can control what color to render in that specific pixel and/or apply a specific effect depending on its value.
Back in the old days, for example, a stencil buffer was often used to create planar reflections in a two-pass technique. The process consisted of using the stencil buffer as a mask that separates the reflective surface from the surrounding scene by rendering only the reflected objects within this mask, achieving the illusion of reflections on a flat surface.
Here is an illustration of the technique:
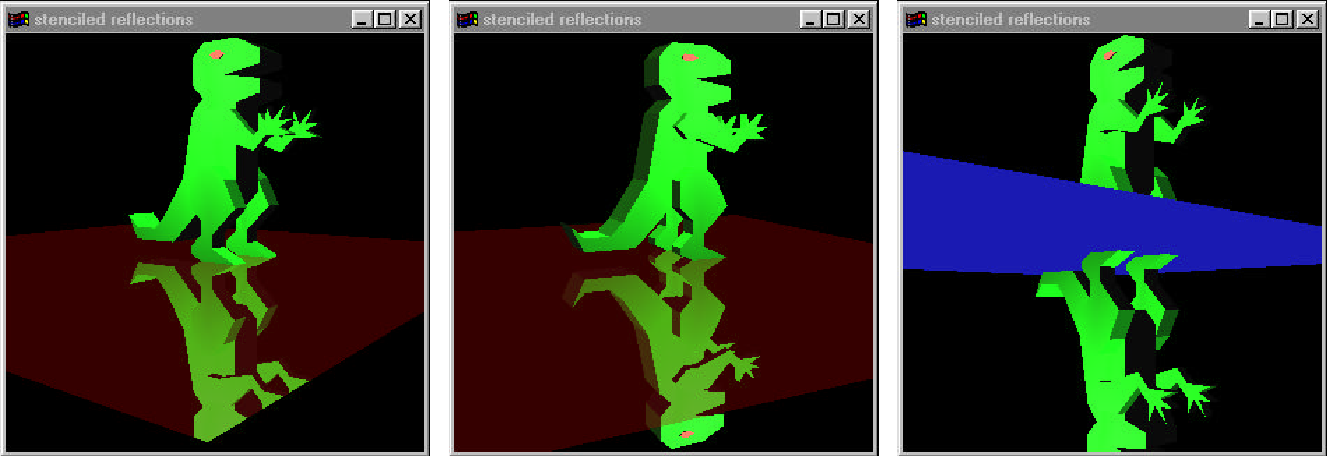
The left image shows the proper use of stenciling to limit the reflection to the reflective surface. The middle and right images do not perform any stenciling. Notice how in the middle image the head peeks beyond the surface. The right image demonstrates that the reflection really is just the object flipped through the mirror plane.
There is a great video by Epic Games explaining the basics of Custom Stencil Buffer and how to use it in a post-processing material in Unreal here.
Enabling Stencil Buffer
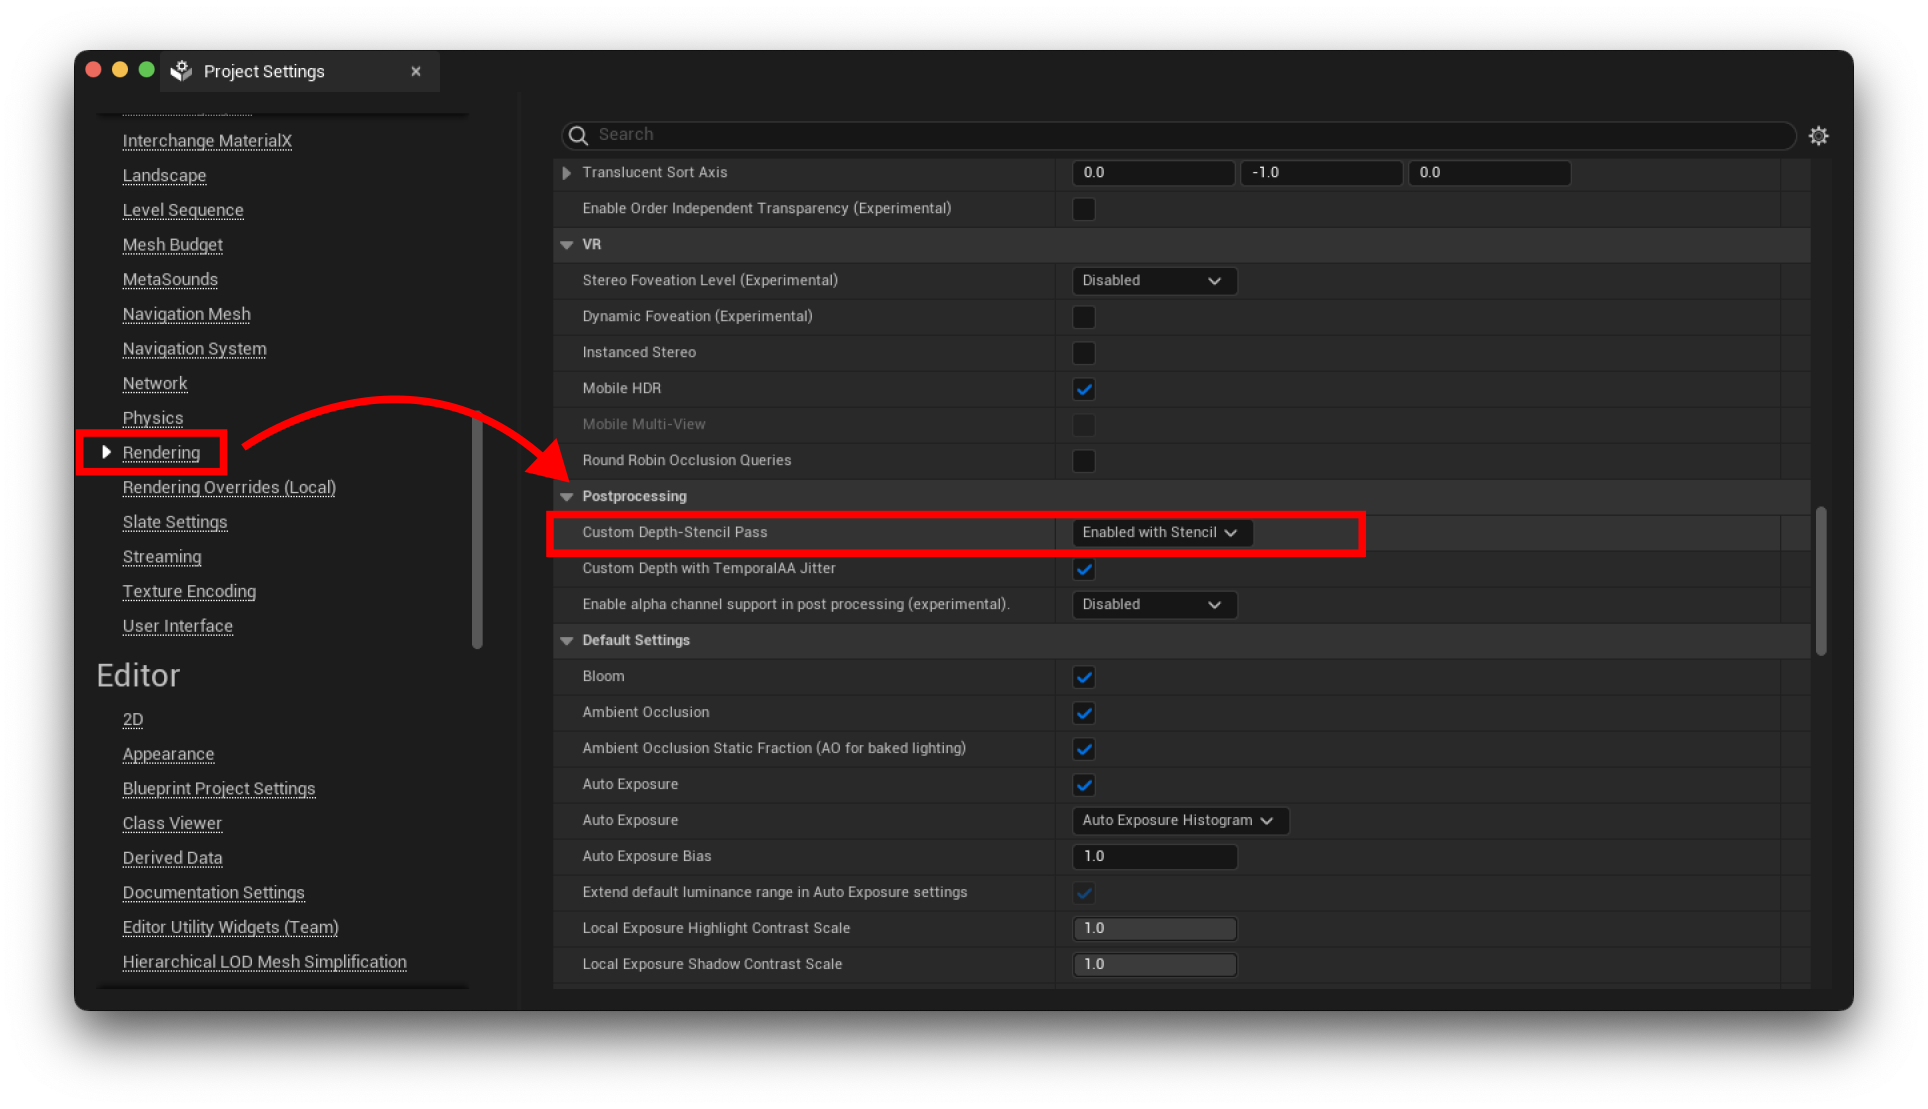
To be able to write to Unreal’s stencil buffer, we need to enable it first. In Editor, go to the “Edit” menu and select “Project Settings…“. Under the “Engine” section, select “Rendering” and look for the “Custom Depth-Stencil Pass” option under the “Postprocessing” groups and make sure you have “Enable with Stencil” checked:
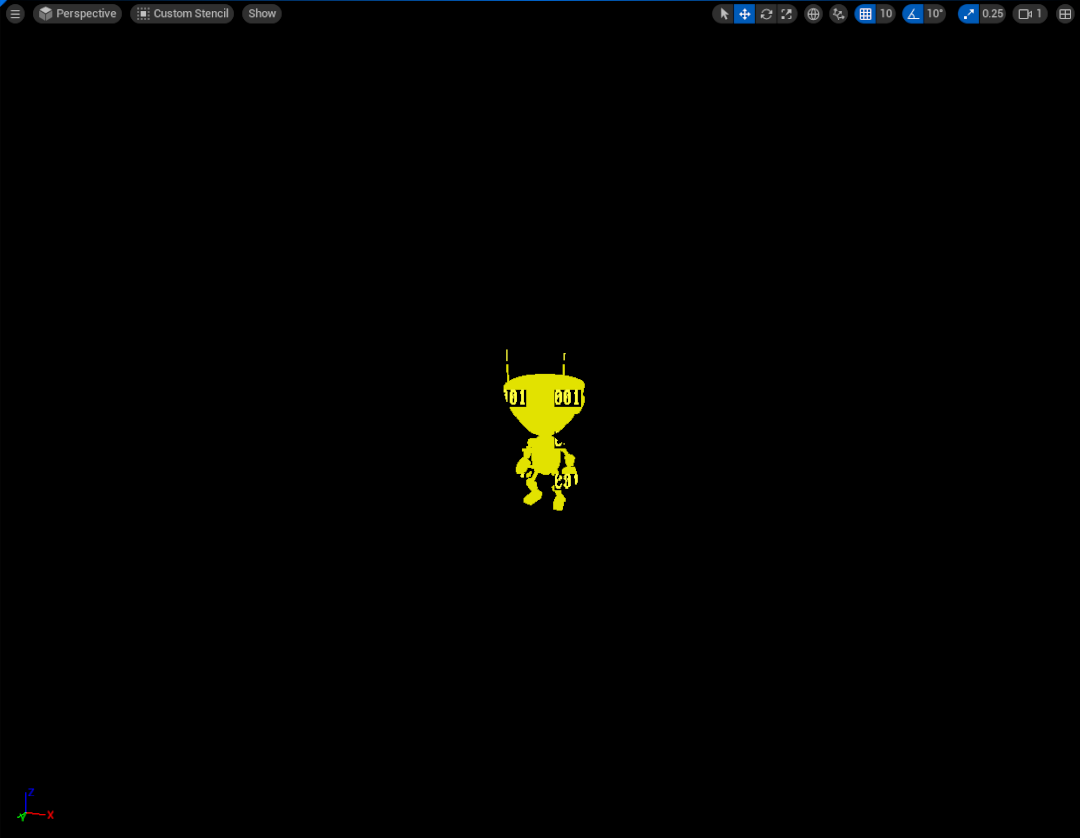
Now, to make sure that everything is set up correctly, let’s write something to the stencil buffer. Open the BP_Bot blueprint located at Content/EOL_Content/Characters/Bot/BP_Bot, select the skeletal Mesh, and under Rendering > Advanced, make sure to enable the option called Render CustomDepth Pass and set the CustomDepth Stencil Value to “1”. By doing this, we are asking Unreal to render the value 1 to the stencil buffer for every pixel that is is part of this mesh during the rendering process:
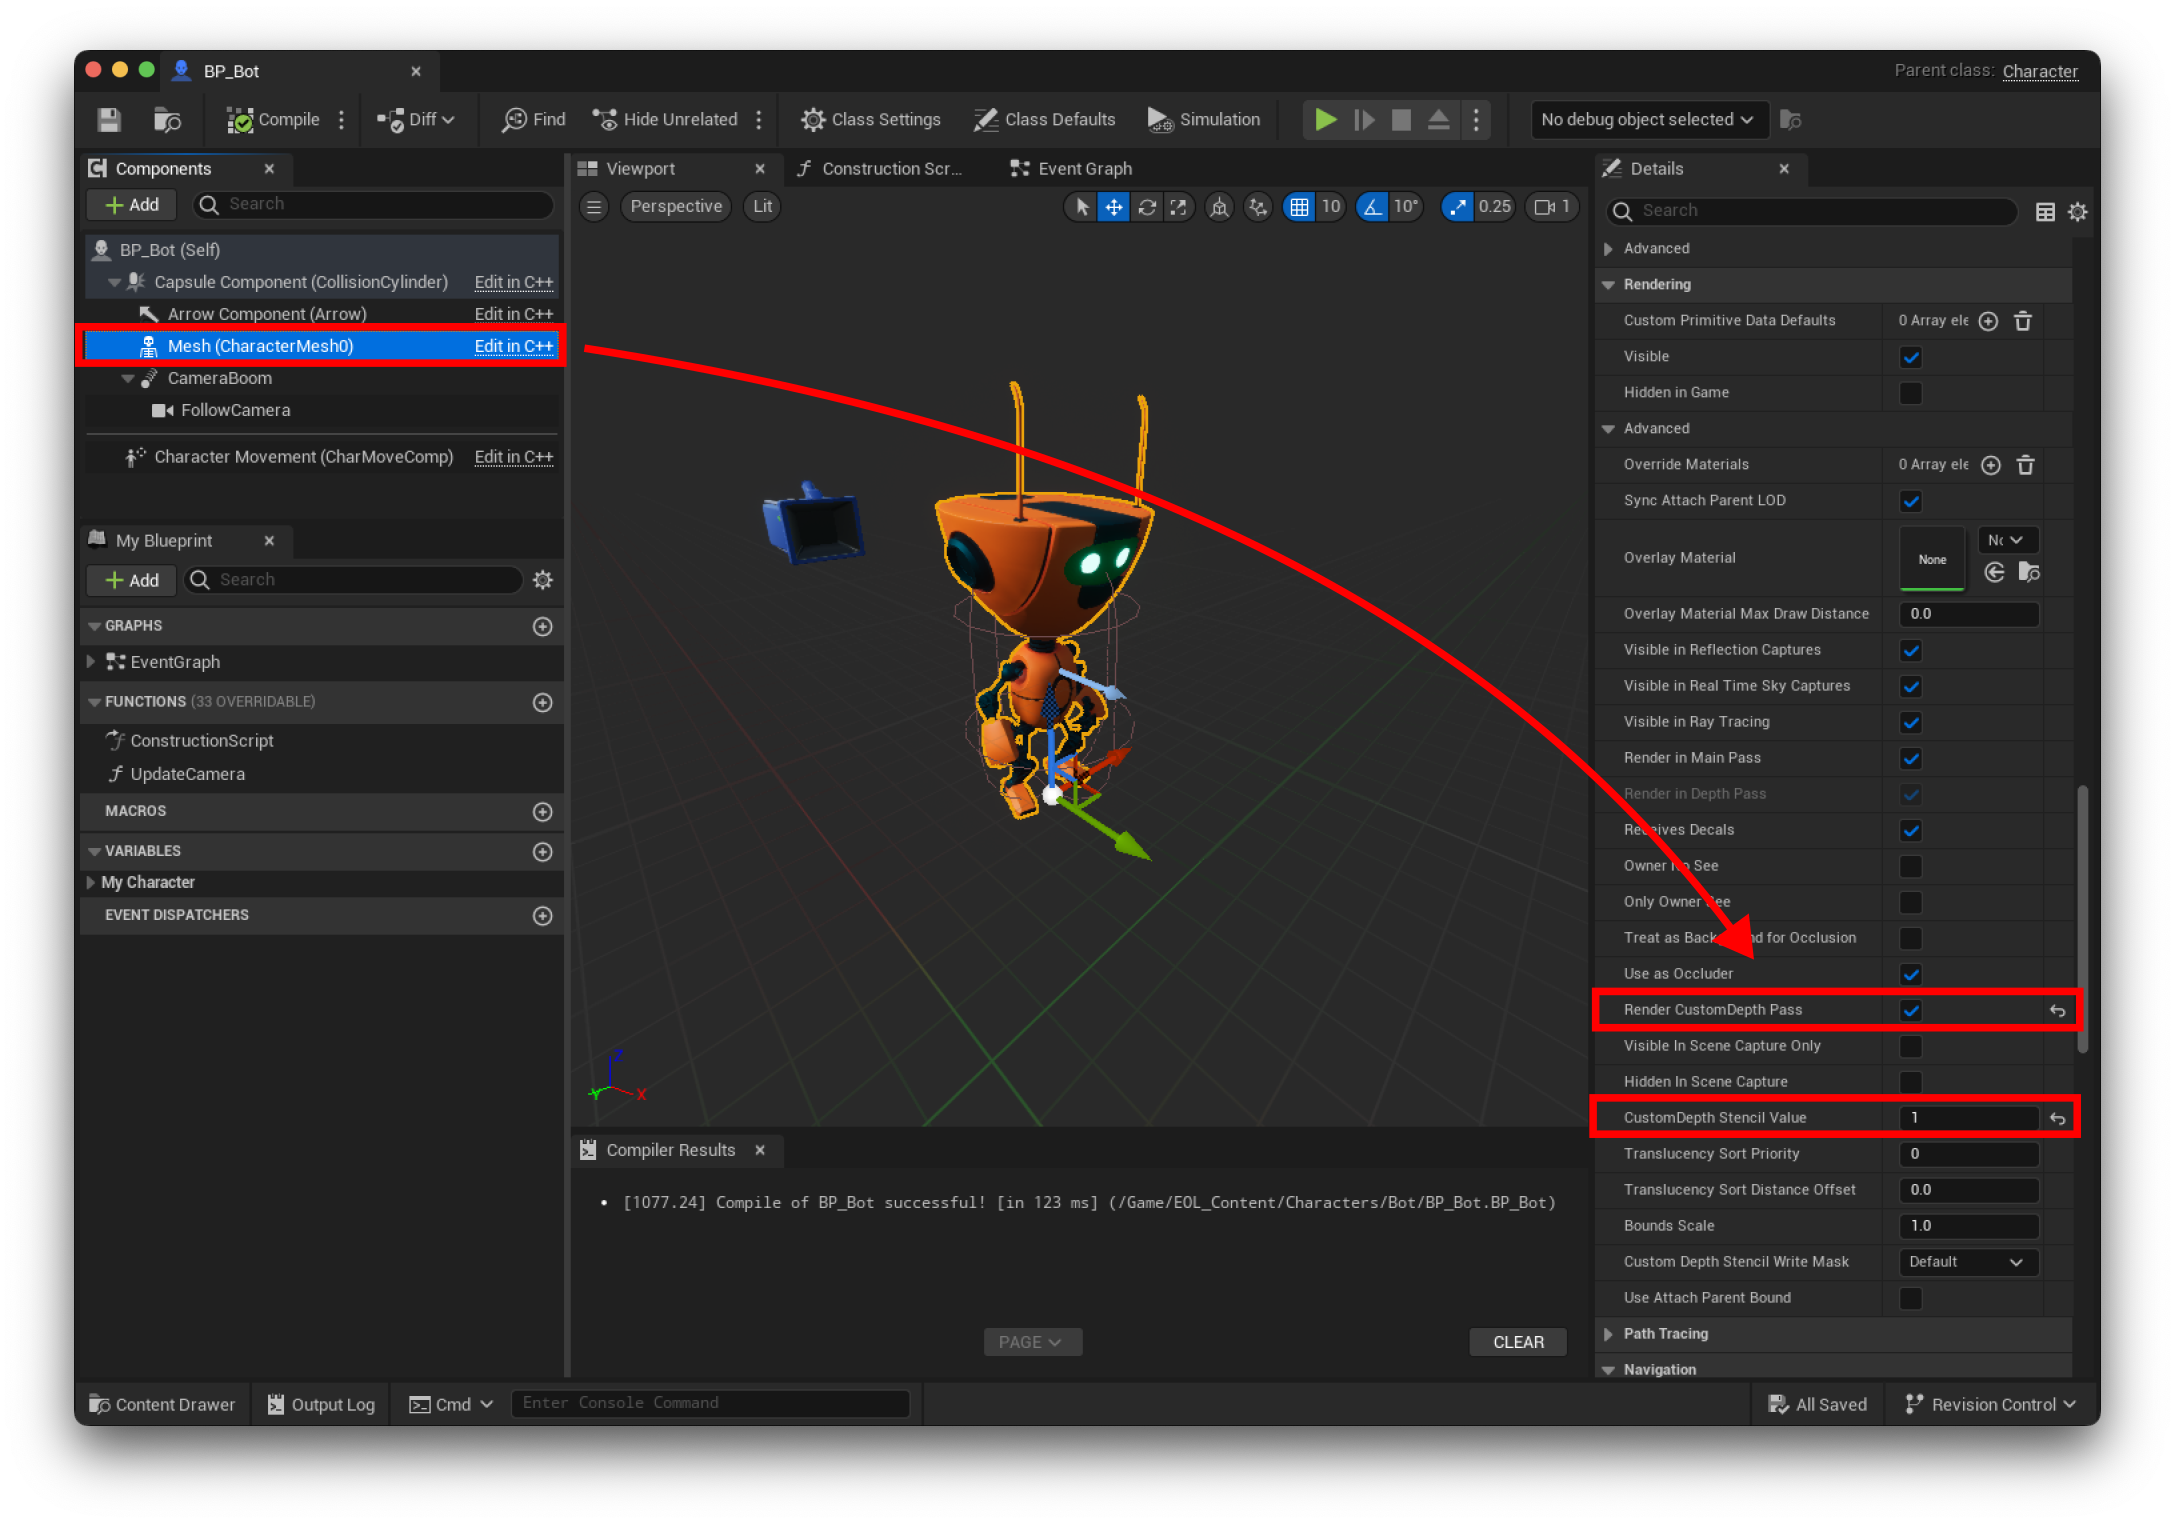
By checking Render CustomDepth Pass, we also enable Unreal to render the depth information about this specific mesh in an extra buffer called custom depth. We are going to use this information to verify if there is something in front of the robot and decide what to do. The CustomDepth Stencil value is going to be used to easily mask which pixels we should verify.
To see this in action, you can play the game, eject (Shift+F1), and switch the View Mode to Buffer Visualization > Custom Stencil:


You can choose any number from 0 to 255 for the CustomDepth Stencil value. This way, you can mask pixels differently and apply different effects by choosing different numbers for different meshes.
For now, we are done setting up the project and ready to create the post-processing material.
Creating the See-Through Material
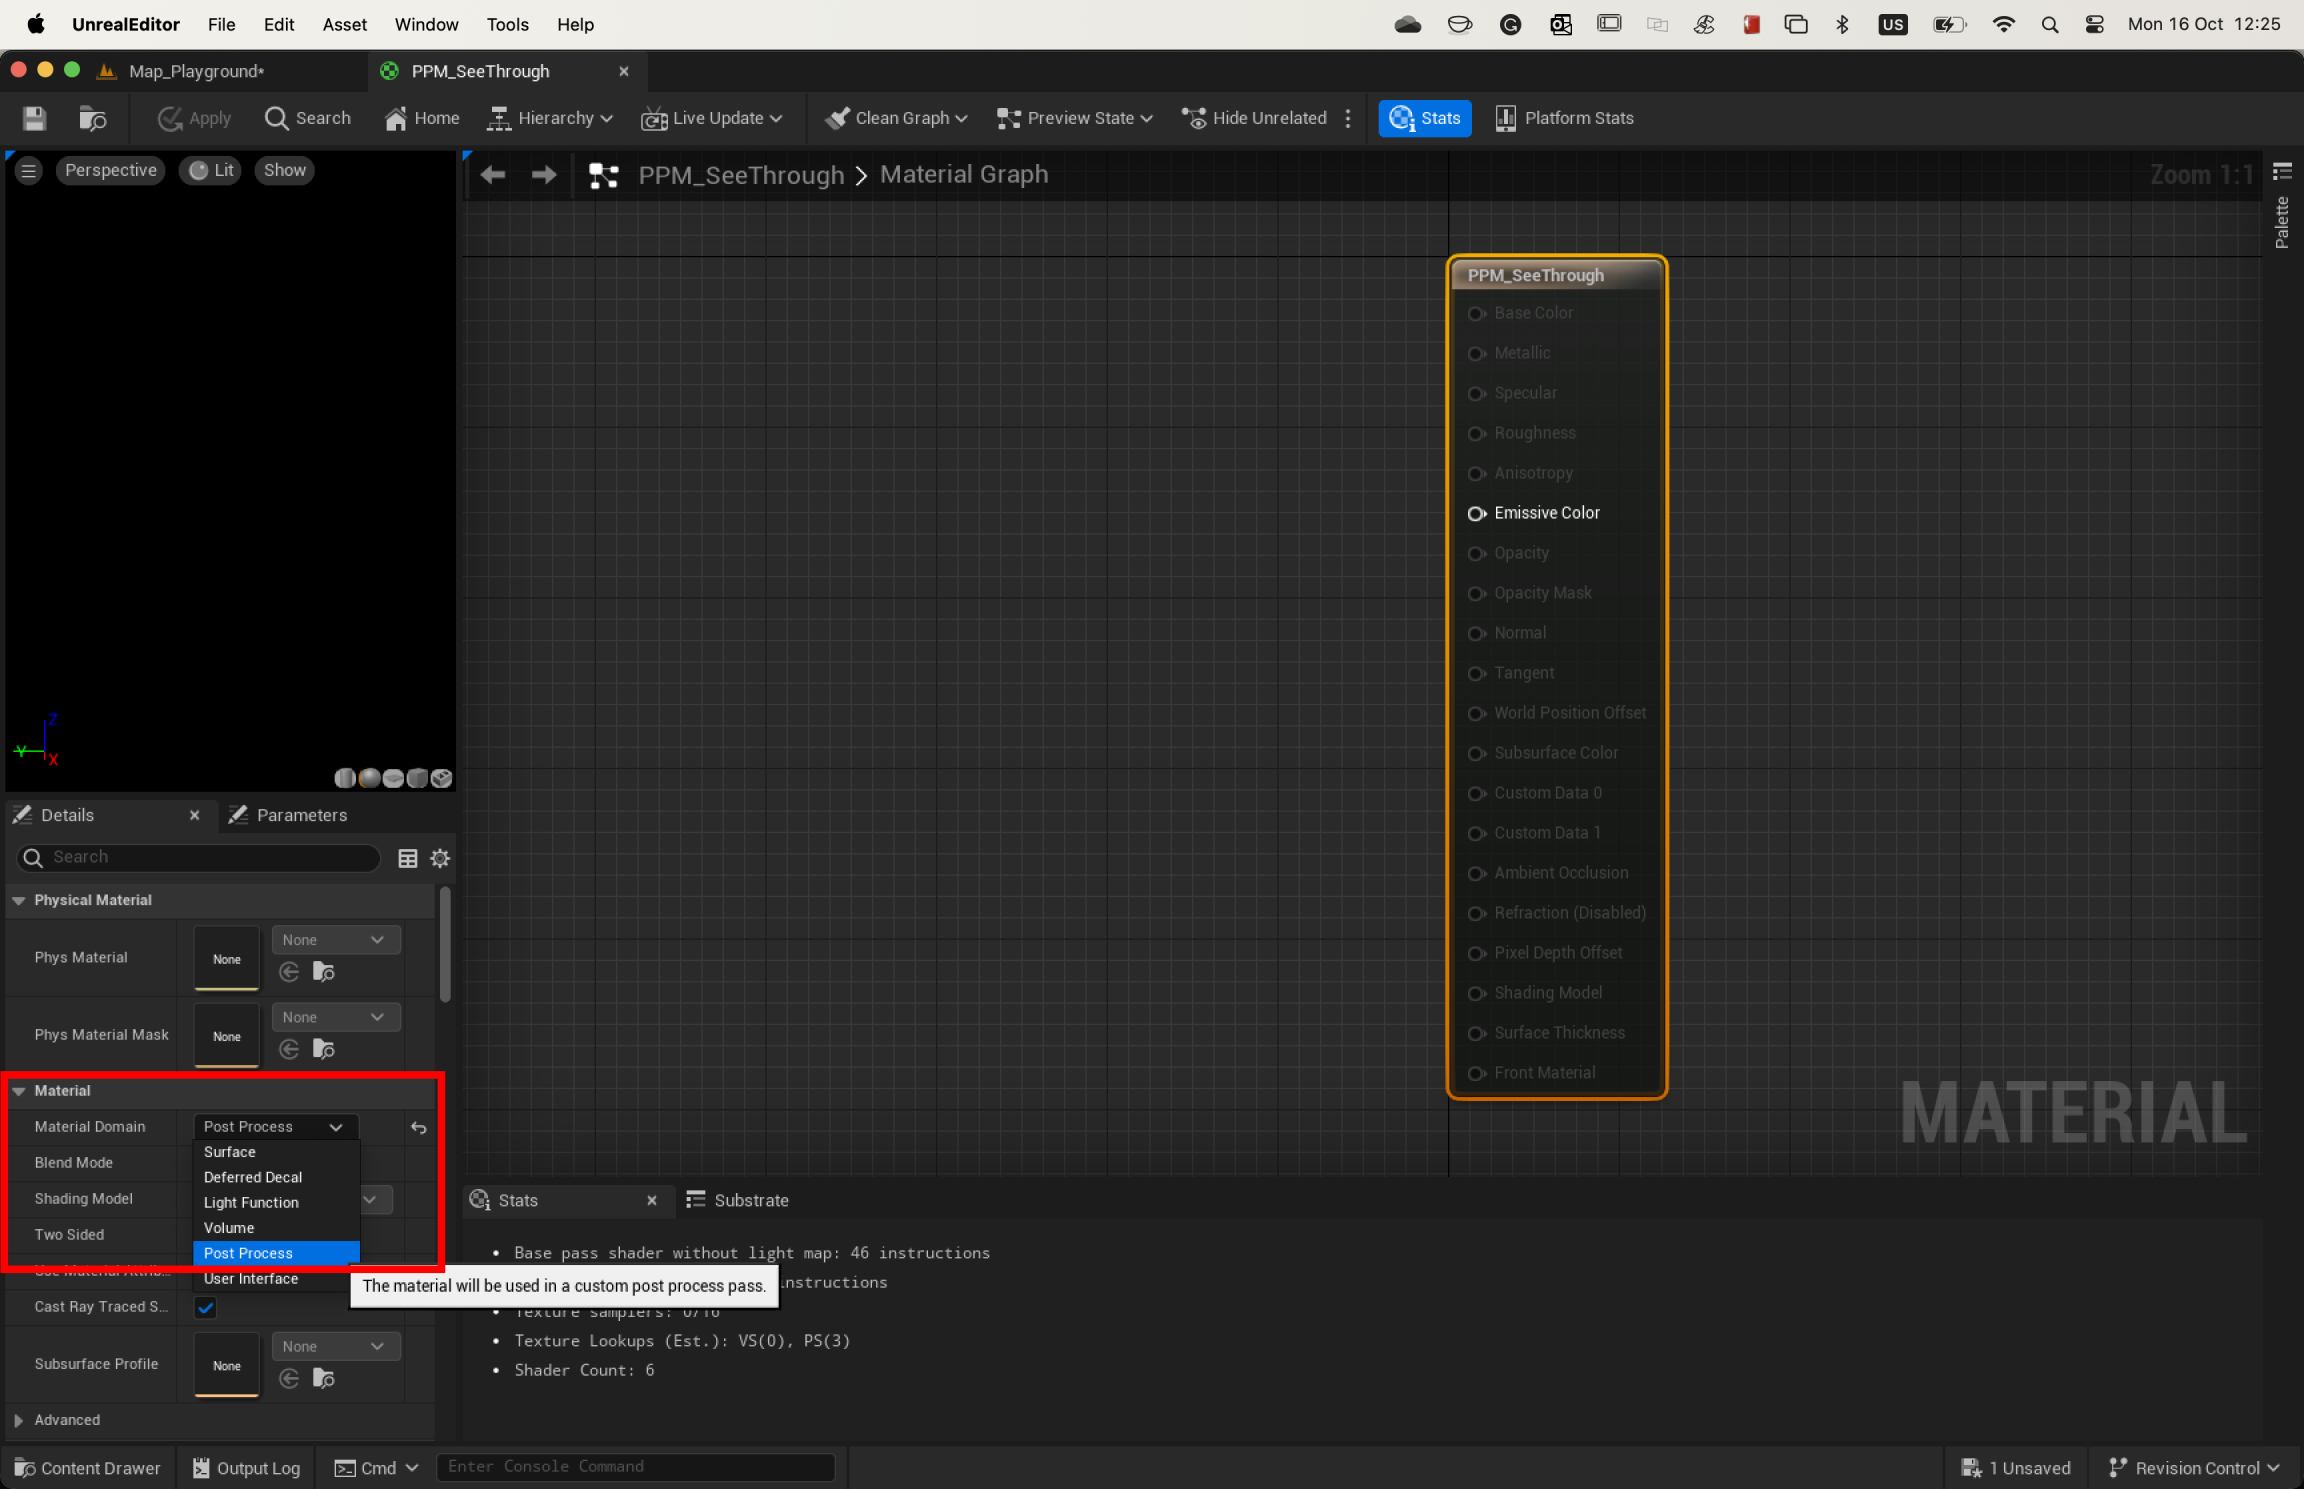
To create the material, go to the Materials folder located at Content/EOL_Content/Materials, right-click, choose Material, and name it “PPM_SeeThrough“.
With the Material Editor open, select the main material node and change its Material Domain property to Post Processing:
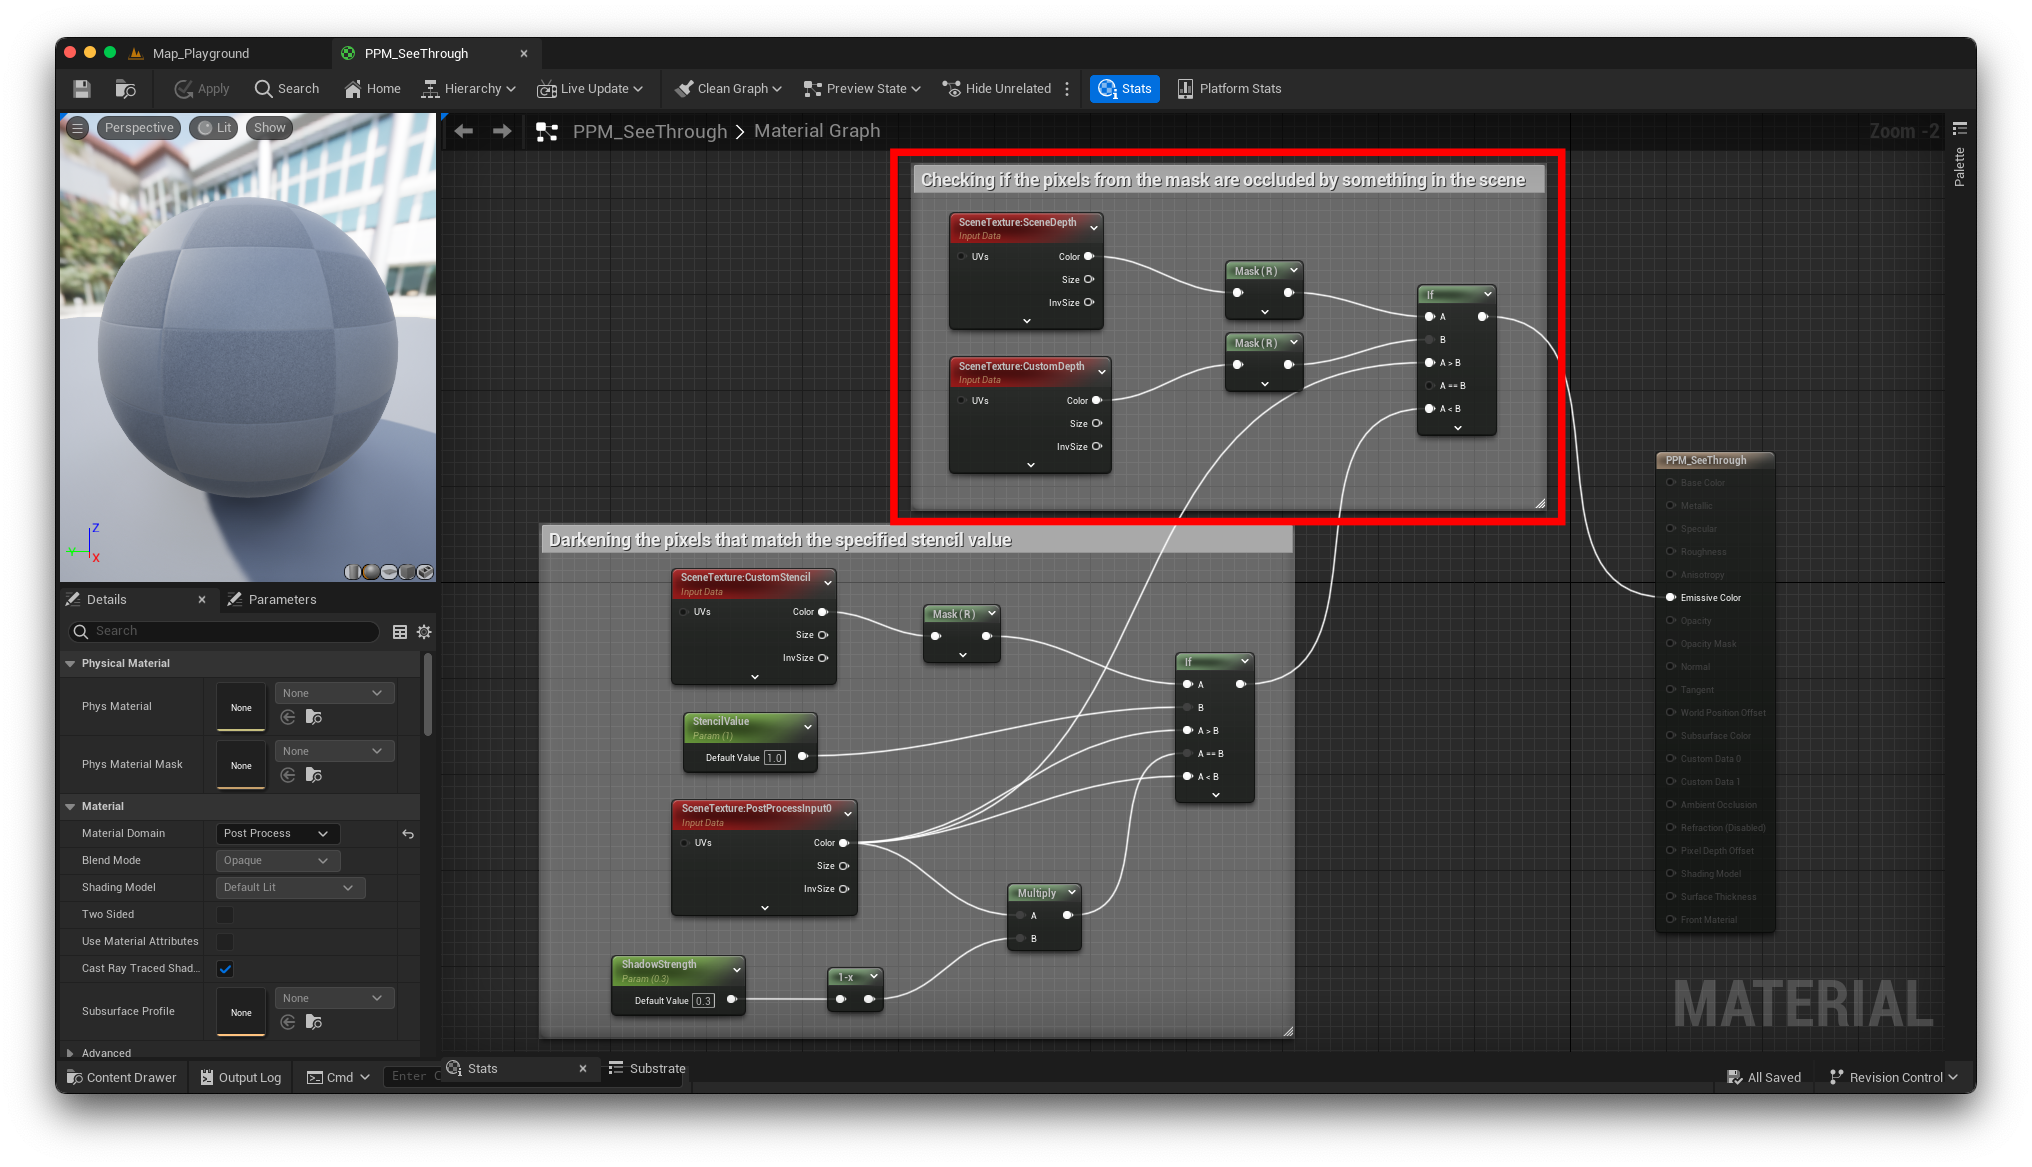
The first step is to darken the pixels within the custom stencil buffer mask (which contains the value of 1). To do that, we are going to need two SceneTexture Nodes. One will be used to access the custom stencil buffer (by setting the Scene Texture ID to Custom Stencil), and the other will be used to access the rendered image (by setting the Scene Texture ID to PostProcessInput0) for that frame.
The main logic for this step is to read the value from the stencil buffer and check if it is equal to the one we used as a mask (set to the StencilValue scalar, which I converted to a parameter). If yes, we darken the color by multiplying the pixel color by a scalar (set to the ShadowStrength scalar, which I also converted to a parameter); otherwise, ignore and keep the original color. The material should look like this:

Notice that we need to mask the output color from the stencil buffer to only use the R (Red) channel (because it has only one channel).
To be able to see this in action, we still need a post-processing volume.
Setting up the See-Through Post-processing Material
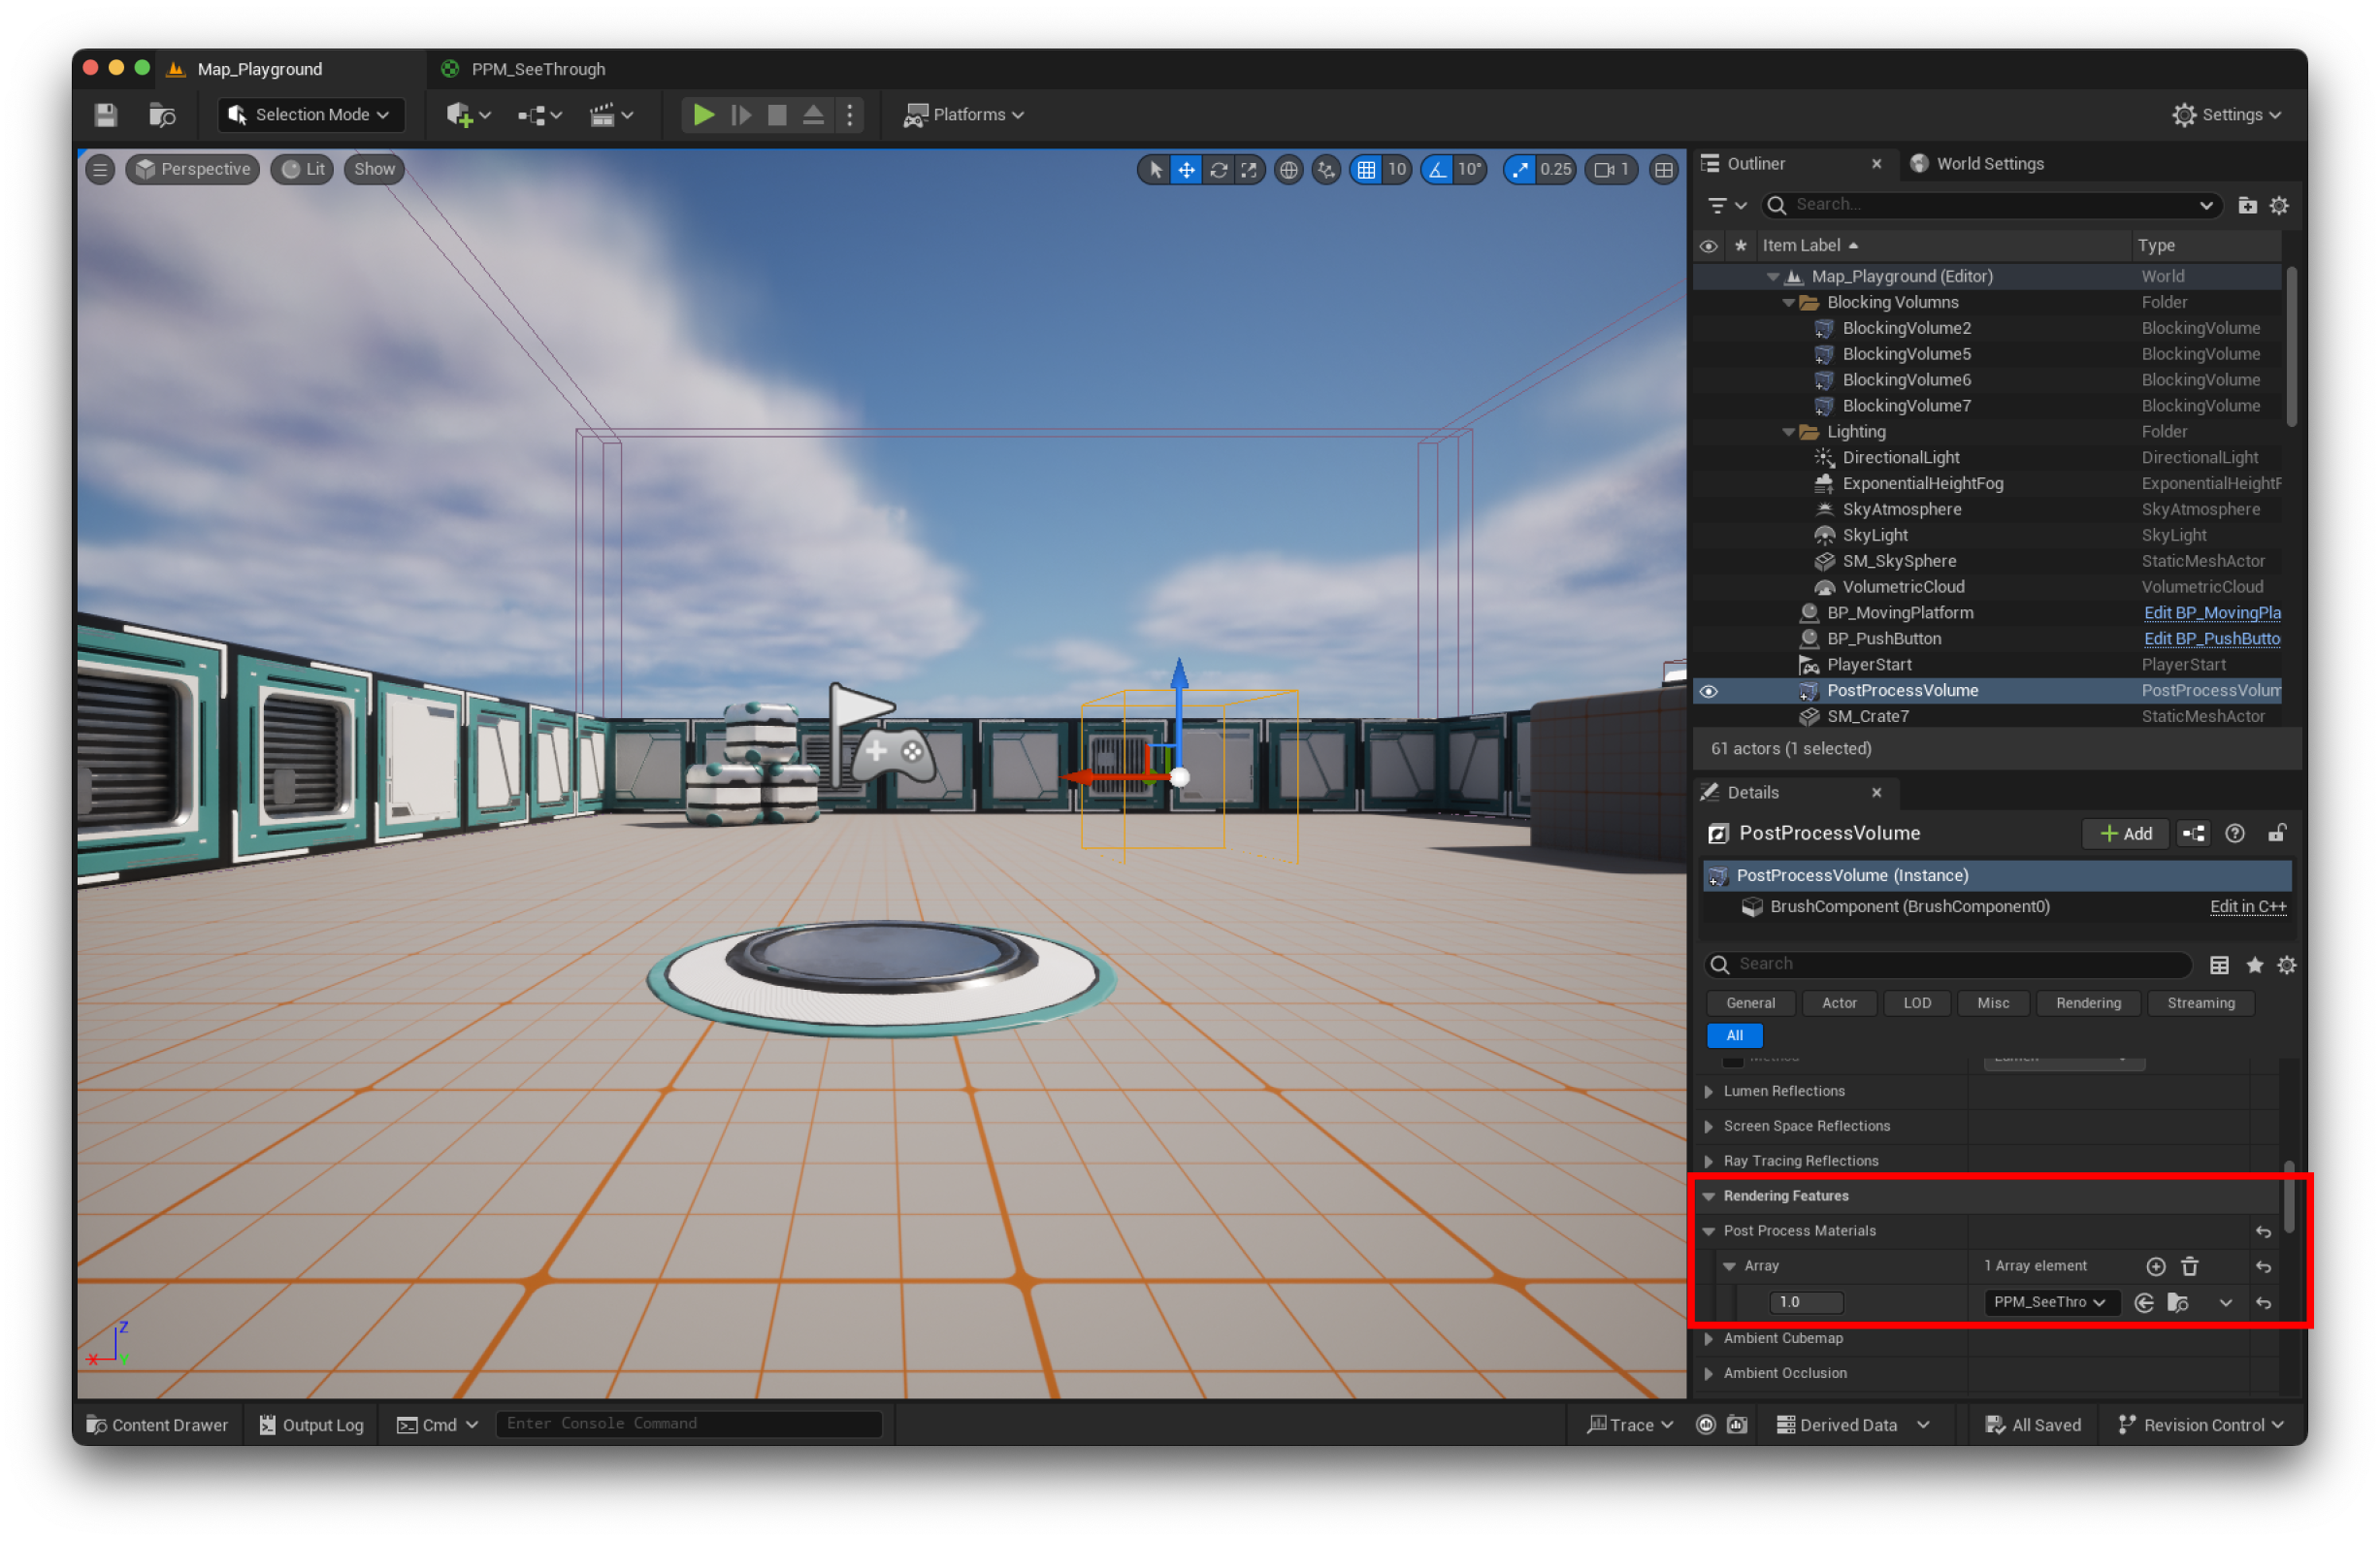
We need to add a post-processing volume to our scene when we want to work with post-processing effects. You can find it in the Place Actor menu:

After adding it, with the volume selected, go to Rendering Features > Post Process Materials, add a new item to the array, choose Asset Reference, and select the newly created PPM_SeeThrough material:
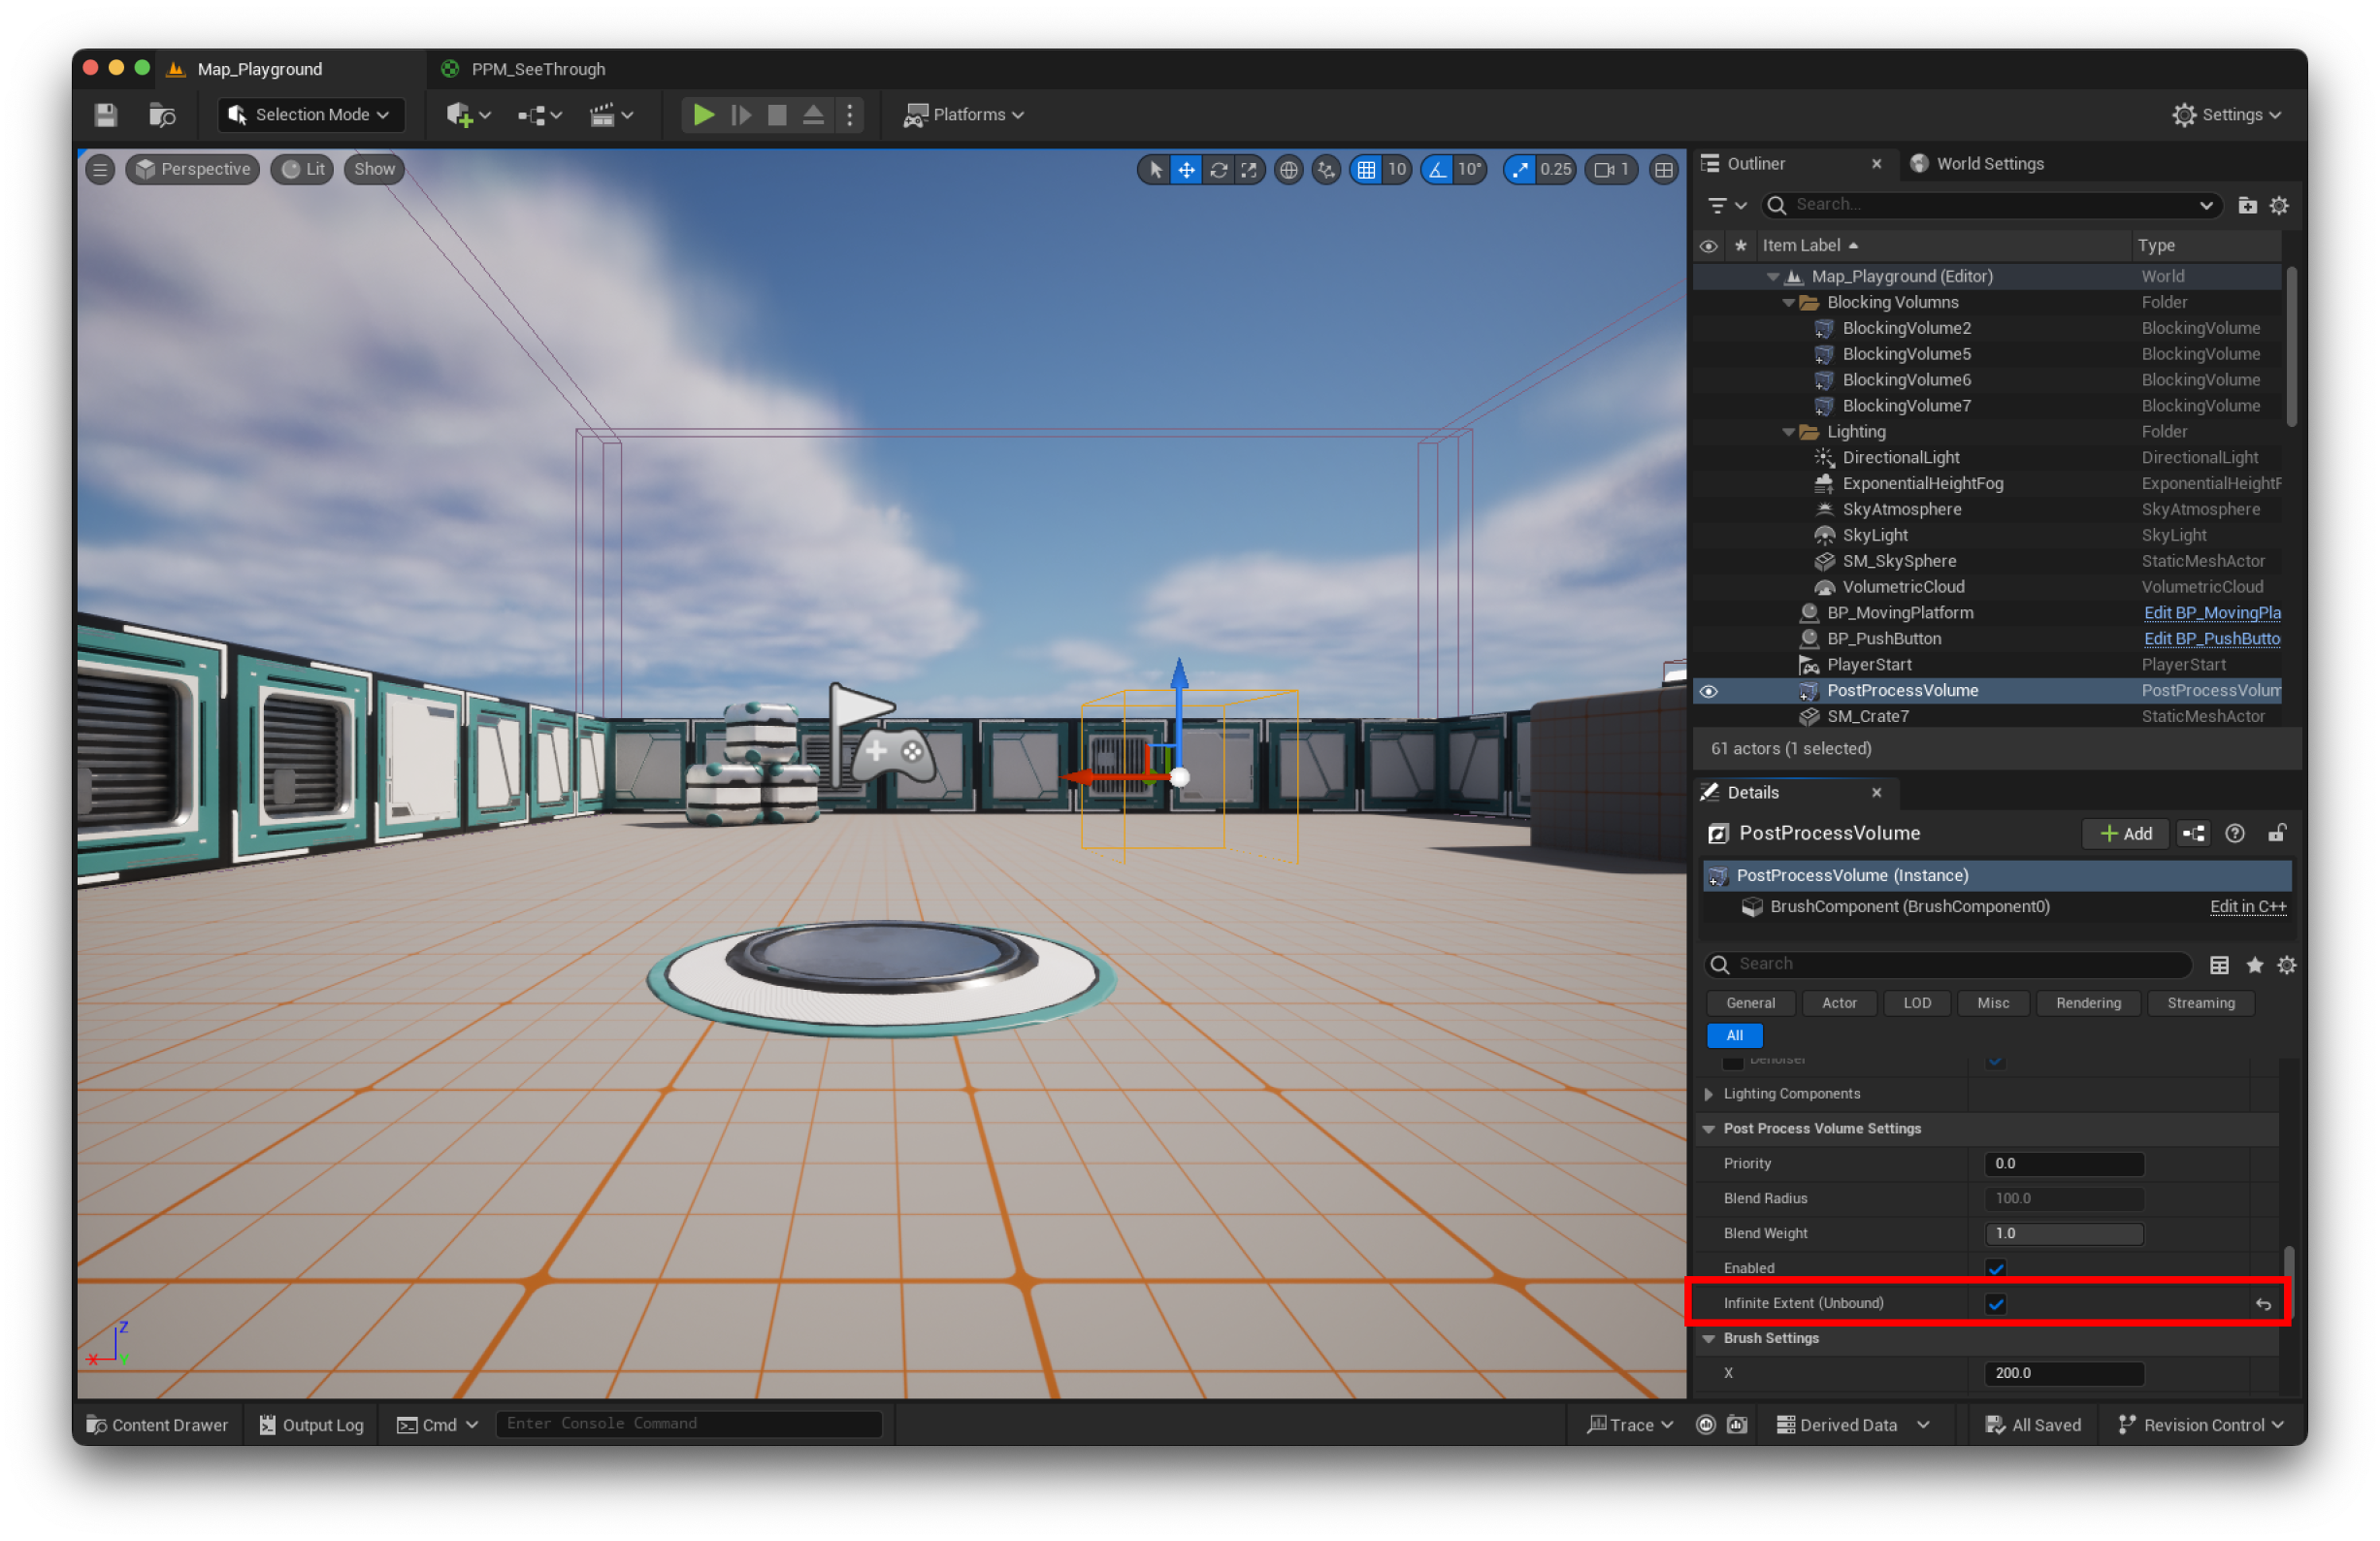
Also, make sure to enable the Infinity Extend (Unbound) option under Post Processing Volume (This will make sure that the effect is enabled as soon as we run the game):
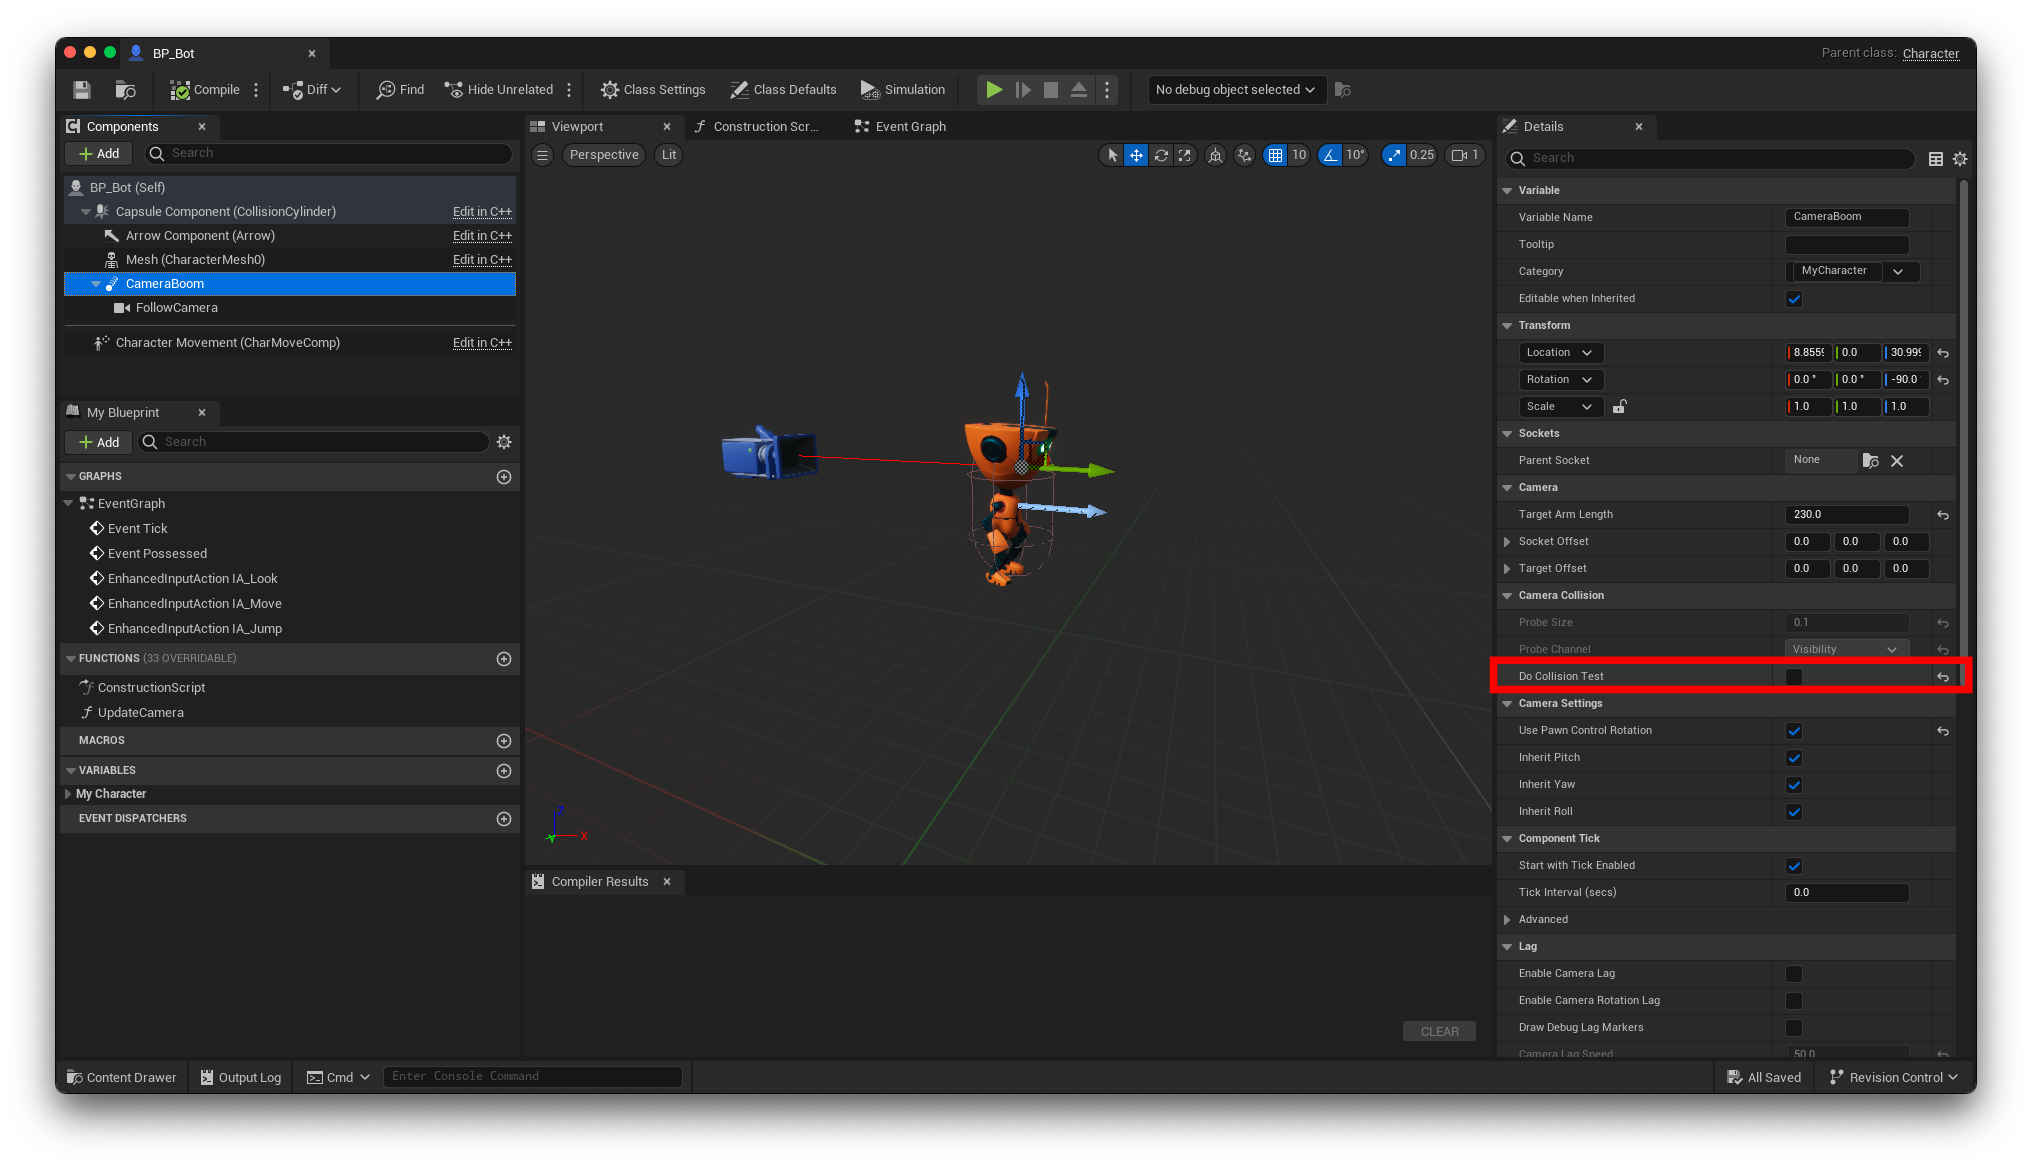
And one last thing: before we can test it, we need to disable the collision test from the spring arm within the robot blueprint. So, open the BP_Bot blueprint, select the CameraBoom (Spring Arm Component), and under Camera Collison, uncheck Do Collision Test:
Now, if you play the game, you should have a partially working solution where the pixels from the robot are a bit darker, and if you go behind an object, you are able to visualize the see-through effect:
However, for now, it is considering all the pixels from the robot’s mesh. In the next section, we are going to fix it.
Fixing the See-Through Material
Now, we need to add an extra check to our material to verify if the robot’s pixel is being occluded by something or not.
To do this, we must compare the information from the scene depth buffer (a Scene Texture with its Scene Texture ID set to SceneDepth) against the custom depth buffer (a Scene Texture with its Scene Texture ID set to CustomDepth), which only contains the robot. If the scene’s depth is smaller (closer to the camera) than the one from the custom depth buffer, it means it’s occluding the robot, and we should choose the darker pixel; otherwise, keep the original.
If you don’t know what a depth buffer (also known as z-buffer) is, please read this.
The material should look like this:
Now, if you play the game, you should have an effect very similar to the one used by Nintendo:
Awesome, isn’t it? 🙂
Our setup is very simple… but I hope it helped you understand how those effects can be done!
Thank you for reading, and until the next tutorial!
Be First to Comment