Introduction
Quest locators are a popular feature in many modern video games, providing players with an easy way to track their progress and find objectives. With the rise of open-world games and large-scale RPGs, players are often faced with daunting tasks that can be difficult to navigate without guidance. Quest locators help to alleviate this issue by providing visual cues and markers that lead players to their next objective.
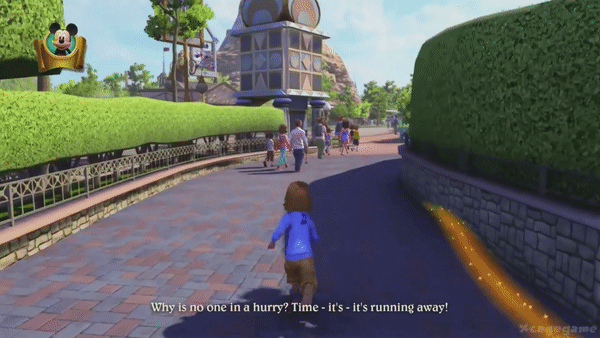
These tools not only make gameplay more user-friendly, but also help to create a more immersive experience by seamlessly integrating with the game’s world and story. For example, in the game Disneyland Adventures, they use a pixie dust effect to guide the user to the next task:
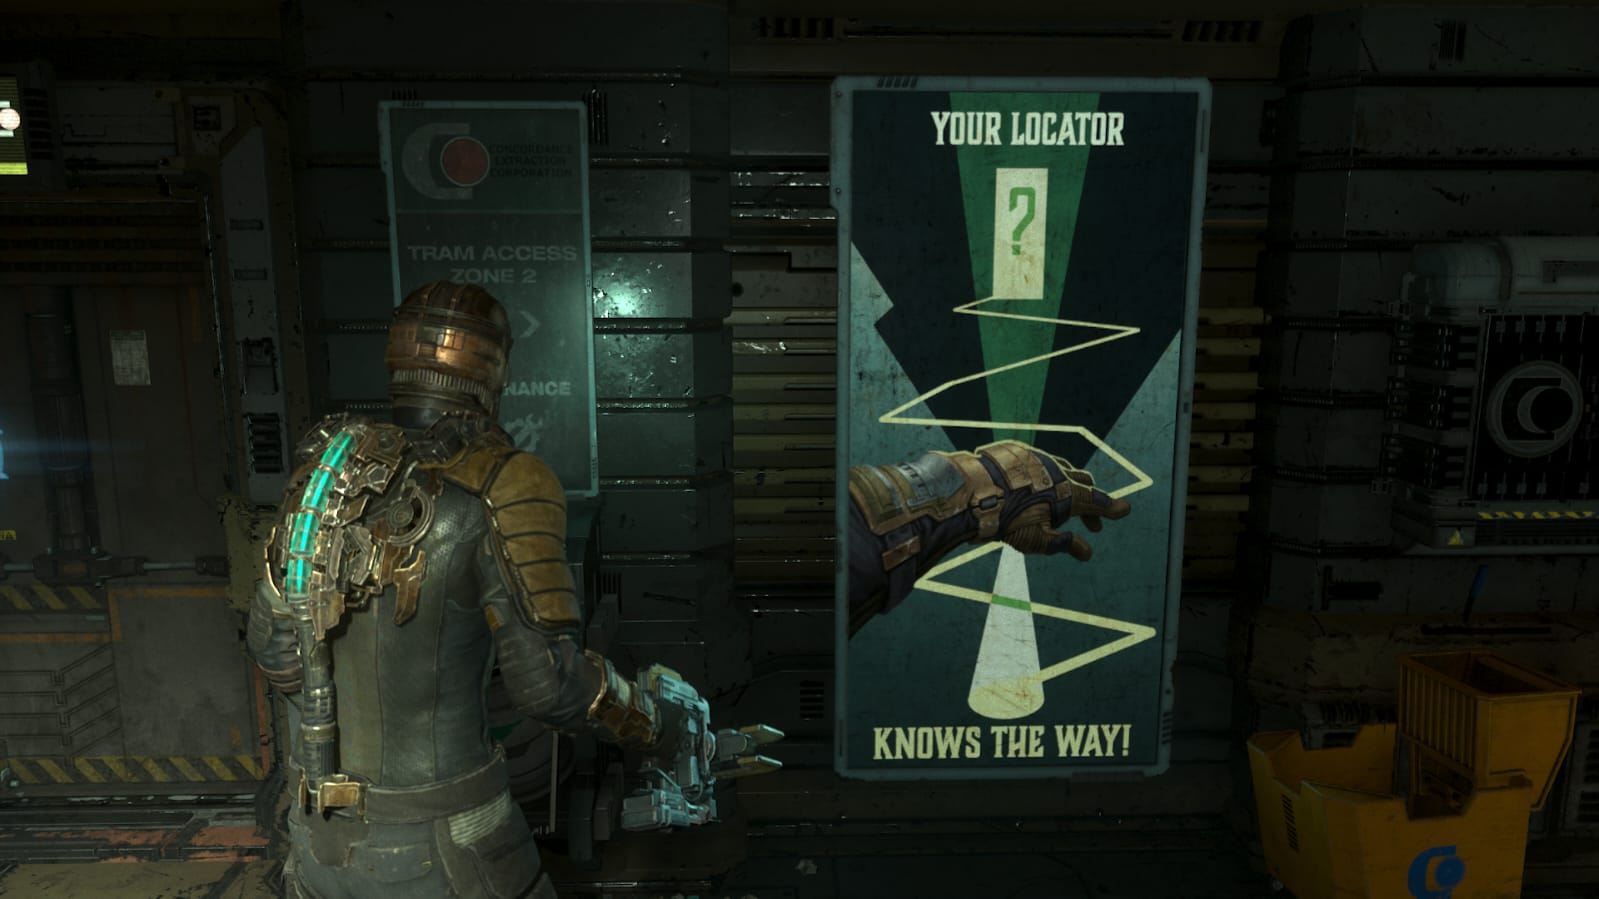
Another very good application of a quest locator can be found in Dead Space. The RIG suit has a navigation system that projects a colored floor guide on the environment that guides the user to objectives:
In this tutorial, we’ll take a closer look at how quest locators work and how they can be implemented in Unreal using C++.
Before You Start
I’m going to use Unreal’s Third-person C++ Template as a starting point for this tutorial. You can also download the full source code from: https://github.com/valentegamedev/ue5-quest-locator
We are going to start by creating a Locator Component that is going to be responsible for showing the path to target whenever requested. That component will also expose some variables to enable the user to choose which particle effect will be used and its speed along the path.
If you are new to C++ in Unreal 5, I always recommend Tom Looman’s Unreal Engine C++ Complete Guide before getting started.
Creating the Locator Component
To create our Locator Component, we need to create a new C++ class derived from ActorComponent. In Unreal Engine, go to the “Tools” menu and select “New C++ Class“. Choose ActorComponent as the base class, give your class name “VLocatorComponent“, choose the class type as “Public“, and click “Create Class“.
Before we start adding code, let’s first disable ticking for the component in the constructor:
...
UVLocatorComponent::UVLocatorComponent()
{
	PrimaryComponentTick.bCanEverTick = false;
}
...
Next, remove the TickComponent function from the header and implementation file. They should look like this after the changes:
#pragma once

#include "CoreMinimal.h"
#include "Components/ActorComponent.h"
#include "VLocatorComponent.generated.h"

UCLASS( ClassGroup=(Custom), meta=(BlueprintSpawnableComponent) )
class QUESTLOCATOR_API UVLocatorComponent : public UActorComponent
{
	GENERATED_BODY()

public:
	UVLocatorComponent();

protected:
	virtual void BeginPlay() override;

public:

};
#include "VLocatorComponent.h"
UVLocatorComponent::UVLocatorComponent()
{
PrimaryComponentTick.bCanEverTick = false;
}
void UVLocatorComponent::BeginPlay()
{
Super::BeginPlay();
}It is a good practice to disable ticking when you don’t need it. Otherwise, the engine may call it every single frame. If you have tick disabled, we can ensure that the engine will not call it. To learn more about tick and how to avoid it, please check this live stream from Epic Games.
Now, we can start working on the component itself. The first thing that we are going to do is to dynamically add a Spline Component to the locator’s owner (player character) as soon as the game starts. The spline is going to be used to create/hold the path points (curve) from the player to the target. So, to do that, we need to create a property to hold a reference to the spline, and inside the BeginPlay(), we create the spline and attach it to the owning character, but keeping a reference to it in the Locator Component. The code should look like this:
...
class QUESTLOCATOR_API UVLocatorComponent : public UActorComponent
{
	GENERATED_BODY()

	UPROPERTY()
	class USplineComponent* OwnerSplineComponent;

public:
	UVLocatorComponent();
...
We used an empty UPROPERTY because we don’t want to expose it to Blueprints and, at the same time, we want to make sure that the Gabage Collector is going to work properly. You can check this post for more details.
#include "VLocatorComponent.h"
#include "Components/SplineComponent.h"

UVLocatorComponent::UVLocatorComponent()
{
	PrimaryComponentTick.bCanEverTick = false;
}

void UVLocatorComponent::BeginPlay()
{
	Super::BeginPlay();

	AActor* Owner = GetOwner();
	UActorComponent* NewSplineComponent = Owner->AddComponentByClass(
		USplineComponent::StaticClass(),
		true,
		FTransform::Identity,
		false);
	OwnerSplineComponent = Cast<USplineComponent>(NewSplineComponent);
}
To learn more about Splines in Unreal. I recommend watching this short tutorial from Epic Games.
In Unreal 5, there is a new function called AddComponentByClass that makes it much easier to add a component in runtime to an Actor in C++. It takes four parameters: Class (The class of component to create), bManualAttachment (Whether manual or automatic attachment is to be used), RelativeTransform (The relative transform between the new component and its attach parent) and bDeferredFinish (Whether or not to immediately complete the creation and registration process for this component). In our example, the key point is that bManualAttachment needs to be false because we don’t want the spline to move together with the character. In other words, it will be part of the character but not follow it.
Now let’s add the new Locator Component to our character. For that, we need to modify the AQuestLocatorCharacter class in C++.
First, we need to add a property to the header file linking it to our new component:
...
UCLASS(config=Game)
class AQuestLocatorCharacter : public ACharacter
{
	GENERATED_BODY()

	UPROPERTY(VisibleAnywhere, BlueprintReadOnly, Category = Locator, meta = (AllowPrivateAccess = "true"))
	class UVLocatorComponent* LocatorComponent;

	/** Camera boom positioning the camera behind the character */
	UPROPERTY(VisibleAnywhere, BlueprintReadOnly, Category = Camera, meta = (AllowPrivateAccess = "true"))
	class USpringArmComponent* CameraBoom;
...
And make sure that we start it properly inside the constructor:
//Don't forget to #include "VLocatorComponent.h"
...
  // Create a follow camera
	FollowCamera = CreateDefaultSubobject<UCameraComponent>(TEXT("FollowCamera"));
	FollowCamera->SetupAttachment(CameraBoom, USpringArmComponent::SocketName); // Attach the camera to the end of the boom and let the boom adjust to match the controller orientation
	FollowCamera->bUsePawnControlRotation = false; // Camera does not rotate relative to arm

	LocatorComponent = CreateDefaultSubobject<UVLocatorComponent>(TEXT("LocatorComponent"));
	// Note: The skeletal mesh and anim blueprint references on the Mesh component (inherited from Character)
	// are set in the derived blueprint asset named ThirdPersonCharacter (to avoid direct content references in C++)
...
Note that we don’t need to call SetupAttachment as we normally do for most components, like the UCameraComponent right above it. This is because our new component is not a Scene Component. It is an Actor Component. It will mostly handle logic, and it will not have a position in space or be parented to another component. To better understand the main differences between different kinds of components, you can check the documentation here.
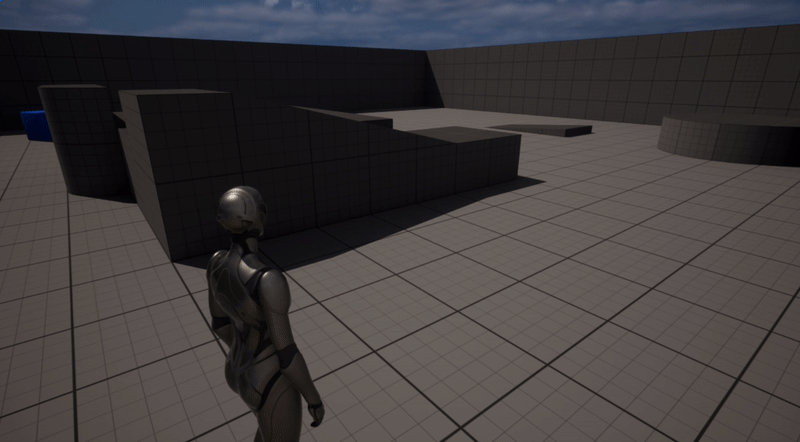
Now, you can compile and reopen the project. If everything is working correctly, after running the project and immediately ejecting (by pressing F8) it, you should be able to see a spline lying around the origin of the scene as follows:
Creating a Path to the Target
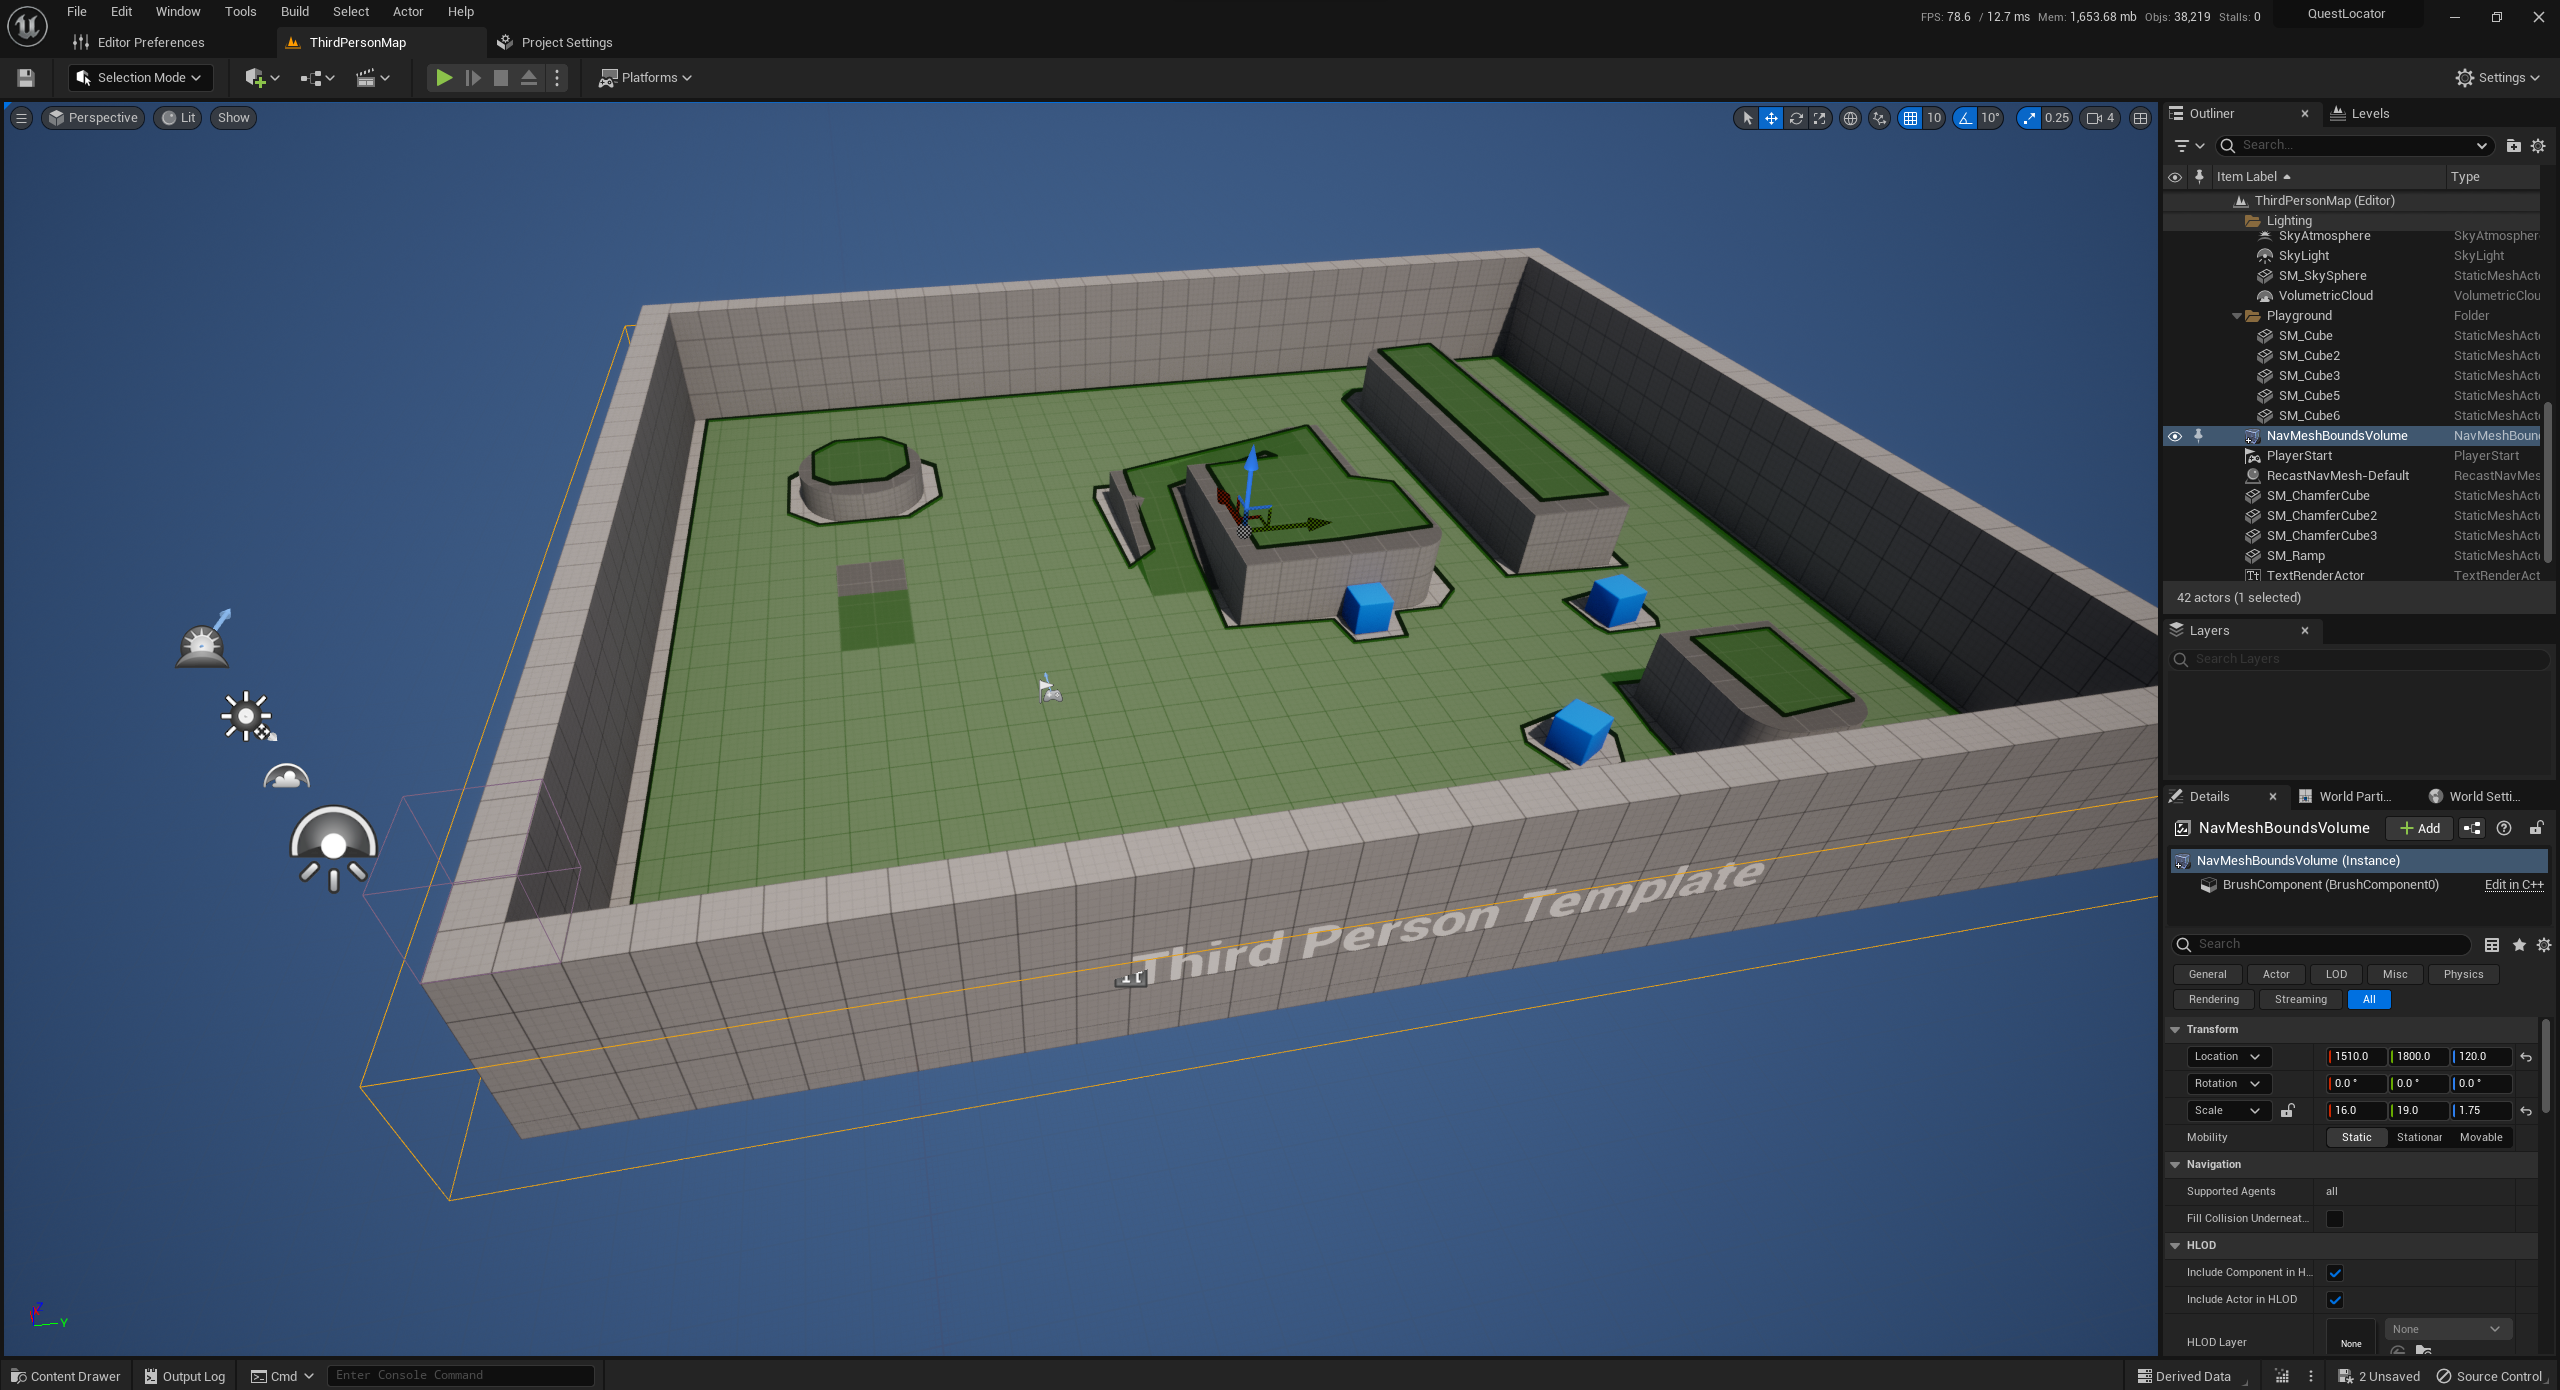
Now, it’s time to create a function to calculate the “best” path to a specific target/position in the map. For that to work, we need to add a NavMeshBoundsVolume to the scene to be able to request the Navigation System the shortest route from one point to another in the map. It is located under the Volumes section in the Place Actors menu:

Make sure to resize it so that it covers the floor. After that, you can enable the navigation visualization to verify which areas are accessible by the navigation system. To do that, you need to turn “on” the visualization in the “show” menu in the Viewport:

Now, let’s declare our ShowPath function in the Locator Component. It will receive the starting location (usually, the character’s location) and the target location. Then, it will ask the Navigation System about the shortest route and copy this information to our previously defined spline. This way, we can use the spline later on to drive our particle effect. Here its how the header file should look like:
...
public:
	UVLocatorComponent();

protected:
	virtual void BeginPlay() override;

public:
	UFUNCTION(BlueprintCallable)
	void ShowPath(FVector Origin, FVector Target);

};
We defined the function as BlueprintCallable so it can be executed in a Blueprint.
And that’s how the implementation should look like:
/* Don't forget to include:
#include "NavigationPath.h"
#include "NavigationSystem.h"
*/
...
void UVLocatorComponent::BeginPlay()
{
	Super::BeginPlay();

	AActor* Owner = GetOwner();

	UActorComponent* SplineComponentRef = Owner->AddComponentByClass(
		USplineComponent::StaticClass(),
		true,
		FTransform::Identity,
		false);
	LocatorSplineComponent = Cast<USplineComponent>(SplineComponentRef);
}

void UVLocatorComponent::ShowPath(FVector Origin, FVector Target)
{
	//Clear any previous points in the spline (old path?)
	OwnerSplineComponent->ClearSplinePoints();

	//Request the path from Origin to Target from the Navigation System
	UNavigationPath* Path = UNavigationSystemV1::FindPathToLocationSynchronously(GetOwner(), Origin, Target);

	//Iterate through all points and add them to the spline
	TArray<FNavPathPoint> PathPoints = Path->GetPath()->GetPathPoints();

	//Check if we have a path
	if (PathPoints.Num() > 0)
	{
		//Add the path points to the spline
		for (int32 Index = 0; Index != PathPoints.Num(); ++Index)
		{
			OwnerSplineComponent->AddSplinePoint(PathPoints[Index].Location,  ESplineCoordinateSpace::World);
			//Set the tangents to zero to avoid weird "knots"
			OwnerSplineComponent->SetTangentsAtSplinePoint(Index, FVector::ZeroVector, FVector::ZeroVector, ESplineCoordinateSpace::Local);
		}
	}
}
...
If you try to compile now, you might get this error:
  LNK2019: unresolved external symbol "__declspec(dllimport) public: class TSharedPtr<struct FNavigationPath,1> __cdecl UNavigationPath::GetPath(void)" (__imp_?GetPath@UNavigationPath@@QEAA?AV?$TSharedPtr@UFNavigationPath@@$00@@XZ) referenced in function "public: void __cdecl UVLocatorComponent::ShowPath(struct UE::Math::TVector<double>,struct UE::Math::TVector<double>)" (?ShowPath@UVLocatorComponent@@QEAAXU?$TVector@N@Math@UE@@0@Z)
  LNK2019: unresolved external symbol "__declspec(dllimport) public: static class UNavigationPath * __cdecl UNavigationSystemV1::FindPathToLocationSynchronously(class UObject *,struct UE::Math::TVector<double> const &,struct UE::Math::TVector<double> const &,class AActor *,class TSubclassOf<class UNavigationQueryFilter>)" (__imp_?FindPathToLocationSynchronously@UNavigationSystemV1@@SAPEAVUNavigationPath@@PEAVUObject@@AEBU?$TVector@N@Math@UE@@1PEAVAActor@@V?$TSubclassOf@VUNavigationQueryFilter@@@@@Z) referenced in function "public: void __cdecl UVLocatorComponent::ShowPath(struct UE::Math::TVector<double>,struct UE::Math::TVector<double>)" (?ShowPath@UVLocatorComponent@@QEAAXU?$TVector@N@Math@UE@@0@Z)
  UnrealEditor-QuestLocator.dll: LNK1120: 2 unresolved externals
This happened because we must add the NavigationSystem module to our Build.cs file. So, open the file located at Source/QuestLocator/QuestLocator.Build.cs and add the NavigationSystem module to the PublicDependencyModuleNames. It should look like this:
// Copyright Epic Games, Inc. All Rights Reserved.
using UnrealBuildTool;

public class QuestLocator : ModuleRules
{
	public QuestLocator(ReadOnlyTargetRules Target) : base(Target)
	{
		PCHUsage = PCHUsageMode.UseExplicitOrSharedPCHs;

		PublicDependencyModuleNames.AddRange(new string[] { "Core", "CoreUObject", "Engine", "InputCore", "HeadMountedDisplay", "EnhancedInput", "NavigationSystem" });
	}
}
Now, you should be able to compile and reopen the project. Before moving on, checking if everything is working properly is important. For that, let’s call the newly created function ShowPath from our BP_ThirdPersonCharacter blueprint located at ThirdPerson/Blueprints/BP_ThirdPersonCharacter (which inherit from our AQuestLocatorCharacter C++ class). So, let’s add an event to the P key by right-clicking in the event graph editor, typing “keyboard” and looking for the letter “P“. Drag the Locator Component as a get node, and from there, call the ShowPath function to calculate the path from the player’s location to the bottom-left corner of the level at (x: 250, y: 250, z: 0). Like this screenshot:

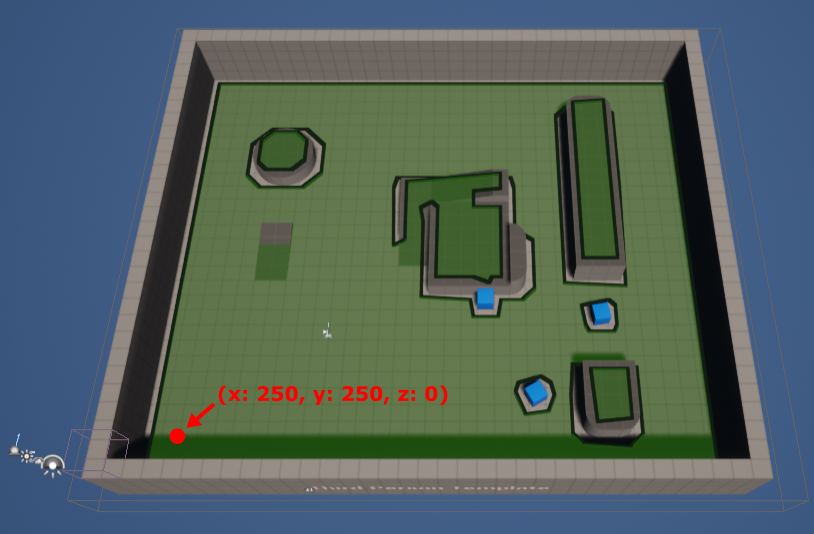
If you play the game, move around, press “P” and eject (F8) from the game, you should be able to see the spline’s path from the player location to the level’s bottom-left corner (x: 250, y: 250, z: 0) like this:

Make the Particle Follow the Path
To setup the particle effect that is going to follow the path, we are going to use a premade asset (made using Niagara) that can be downloaded from here. The pack contains one particle that mimics the floor guide from Dead Space.
Niagara is a visual effects editor (built-in in Unreal) that allows you to create and edit particle systems in real-time. If you want to know more about Niagara, I highly recommend this YouTube channel from Ashif Ali.
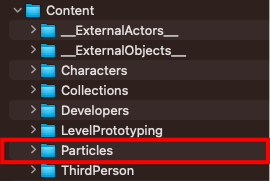
To add the particle effect to your project, you need to unzip the file and copy and paste the “Particles” folder inside the project’s Content folder. The file structure should look like this:
Then, when you open your project once again, you should be able to see the asset:

Now, we need to add two properties to our component. First, a property that is going to hold a reference to a Niagara Component (responsible for playing the effect in the game), in which we are going to create inside BeginPlay, pretty similar to what we did to the Spline Component. Second, a property (exposed to Blueprints) that is going to enable us to choose which Niagara System we want to use as an effect for the Niagara Component created in the BeginPlay:
...
class QUESTLOCATOR_API UVLocatorComponent : public UActorComponent
{
	GENERATED_BODY()

	UPROPERTY()
	class USplineComponent* OwnerSplineComponent;

	UPROPERTY()
	class UNiagaraComponent* OwnerNiagaraComponent;

	UPROPERTY(EditAnywhere, BlueprintGetter=GetParticle, BlueprintSetter=SetParticle, Category = "Locator")
	class UNiagaraSystem* Particle;

public:
	UVLocatorComponent();

protected:
	virtual void BeginPlay() override;

public:
	UFUNCTION(BlueprintCallable)
	void ShowPath(FVector Origin, FVector Target);

	UFUNCTION(BlueprintGetter)
	UNiagaraSystem* GetParticle() const;

	UFUNCTION(BlueprintSetter)
	void SetParticle(UNiagaraSystem* NewParticle);
...
Note that I declared the Particle as private (below GENERATED_BODY) and I’ve used the BlueprintGetter and BlueprintSetter specifiers for encapsulation. You can see more details about it in my first post.
I’ve also added the EditAnywhere specifier to the Particle. This way, we can set its initial value in the blueprint editor even though the property is private.
Next, inside the BeginPlay function, we are going to attach a Niagara Component (using the system assigned to the Particle property) to the owner (our player) and keep a reference to it in the OwnerNiagaraComponent property:
//Don't forget to #include "NiagaraComponent.h"
...
void UVLocatorComponent::BeginPlay()
{
	Super::BeginPlay();

	AActor* Owner = GetOwner();

	UActorComponent* SplineComponentRef = Owner->AddComponentByClass(
		USplineComponent::StaticClass(),
		true,
		FTransform::Identity,
		false);
	OwnerSplineComponent = Cast<USplineComponent>(SplineComponentRef);

	UActorComponent* NiagaraComponentRef = Owner->AddComponentByClass(
		UNiagaraComponent::StaticClass(),
		true,
		FTransform::Identity,
		false);
	OwnerNiagaraComponent = Cast<UNiagaraComponent>(NiagaraComponentRef);
	OwnerNiagaraComponent->SetAsset(Particle);
}
...
UNiagaraSystem* UVLocatorComponent::GetParticle() const
{
	return Particle;
}

void UVLocatorComponent::SetParticle(UNiagaraSystem* NewParticle)
{
	Particle = NewParticle;
}
...
Once again, if you try to compile, you might get an error:
  VLocatorComponent.gen.cpp(15): [C4430] missing type specifier - int assumed. Note: C++ does not support default-int
  VLocatorComponent.gen.cpp(15): [C2146] syntax error: missing ';' before identifier 'UClass'
  VLocatorComponent.gen.cpp(16): [C4430] missing type specifier - int assumed. Note: C++ does not support default-int
  VLocatorComponent.gen.cpp(16): [C2086] 'int NIAGARA_API': redefinition
  VLocatorComponent.gen.cpp(15): see declaration of 'NIAGARA_API'
  VLocatorComponent.gen.cpp(16): [C2146] syntax error: missing ';' before identifier 'UClass'
  VLocatorComponent.gen.cpp(132): [C2065] 'Z_Construct_UClass_UNiagaraComponent_NoRegister': undeclared identifier
  VLocatorComponent.gen.cpp(139): [C2065] 'Z_Construct_UClass_UNiagaraSystem_NoRegister': undeclared identifier
  VLocatorComponent.cpp(6): [C1083] Cannot open include file: 'NiagaraComponent.h': No such file or directory
That’s because we need to add the Niagara module to our Build.cs file. So, open the file located at Source/QuestLocator/QuestLocator.Build.cs and add the Niagara module to the PublicDependencyModuleNames. It should look like this:
// Copyright Epic Games, Inc. All Rights Reserved.

using UnrealBuildTool;

public class QuestLocator : ModuleRules
{
	public QuestLocator(ReadOnlyTargetRules Target) : base(Target)
	{
		PCHUsage = PCHUsageMode.UseExplicitOrSharedPCHs;

		PublicDependencyModuleNames.AddRange(new string[] { "Core", "CoreUObject", "Engine", "InputCore", "HeadMountedDisplay", "EnhancedInput", "NavigationSystem", "Niagara" });
	}
}
Now, you should be able to compile once again and reopen the project.
For the animation itself, we are going to create a Timer that is going to behave as our “Tick” by calling an UpdatePath function, which is going to be responsible for moving the particle along the spline and, whenever it reaches the end of the spline, it will stop the timer.
For that to work, we are going to declare the UpdatePath function and some extra properties in our component: a property to hold a reference to our timer, a float property for the speed, and another float property that is going to keep track of the position of the particle along the spline during the animation. The header file should look like this:
#pragma once

#include "CoreMinimal.h"
#include "Components/ActorComponent.h"
#include "VLocatorComponent.generated.h"

UCLASS(Blueprintable, ClassGroup=(Custom), meta=(BlueprintSpawnableComponent) )
class QUESTLOCATOR_API UVLocatorComponent : public UActorComponent
{
	GENERATED_BODY()

	UPROPERTY()
	class USplineComponent* OwnerSplineComponent;

	UPROPERTY()
	class UNiagaraComponent* OwnerNiagaraComponent;

	UPROPERTY(EditAnywhere, BlueprintGetter=GetParticle, BlueprintSetter=SetParticle, Category = "Locator")
	class UNiagaraSystem* Particle;

	UPROPERTY()
	FTimerHandle TimerHandle;

	UPROPERTY(BlueprintGetter=GetSpeed, BlueprintSetter=SetSpeed, EditAnywhere, Category="Locator")
	float Speed;

	UPROPERTY()
	float DistanceAlongSpline;

	UFUNCTION()
	void UpdatePath();
public:
	UVLocatorComponent();

protected:
	virtual void BeginPlay() override;

public:
	UFUNCTION(BlueprintCallable)
	void ShowPath(FVector Origin, FVector Target);

	UFUNCTION(BlueprintGetter)
	UNiagaraSystem* GetParticle() const;

	UFUNCTION(BlueprintSetter)
	void SetParticle(UNiagaraSystem* NewParticle);

	UFUNCTION(BlueprintGetter)
	float GetSpeed() const;

	UFUNCTION(BlueprintSetter)
	void SetSpeed(float NewSpeed);
};
Note that, once again, everything was declared as private (below GENERATED_BODY) and I’ve used the BlueprintGetter and BlueprintSetter specifiers for encapsulating the Speed property. The EditAnywhere specifier was also set to the Speed.
We are almost done. Let’s add the getter and setter for the Speed and start the Timer inside the ShowPath function:
...
void UVLocatorComponent::ShowPath(FVector Origin, FVector Target)
{
	//Clear any previous points in the spline (old path?)
	OwnerSplineComponent->ClearSplinePoints();

	//Request the path from Origin to Target from the Navigation System
	UNavigationPath* Path = UNavigationSystemV1::FindPathToLocationSynchronously(GetOwner(), Origin, Target);

	//Iterate through all points and add them to the spline
	TArray<FNavPathPoint> PathPoints = Path->GetPath()->GetPathPoints();

	//Check if we have a path
	if (PathPoints.Num() > 0)
	{
		//Add the path points to the spline
		for (int32 Index = 0; Index != PathPoints.Num(); ++Index)
		{
			OwnerSplineComponent->AddSplinePoint(PathPoints[Index].Location,  ESplineCoordinateSpace::World);
			//Set the tangents to zero to avoid weird "knots"
			OwnerSplineComponent->SetTangentsAtSplinePoint(Index, FVector::ZeroVector, FVector::ZeroVector, ESplineCoordinateSpace::Local);
		}

		//Set the particle location to the beginning of the path
		OwnerNiagaraComponent->SetWorldLocation(PathPoints[0].Location);

		//Reset the simulation
		OwnerNiagaraComponent->ReinitializeSystem();
		//Reset to 0.0
		DistanceAlongSpline = 0.0f;

		//Clear any active timer
		GetWorld()->GetTimerManager().ClearTimer(TimerHandle);
		//Start the timer
		GetWorld()->GetTimerManager().SetTimer(TimerHandle, this, &UVLocatorComponent::UpdatePath, 0.02f /* Repeat every 0.02 seconds */, true /* Loop */);
	}
}
...
float UVLocatorComponent::GetSpeed() const
{
	return Speed;
}

void UVLocatorComponent::SetSpeed(float NewSpeed)
{
	Speed = NewSpeed;
}
...
Note that we use the TimerHandle property to keep a reference to the active Timer, and we also use it to clear any active Timer (if necessary). If you want to know more about Timers in C++, please check this great post by Tom Looman.
We also need to implement our UpdatePath function. It will be responsible for updating the position of the particle effect along the spline by the given Speed. It will clear the timer and hide the particle whenever it reaches its end. The function should look like this:
...
void UVLocatorComponent::UpdatePath()
{
	//Get the timer rate
	float TimerRate = GetWorld()->GetTimerManager().GetTimerRate(TimerHandle);

	//Update the distance along the spline
	DistanceAlongSpline += Speed * TimerRate;

	//Check if it reached the end
	if (DistanceAlongSpline >= OwnerSplineComponent->GetSplineLength())
	{
		//Clear the timer
		GetWorld()->GetTimerManager().ClearTimer(TimerHandle);
	}
	else
	{
		//Update particle location in world space
		FVector NewLocation = OwnerSplineComponent->GetLocationAtDistanceAlongSpline(DistanceAlongSpline, ESplineCoordinateSpace::World);
		OwnerNiagaraComponent->SetWorldLocation(NewLocation);

		//Update particle rotation in world space
		FRotator NewRotation = OwnerSplineComponent->GetRotationAtDistanceAlongSpline(DistanceAlongSpline, ESplineCoordinateSpace::World);
		OwnerNiagaraComponent->SetWorldRotation(NewRotation);
	}
}
...
The last thing we need to do to test if everything is working is to set the initial value for the Speed property and choose the Niagara System we want to use as the Particle. For this example, I used a value of 1000 (2x faster than the player) for the Speed and the NS_FloorGuide asset as the particle. Here it is:

Running the Game
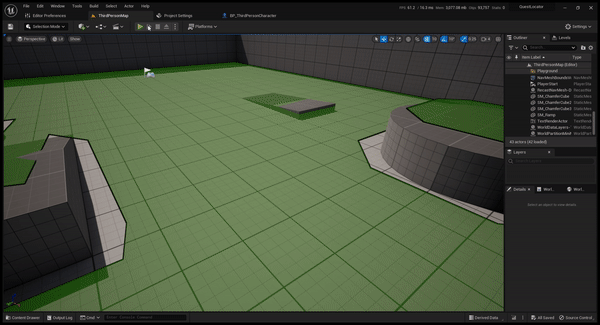
Compile and save. Now, run the game, move around, and press the P key. If everything goes well, you should see the particle following the path until it reaches the target:
I took some time and added an extra animation (Animation Montage) and particle to mimic (more closely) the navigation system from Dead Space:
The extra setup is out of the scope of this tutorial (maybe another tutorial?). However, it is available in the source code provided in this tutorial.
The Locator System is not perfect ( you might need to hide and unhide the particles, offset from the floor, etc.), but it is already a good starting point 🙂
Now, you can easily hook it up to a Quest System and have fun! Once again, thank you for reading, and I hope to have you back in the next tutorial!
Be First to Comment