Introduction
Welcome back! In the previous tutorial of our “Health Bars in Unreal 5” series, we created a basic health bar system using C++ in Unreal Engine, in which you can easily add a component to any Actor that should have health and can be damaged. Now, we will create different ways of displaying the player’s health to the user.
If you haven’t had the chance to read Part 1 yet, please do so here.
Also, I will assume that you already have a basic understanding of C++ and are familiar with the Unreal Engine environment. If you’re new to either of these, I recommend reviewing introductory resources before diving into this tutorial.
If you are new to C++ in Unreal 5, I highly recommend Tom Looman’s Unreal Engine C++ Complete Guide before getting started.
Before You Start
It’s good to mention that I’m going to use Part 1 as a starting point. You can also download the full source code for Part 2 from: https://github.com/valentegamedev/ue5-health-bars-part2
Without further ado. Let’s get started!
Unreal Motion Graphics (UMG)
For the first attempt at showing the health bar to the user, we will use the Unreal Motion Graphics (UMG). UMG is a visual interface design system in Unreal Engine. It allows developers to create interactive user interfaces using a node-based visual scripting approach. With UMG, you can design and customize UI components, animate them, and handle user interactions. It seamlessly integrates with Unreal Engine’s Blueprint system, making it easy to connect UI elements to game logic.
To get started with the basics of UMG in Unreal Engine. I recommend this video tutorial by SmartPoly and the documentation.
Creating a Basic Health Bar in UMG
To get started, create a new C++ class derived from UserWidget to create our Health Bar widget. In Unreal Engine, go to the “Tools” menu and select “New C++ Class“. Choose UserWidget from the “All Classes” tab as the base class, give your class name “VHealthBarWidget“, choose the class type as “Public“, and click “Create Class“.
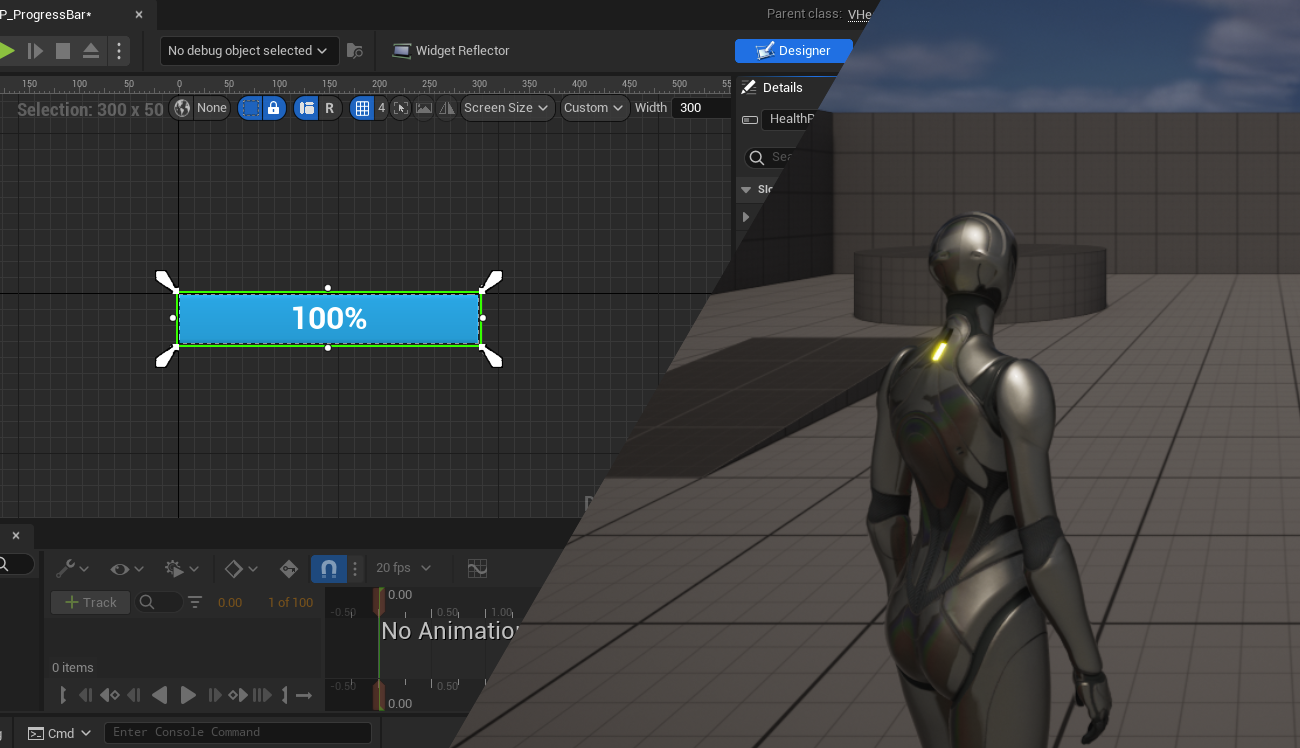
The goal is to create a widget that will look like this:
So, the first thing we will do is add two new properties called HealthProgressBar (UProgressBar) and HealthTextBlock (UTextBlock) to our header file as protected (so we can easily bind them in Unreal using Blueprints). In Unreal, a handy specifier called BindWidget can be added to help set up widgets using C++.
In Unreal Engine, the BindWidget specifier establishes a connection between a widget declared in the UMG Designer and a C++ variable within a UserWidget class with the exact same name. This specifier helps to simplify the process of accessing and manipulating widgets in the user interface directly from your C++ code.
To have a more in-depth introduction to the BindWidget specifier, please check this tutorial by BenUI.
There is also the BindWidgetOptional specifier, which is similar in functionality but differs in its behavior when binding widgets in C++ because it will not always require the widget to be declared. In other words, if a variable with the same name is not defined in the UMG Designer, it will not be valid in C++.
The header should look like this:
...
UCLASS()
class HEALTHBARS_API UVHealthBarWidget : public UUserWidget
{
	GENERATED_BODY()

protected:
	UPROPERTY(EditAnywhere, meta = (BindWidget))
	class UProgressBar* HealthProgressBar;

	UPROPERTY(EditAnywhere, meta = (BindWidget))
	class UTextBlock* HealthTextBlock;

public:

};
Now, let’s create the blueprint from our newly created C++ class. This way, we can set up how it will look visually.
Create a folder called “UMG” in your Contents Folder, and inside that folder, right-click and select the “Blueprint Class” menu under “Create Basic Asset“. Type “UVHealthBarWidget” in the “All Classes” section and select the “UVHealthBarWidget“ class. Name it WBP_ProgressBar.
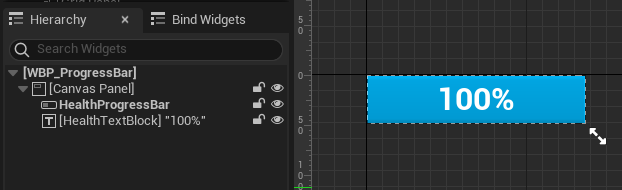
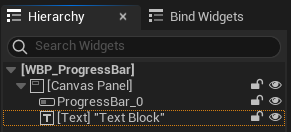
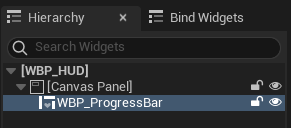
Drag a Canvas Panel to the root of the widget. Then, as a child of the Canvas Panel, you can drag a Progress Bar and a Text Block. The hierarchy should look like this:
Now, if you try to compile, you might get this error:

That happened because of the BindWidget specifier. The blueprint expects two widgets called HealthProgressBar and HealthTextBlock. So, to fix this, we need to rename the added Progress Bar to “HealthProgressBar” and the Text Block to “HealthTextBlock”. Now, if you recompile it, the error should be gone and your widget should look like this:
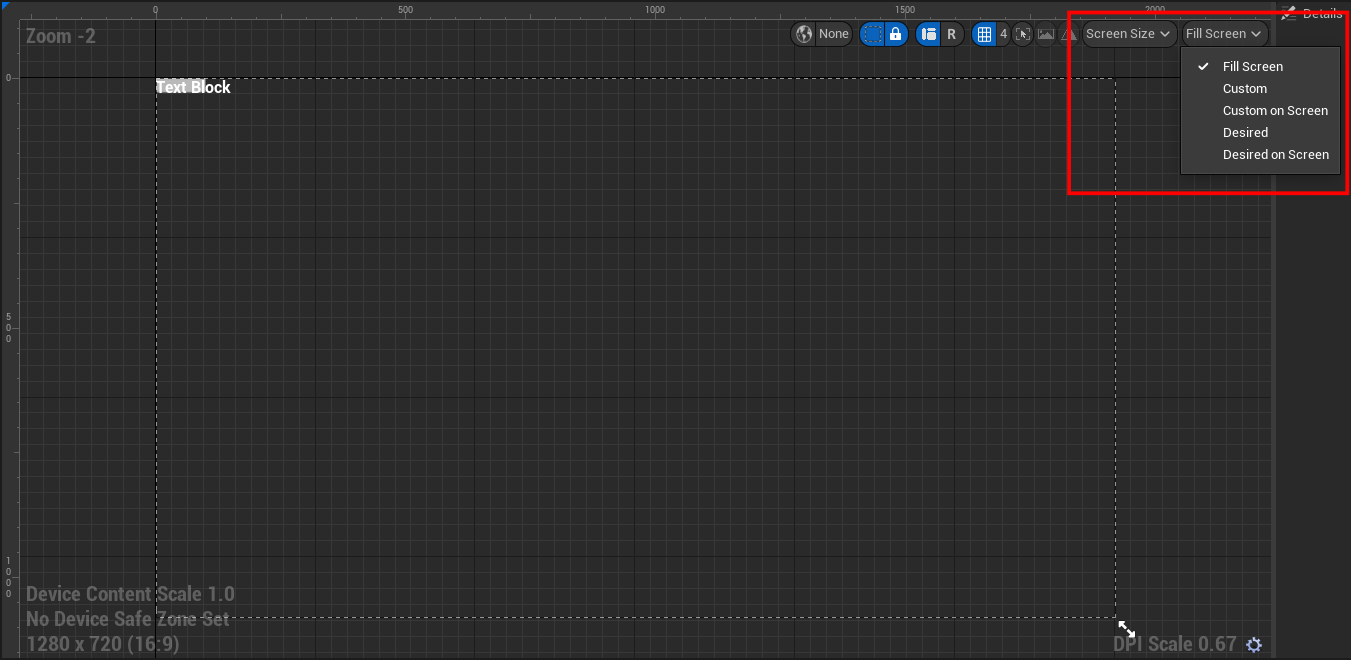
Next, let’s tweak the visual a bit. However, before changing anything, let’s set the viewport to a custom size to visualize our health bar better. For that, go to the menu located in the top right corner and select “Custom”:
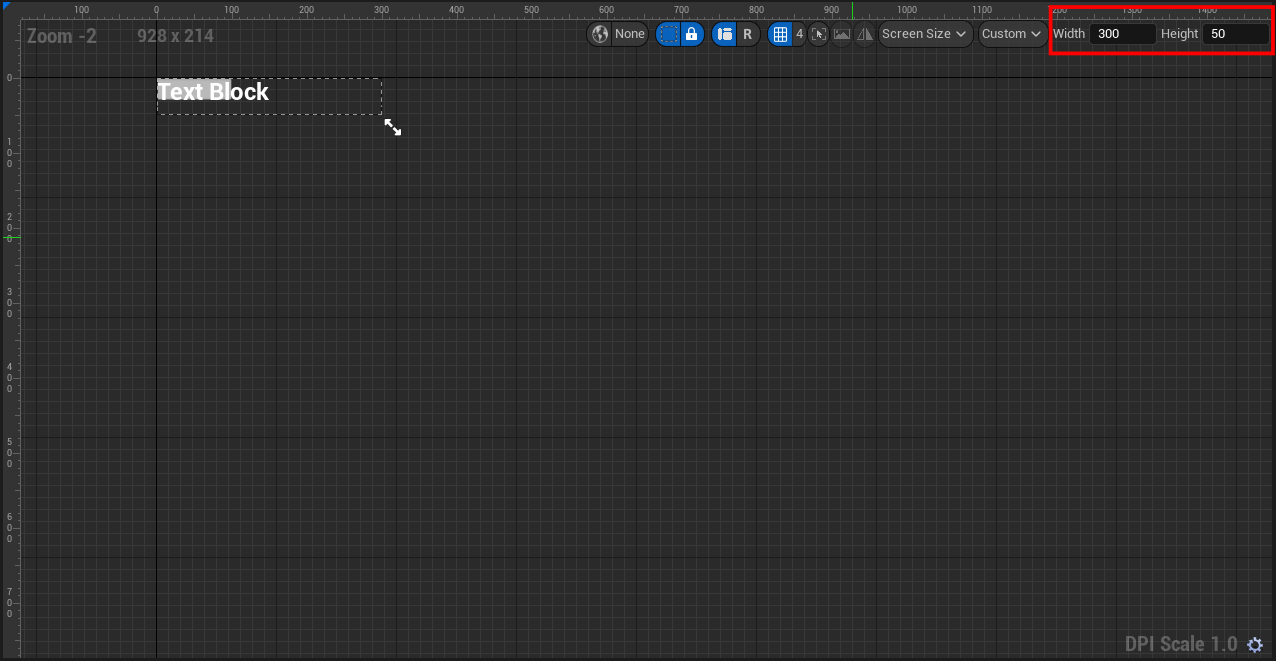
Set the size to 300 x 50:
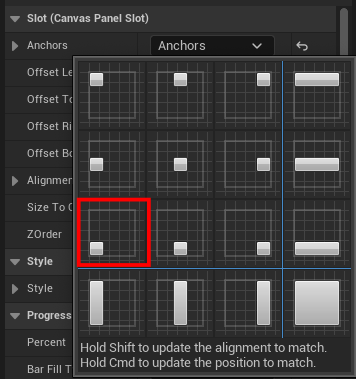
To adjust the widgets, first, select the HealthProgressBar and set its Anchor to Fill (lower right corner):

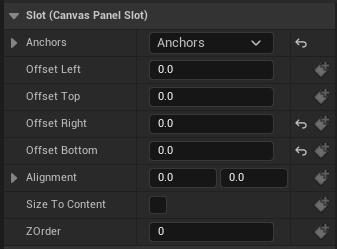
Also, ensure that all values in the Slot section have a value of 0.0:
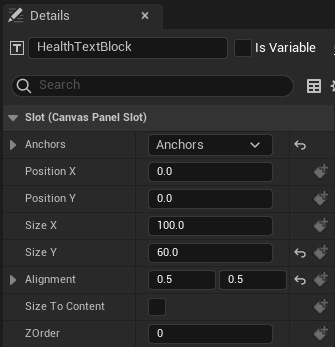
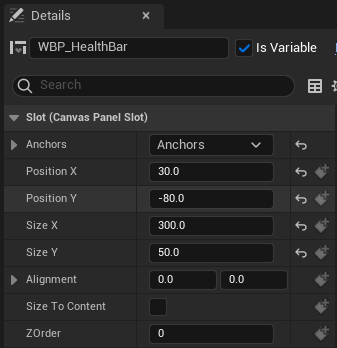
Now, select the HealthTextBlock and set its Anchor to Center:
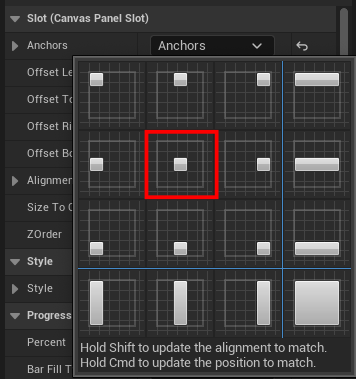
You should set the Slot values like this image:
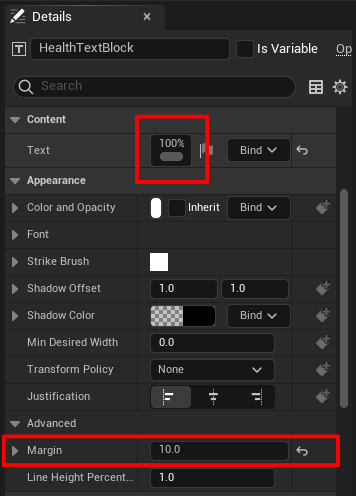
And, lastly, set its Text to “100%” and the Margin to 10.0:
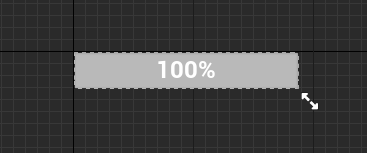
After those changes, our Health Bar should look like this:
To update its values in-game, we will connect our Health Bar to a Health Component and listen to its changes. This way, we prevent binding an event to read the health values on a Tick or NativeTick.
For that, we are going to add a pointer to hold a reference to a target Health Component (UVHealthComponent), a setter function called SetTargetHealthComponent, and a function that will be used as a callback for the Health Component delegate (OnHealthChanged) in our UVHealthBarWidget header file:
...
UCLASS()
class HEALTHBARS_API UVHealthBarWidget : public UUserWidget
{
	GENERATED_BODY()

	TWeakObjectPtr<class UVHealthComponent> TargetHealthComponent;

	UFUNCTION()
	void OnHealthChanged(int32 NewHealth, int32 MaxHealth);

protected:
	UPROPERTY(EditAnywhere, meta = (BindWidget))
	class UProgressBar* HealthProgressBar;

	UPROPERTY(EditAnywhere, meta = (BindWidget))
	class UTextBlock* HealthTextBlock;


public:
	UFUNCTION(BlueprintCallable)
	void SetTargetHealthComponent(UVHealthComponent* NewHealthComponent);
};
...
Note that I’ve used a TWeakObjPtr for the TargetHealthComponent. That’s a Weak Object Pointer. Basically, a weak pointer does not prevent the object from being destroyed or deallocated. It is typically used when you need to reference an object but don’t want to own or control its lifetime.
The implementation file should look like this:
#include "VHealthBarWidget.h"

#include "VHealthComponent.h"
#include "Components/ProgressBar.h"
#include "Components/TextBlock.h"

void UVHealthBarWidget::OnHealthChanged(int32 NewHealth, int32 MaxHealth)
{
	float Percentage = static_cast<float>(NewHealth)/MaxHealth;
	HealthProgressBar->SetPercent(Percentage);
	HealthTextBlock->SetText(FText::FromString(FString::Printf(TEXT("%d%%"), static_cast<int32>(Percentage*100))));
}

void UVHealthBarWidget::SetTargetHealthComponent(UVHealthComponent* NewHealthComponent)
{
	//Unregister from the old target health component
	if (TargetHealthComponent.IsValid())
	{
		TargetHealthComponent->OnHealthChanged.RemoveDynamic(this, &UVHealthBarWidget::OnHealthChanged);
	}

	TargetHealthComponent = NewHealthComponent;

	//Register to the new target health component
	if(TargetHealthComponent.IsValid())
	{
		TargetHealthComponent->OnHealthChanged.AddDynamic(this, &UVHealthBarWidget::OnHealthChanged);
	}
}
The SetTargetHealthComponent function is responsible for registering/unregistering our Health Bar to the OnHealthChanged delegate of a target Health Component (UVHealthComponent).
Inside the OnHealthChanged callback, we simply calculate the percentage of health, set it to the HealthProgressBar, and update the text for the HealthTextBlock.
This way, we can easily “listen” to any Health Component (created in Part 1 of this tutorial).
Displaying the Health Bar in the Game
To display our Health Bar, we are going to create a new UserWidget that will be used as a container for our Health Bar and, to keep it simple, display it from the BeginPlay event of our BP_ThirdPersonCharacter.
In a more complex setup, I like to use the HUD class as a central place for my widgets. To know more about this way of setting up widgets, please check out this amazing tutorial by Kekdot on YouTube.
So, from the “UMG” folder, right-click, and select the “Blueprint Class” menu under “Create Basic Asset“. Type “UserWidget” in the “All Classes” section and select the “UserWidget“ class. You can name it WBP_HUD.
Drag a Canvas Panel to the root of the widget. Then, as a child of the Canvas Panel, you can drag our newly created WBP_ProgressBar from the User Created section. The hierarchy should look like this:
Now, select the WBP_ProgressBar and set its Anchor to the Lower Left corner:
Use those values for the Slot:
And, if everything goes well, you should have something like this:

Now, let’s add our WBP_HUD to the character. Open the BP_ThirdPersonCharacter, and in the BeginPlay event, create a WBP_HUD widget, set it to a “HUD” variable of type WBP_HUD (we need to access it later), and add it to the viewport:

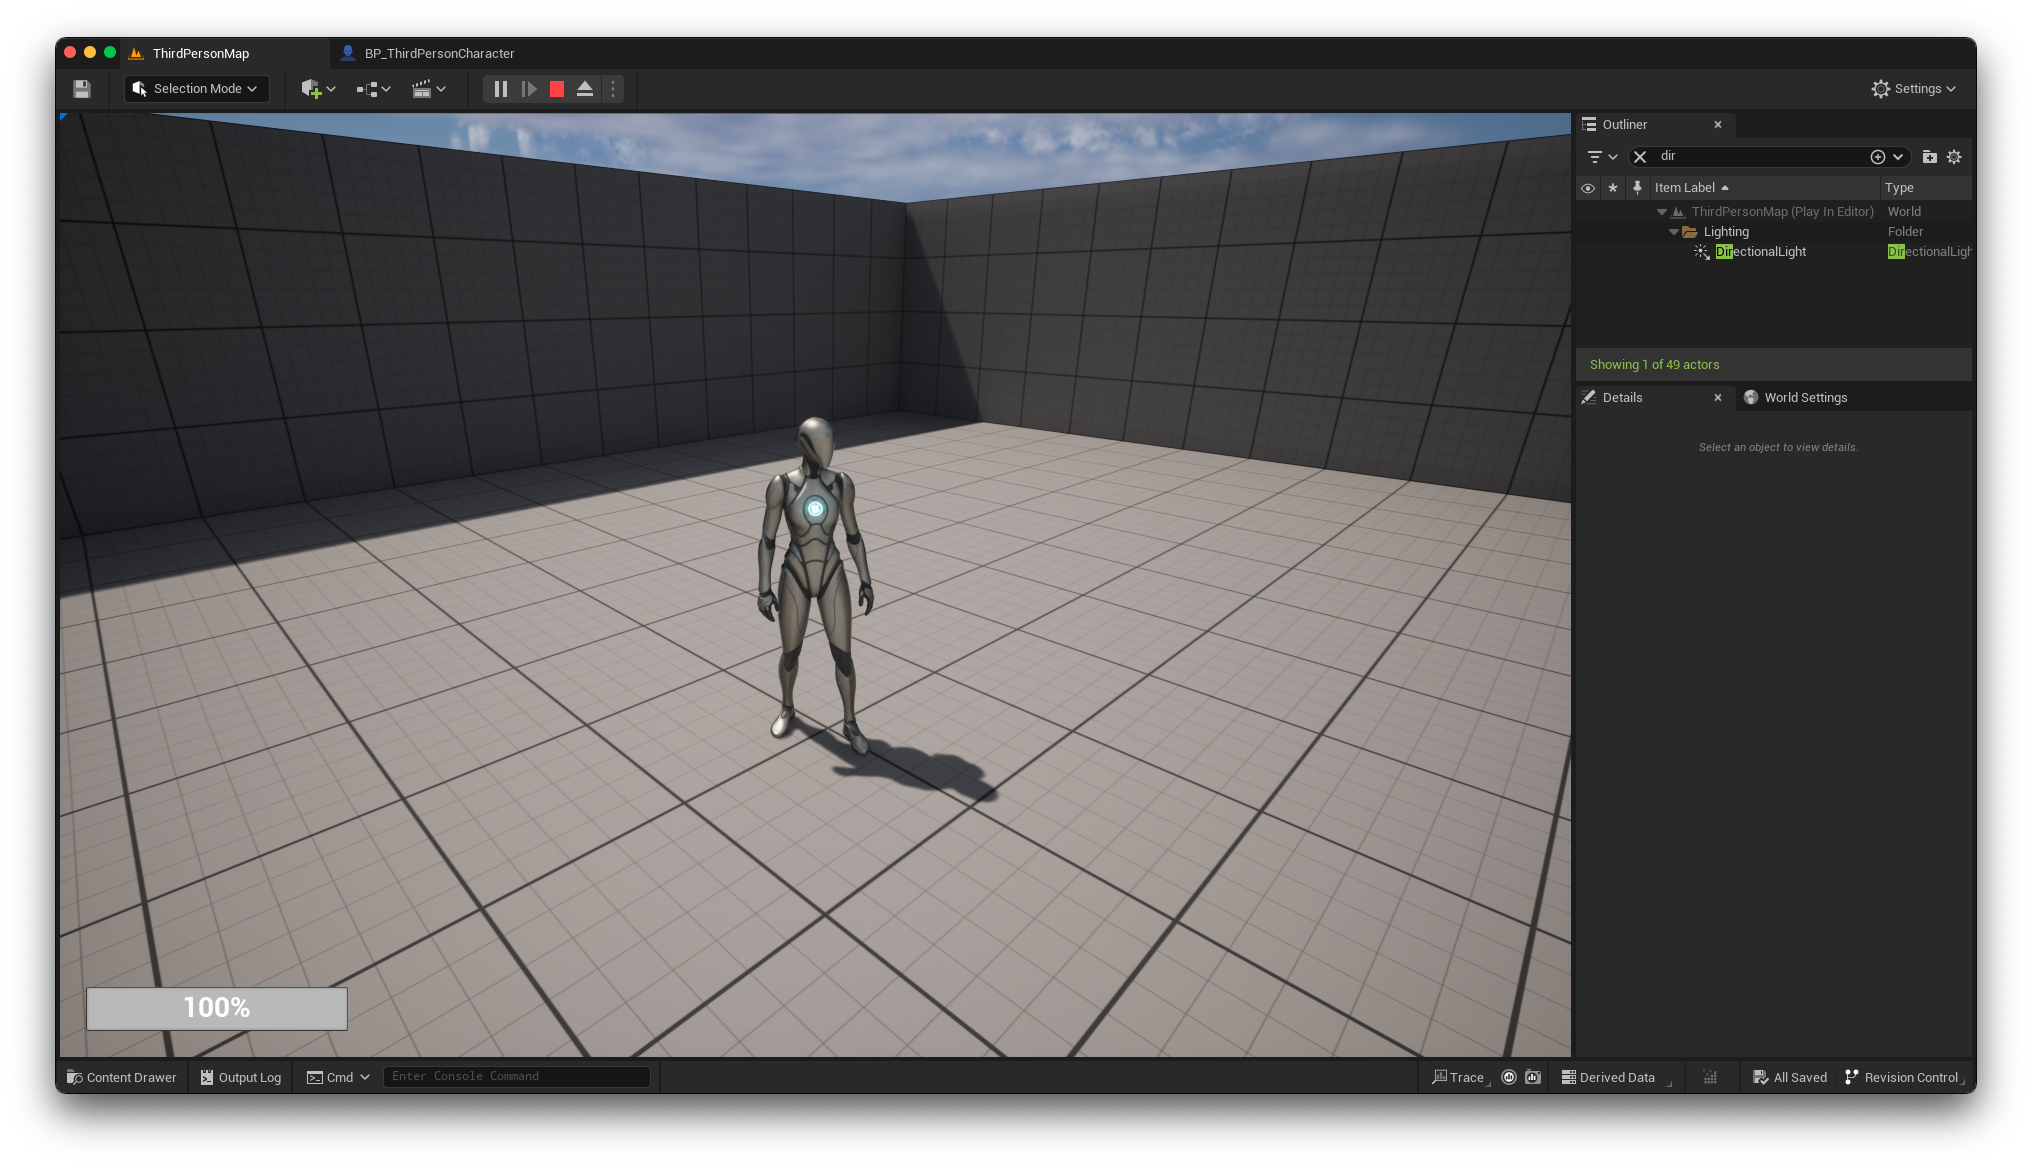
If you compile and run the game, you should get something like this:
However, we still have two issues: the Health Bar starts empty and does not respond to the damage event when we press the O key (setup done in Part 1 of this tutorial).
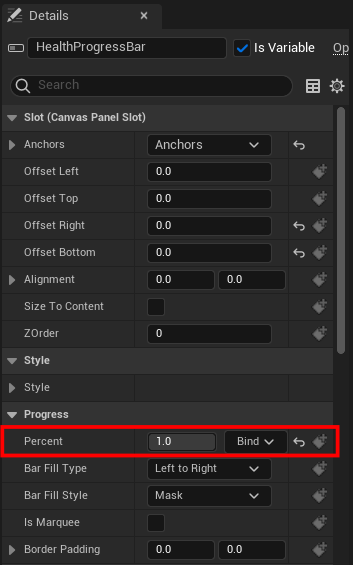
Fixing the first issue is very simple. Open the WBP_ProgressBar, select the HealthProgressBar, and set the Percent value to 1.0 under the Progress value:
For the second, we need to modify the BeginPlay event from the BP_ThirdPersonCharacter so that it will also set the Health Component from the character as the Target Health Component for our Health Bar:

Now, if you recompile, run the game, and press the O key, you should have this:
That’s nice, isn’t it?
“Killing” the Player
To make things more interesting, let’s create a little code to activate the ragdoll physics for the character’s Skeletal Mesh as soon as the health reaches 0.0 and our Health Component triggers the OnHealthDepleted delegate.
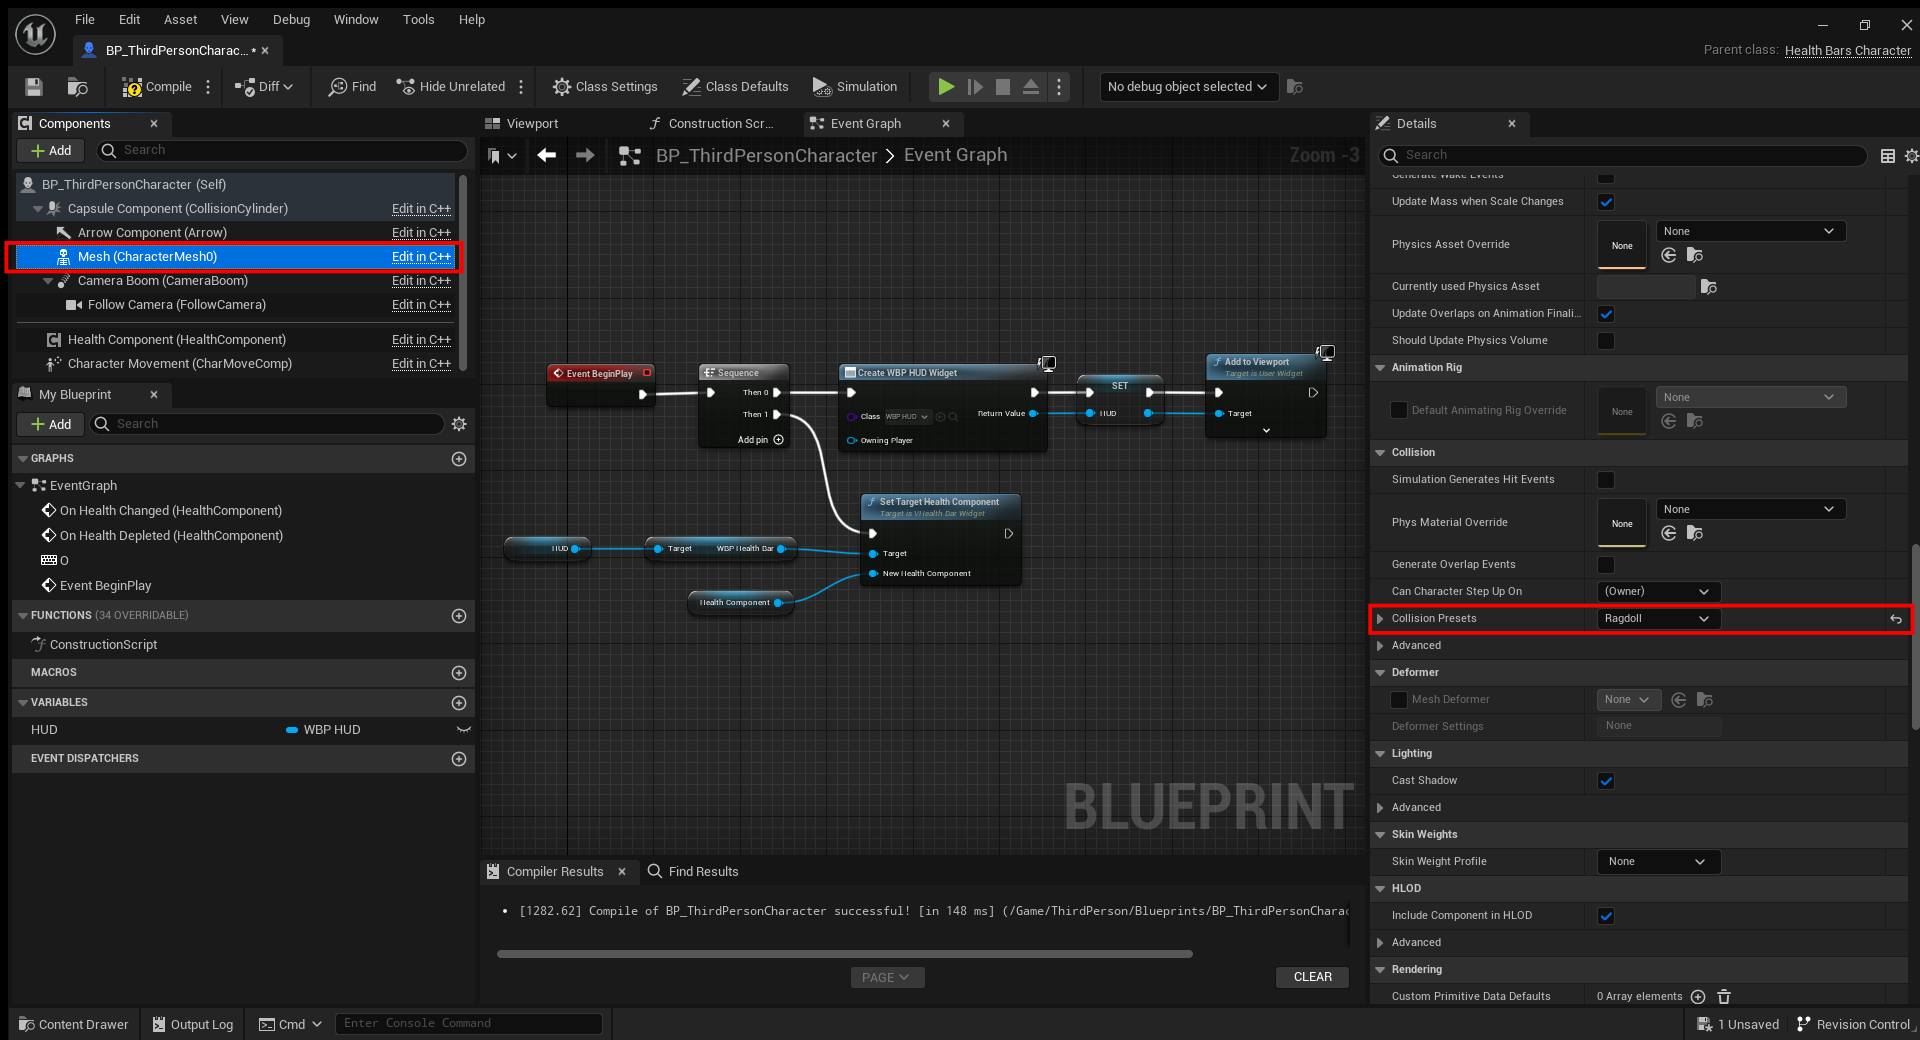
First, we need to change the Collision’s Preset from the Mesh within the BP_ThirdPersonCharacter to Ragdoll, as shown here:
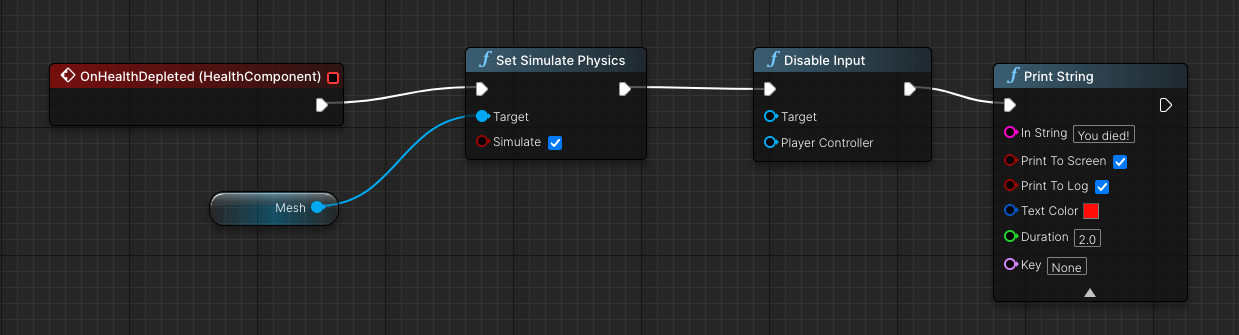
Then, set the ragdoll physics to be simulated and disable the player’s input as soon as the health is depleted. We can reuse the OnHealthDepleted event that we created in Part 1 of this tutorial:
Once again, if you recompile, run the game, and press the O key until you “die”, you should get this:
Cool! That’s it! We successfully integrated our Health Bar with our previously created Health Component! 🙂
Bonus: Replicate the Spinal Health system from Dead Space
I thought it would be nice to extend the example a bit and replicate the Spinal Health system from the Dead Space game. If you never played the game and don’t know what it is. Basically, the main character wears a suit that is capable of showing the player’s health through a colored tube/bar on his back. You can visualize it here:

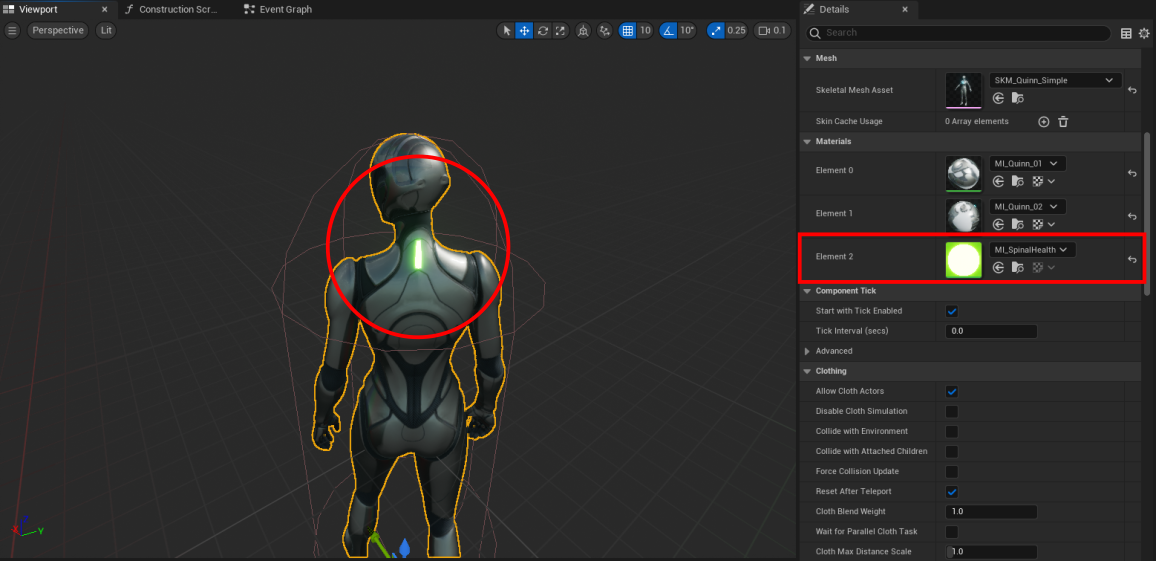
Sadly, by default, we can’t easily replicate this by using Unreal’s mannequins. So, I quickly exported SKM_Quinn_Simple as a .fbx and modified it in Blender by adding a new material to the faces near the neck to replicate the Spinal Health effect, as you can see here:
The modified version of the SKM_Quinn_Simple can be downloaded from here. The pack contains the modified skeletal mesh and the new material.
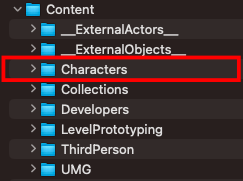
To add the files to your project, you need to unzip the file and copy and paste the “Characters” folder inside the project’s Content folder and replace the files when asked. The file structure should look like this:
The M_SpinalHealth material is very simple. I basically used a parameter called FillAmount to drive the vertical filling of the mesh’s faces while, at the same time, I lerp between the green (full health) and red color (empty health). You can check its behavior by opening the material instance called MI_SpinalHealth (located at Content/Characters/Mannequins/Materials/Instances/Quinn/MI_SpinalHealth) and changing the FillAmount parameter:
Now, we need to link the Health Component to the new material. We can do that by using the OnHealthChanged event (setup in Part 1 of this tutorial) to drive the FillAmount parameter.
However, to change the material’s parameter in-game, we need to create a dynamic version of the material and keep a reference to it (to access it later). We should do this in the BeginPlay event inside our BP_ThirdPersonCharacter:
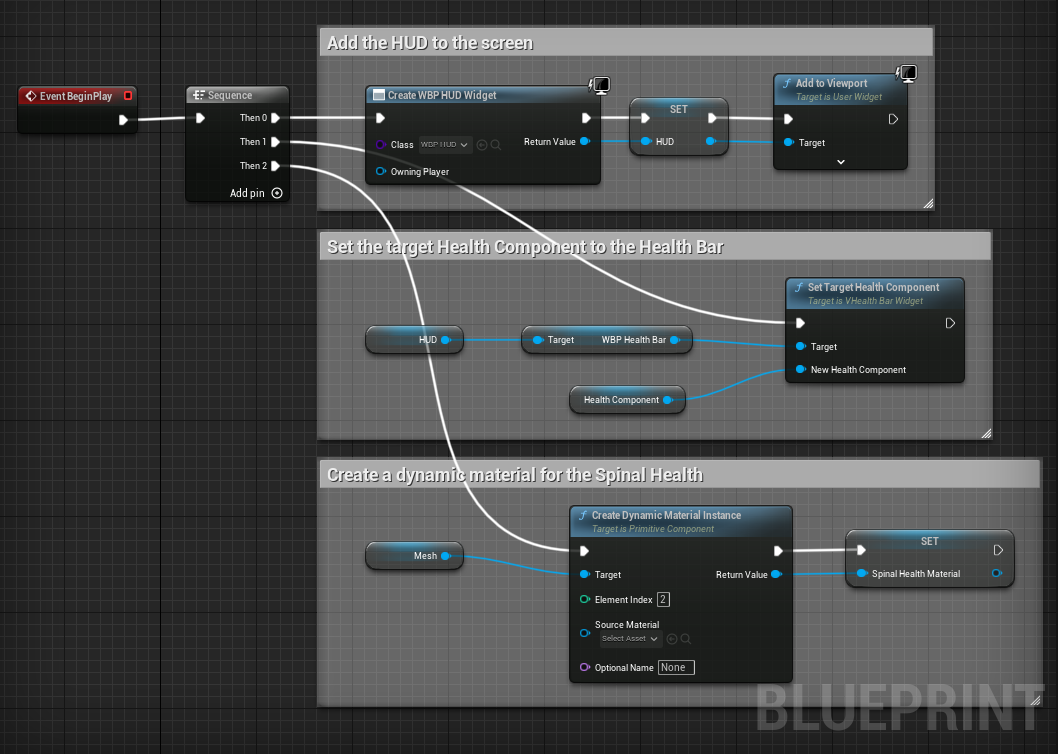
Keep in mind that it’s very important to set the Element Index from the Create Dynamic Material Instance node to 2 (the MI_SpinalMaterial is the third material in the Skeletal Mesh).
And the last step is to modify the OnHealthChanged event to update the FillAmount parameter:

I had to cast the NewHealth and MaxHealth values from Integer to Float so that we get a real number between 0.0 and 1.0.
That should be it! If you recompile, run the game, and press the O key until you “die”, you should get this:
Nice! We can see that the “Spinal Health” is reacting together with the health system! However, looking at the video, the character is too far from the camera to see it properly. So, I tweaked the settings for the camera a bit to mimic something closer to the Dead Space “style”:
That’s it! We have completed our basic health system! 🙂
Once again, thank you for reading, and I hope to have you back in the next tutorial!
Be First to Comment