
Last updated on April 21, 2023
Reading Time: 9 minutesIntroduction
Health bars are a common feature in many video games and serve as a visual representation of a player’s health. The use of health bars adds an element of tension and challenge to the gameplay, as players must constantly monitor their health and make decisions to avoid taking damage.
In some games, the health bar is divided into smaller segments, allowing players to track how close they are to death.

In others, the health bar may change color or pulse when the character is close to death, adding a sense of urgency to the player’s actions.

Health bars were also moved from the HUD (heads-up display) to in-game elements.

So, due to all those possibilities, I’ve decided to do some experimentation and create this tutorial about creating a wide range of health bars in Unreal 5.
Before You Start
It’s good to mention that I’m going to use Unreal’s Third-person C++ Template as a starting point for this tutorial. You can also download the full source code from: https://github.com/valentegamedev/ue5-health-bars
The first step is to create a simple and flexible Health System allowing us to experiment with our different bars quickly. For that, we are making a custom Health Component that can be attached to any Actor in the scene that should take/receive damage in our game.
If you are new to C++ in Unreal 5, I highly recommend Tom Looman’s Unreal Engine C++ Complete Guide before getting started.
Creating the Health Component
To create our Health Component, we need to create a new C++ class derived from ActorComponent. In Unreal Engine, go to the “Tools” menu and select “New C++ Class“. Choose ActorComponent as the base class, give your class name “VHealthComponent“, choose the class type as “Public“, and click “Create Class“.
Before we start adding code, let’s change a few things. First, we should disable ticking for the component in the constructor:
...
UVHealthComponent::UVHealthComponent()
{
   PrimaryComponentTick.bCanEverTick = false;
}
...
Next, remove the TickComponent function from the header and implementation file.
They should look like this after the changes:
#pragma once

#include "CoreMinimal.h"
#include "Components/ActorComponent.h"
#include "VHealthComponent.generated.h"


UCLASS( ClassGroup=(Custom), meta=(BlueprintSpawnableComponent) )
class HEALTHBARS_API UVHealthComponent : public UActorComponent
{
	GENERATED_BODY()

public:
	UVHealthComponent();

protected:
	virtual void BeginPlay() override;

public:

};
#include "VHealthComponent.h"

UVHealthComponent::UVHealthComponent()
{
	PrimaryComponentTick.bCanEverTick = false;
}

void UVHealthComponent::BeginPlay()
{
	Super::BeginPlay();
}
It is a good practice to disable ticking when you don’t need it. Otherwise, the engine can call it every single frame. If you have tick disabled, we can ensure that the engine will not call it. To learn more about tick and how to avoid it, please check this live stream from Epic Games.
Now, we can start working on the component itself. The first thing that we are going to do is to add two new properties called Health and MaxHealth to our header file after the macro GENERATED_BODY() (by default, everything that is declared after it will be private) and two public getters (BlueprintGetter) functions called GetHealth() and GetMaxHealth().
...
class HEALTHBARS_API UVHealthComponent : public UActorComponent
{
	GENERATED_BODY()

	// Current health
	UPROPERTY(BlueprintGetter=GetHealth, Category="Default")
	int32 Health;

	// Max health
	UPROPERTY(BlueprintGetter=GetMaxHealth, EditAnywhere, Category="Default")
	int32 MaxHealth;

public:
	UVHealthComponent();

protected:
	virtual void BeginPlay() override;

public:
	UFUNCTION(BlueprintGetter)
	int32 GetHealth() const;

	UFUNCTION(BlueprintGetter)
	int32 GetMaxHealth() const;
};
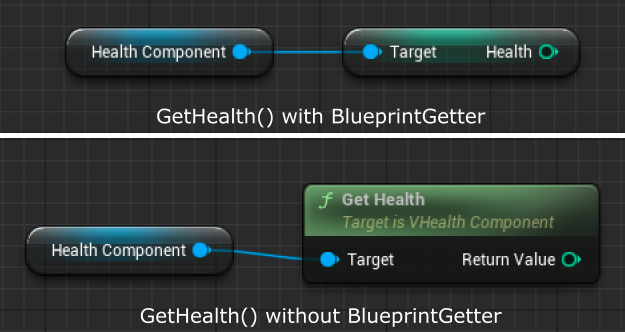
I’ve used the BlueprintGetter specifier for both properties and functions for encapsulating the newly created properties. This way, we can access them in blueprints using the get node without needing to call a function, and in C++, use it as a regular function. So, whenever we call the get node (in blueprints) for Health it will call the GetHealth() function instead, and the same thing for MaxHealth, it will call GetMaxHealth(). We have many other ways to set this up. I’m going to try to keep things simple and maybe later write a post just about UPROPERTY and UFUNCTION specifiers. In the meanwhile, you can check out BenUI’s excellent guide for UPROPERTY and UFUNCTION. To learn a little bit more about encapsulation, check it here.
Note that I’ve also added the EditAnywhere specifier just for the MaxHealth. This way, we can set its initial value in the blueprint editor even though the property is private. Now, in the implementation file, let’s initialize the Health property with MaxHealth inside the BeginPlay function and add the code for our getters:
...
void UVHealthComponent::BeginPlay()
{
	Super::BeginPlay();
	Health = MaxHealth;
}

int32 UVHealthComponent::GetHealth() const
{
	return Health;
}

int32 UVHealthComponent::GetMaxHealth() const
{
	return MaxHealth;
}
...
We also need a function to be able to update our health (damage or heal). To do that, we need to define an UpdateHealth() function in the header file and add its logic in the implementation file:
...
protected:
	virtual void BeginPlay() override;

public:

	UFUNCTION(BlueprintGetter)
	int32 GetHealth() const;

	UFUNCTION(BlueprintGetter)
	int32 GetMaxHealth() const;

	UFUNCTION(BlueprintCallable)
	void UpdateHealth(int32 DeltaHealth);

};
...
...
int32 UVHealthComponent::GetMaxHealth() const
{
return MaxHealth;
}
void UVHealthComponent::UpdateHealth(int32 DeltaHealth)
{
Health+=DeltaHealth;
//Clamp the health to avoid values less than 0 and bigger than MaxHealth
Health = FMath::Clamp(Health, 0.0f, MaxHealth);
}
...We also need some way to facilitate the integration of this system into the UI in the future. To do that, we are going to declare two Delegates (Events) that are going to be triggered whenever we update the health and when the health reaches 0.0.
For that, we need to declare them after the #includes in the header file. They should be declared as FOnHealthChangedSignature and FOnHealthDepletedSignature. The FOnHealthChangedSignature is going to have two parameters: NewHealth and MaxHealth. This way, we can easily calculate our health percentage as soon as it changes. The FOnHealthDepletedSignature will not have parameters. It will only notify that the owning actor had his health depleted (reached 0.0). The declaration should look like this:
#include "CoreMinimal.h"
#include "Components/ActorComponent.h"
#include "VHealthComponent.generated.h"

DECLARE_DYNAMIC_MULTICAST_DELEGATE(FOnHealthDepletedSignature);
DECLARE_DYNAMIC_MULTICAST_DELEGATE_TwoParams(FOnHealthChangedSignature, int32, NewHealth, int32, MaxHealth);

UCLASS( ClassGroup=(Custom), meta=(BlueprintSpawnableComponent) )
...
If you check the naming convention in the Unreal code, the standard prefix for delegates is F and Signature as the suffix.
After the declaration, we need to define them in our component. Let’s add them in the public section after the constructor in the header file:
...
public:
	UVHealthComponent();

	UPROPERTY(BlueprintAssignable, Category = "Default")
	FOnHealthChangedSignature OnHealthChanged;

	UPROPERTY(BlueprintAssignable, Category = "Default")
	FOnHealthDepletedSignature OnHealthDepleted;

protected:
	virtual void BeginPlay() override;
...
To learn more about delegates, I highly recommend BenUI’s Intro to Delegates and Advanced Delegates in C++.
Now is time to trigger them in code by calling the Broadcast function. That is going to be done inside the UpdateHealth function. So, whenever the health changes, we trigger OnHealthChanged, and if it reaches 0.0, we trigger OnHealthDepleted. Here is the code:
...
void UVHealthComponent::UpdateHealth(int32 DeltaHealth)
{
	Health+=DeltaHealth;
	//Clamp the health to avoid values less than 0 and bigger than MaxHealth
	Health = FMath::Clamp(Health, 0.0f, MaxHealth);

	if(Health == 0.0f)
	{
		OnHealthDepleted.Broadcast();
	} else
	{
		OnHealthChanged.Broadcast(Health, MaxHealth);
	}
}
...
We are mostly done with the component. Now is time to add it to our character and test if everything works properly.
Before we move on, you can check how the final code looks like:
#pragma once

#include "CoreMinimal.h"
#include "Components/ActorComponent.h"
#include "VHealthComponent.generated.h"

DECLARE_DYNAMIC_MULTICAST_DELEGATE(FOnHealthDepletedSignature);
DECLARE_DYNAMIC_MULTICAST_DELEGATE_TwoParams(FOnHealthChangedSignature, int32, NewHealth, int32, MaxHealth);

UCLASS( ClassGroup=(Custom), meta=(BlueprintSpawnableComponent) )
class HEALTHBARS_API UVHealthComponent : public UActorComponent
{
	GENERATED_BODY()

	// Current health
	UPROPERTY(BlueprintGetter=GetHealth, Category="Default")
	int32 Health;

	// Max health
	UPROPERTY(BlueprintGetter=GetMaxHealth, EditAnywhere, Category="Default")
	int32 MaxHealth;

public:
	UVHealthComponent();

	UPROPERTY(BlueprintAssignable, Category = "Default")
	FOnHealthChangedSignature OnHealthChanged;

	UPROPERTY(BlueprintAssignable, Category = "Default")
	FOnHealthDepletedSignature OnHealthDepleted;

protected:
	virtual void BeginPlay() override;

public:
	UFUNCTION(BlueprintGetter)
	int32 GetHealth() const;

	UFUNCTION(BlueprintGetter)
	int32 GetMaxHealth() const;

	UFUNCTION(BlueprintCallable)
	void UpdateHealth(int32 DeltaHealth);
};
#include "VHealthComponent.h"

UVHealthComponent::UVHealthComponent()
{
	PrimaryComponentTick.bCanEverTick = false;
}

void UVHealthComponent::BeginPlay()
{
	Super::BeginPlay();
	Health = MaxHealth;
}

int32 UVHealthComponent::GetHealth() const
{
	return Health;
}

int32 UVHealthComponent::GetMaxHealth() const
{
	return MaxHealth;
}

void UVHealthComponent::UpdateHealth(int32 DeltaHealth)
{
	Health+=DeltaHealth;
	//Clamp the health to avoid values less than 0 and bigger than MaxHealth
	Health = FMath::Clamp(Health, 0.0f, MaxHealth);

	if(Health == 0.0f)
	{
		OnHealthDepleted.Broadcast();
	} else
	{
		OnHealthChanged.Broadcast(Health, MaxHealth);
	}
}
To add the new Health Component to our character, we need to modify the AHealthBarsCharacter class in C++.
First, we need to add a property to the header file linking it to our new component:
...
UCLASS(config=Game)
class AHealthBarsCharacter : public ACharacter
{
	GENERATED_BODY()

	UPROPERTY(VisibleAnywhere, BlueprintReadOnly, Category = Camera, meta = (AllowPrivateAccess = "true"))
	class UVHealthComponent* HealthComponent;

	/** Camera boom positioning the camera behind the character */
	UPROPERTY(VisibleAnywhere, BlueprintReadOnly, Category = Camera, meta = (AllowPrivateAccess = "true"))
	class USpringArmComponent* CameraBoom;
...
And make sure that we start it properly inside the constructor:
//Don't forget to #include "VHealthComponent.h"
...
	// Create a follow camera
	FollowCamera = CreateDefaultSubobject<UCameraComponent>(TEXT("FollowCamera"));
	FollowCamera->SetupAttachment(CameraBoom, USpringArmComponent::SocketName); // Attach the camera to the end of the boom and let the boom adjust to match the controller orientation
	FollowCamera->bUsePawnControlRotation = false; // Camera does not rotate relative to arm

	HealthComponent = CreateDefaultSubobject<UVHealthComponent>(TEXT("HealthComponent"));

	// Note: The skeletal mesh and anim blueprint references on the Mesh component (inherited from Character)
	// are set in the derived blueprint asset named ThirdPersonCharacter (to avoid direct content references in C++)
...
Note that we don’t need to call SetupAttachment as we normally do for most components, like the UCameraComponent right above it. This is because our new component is not a Scene Component. It is an Actor Component. It will mostly handle logic, and it will not have a position in space or be parented to another component. To better understand the main differences between different kinds of components, you can check the documentation here.
Testing the Health Component using Blueprints
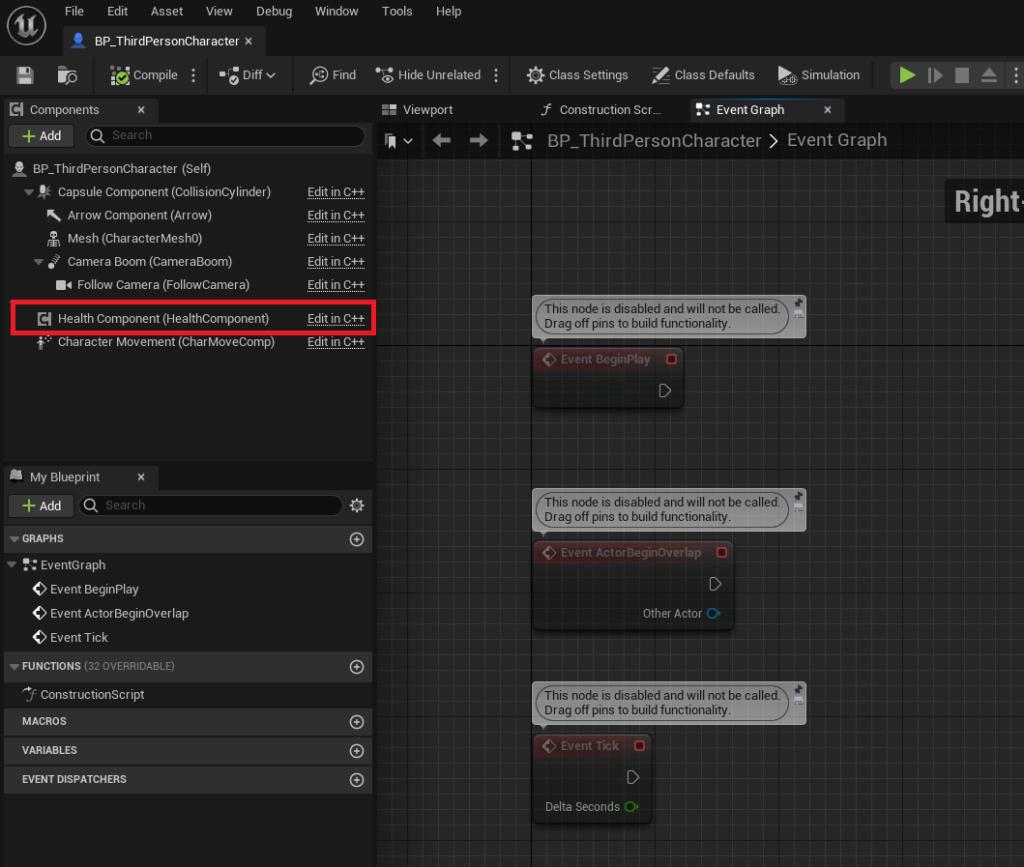
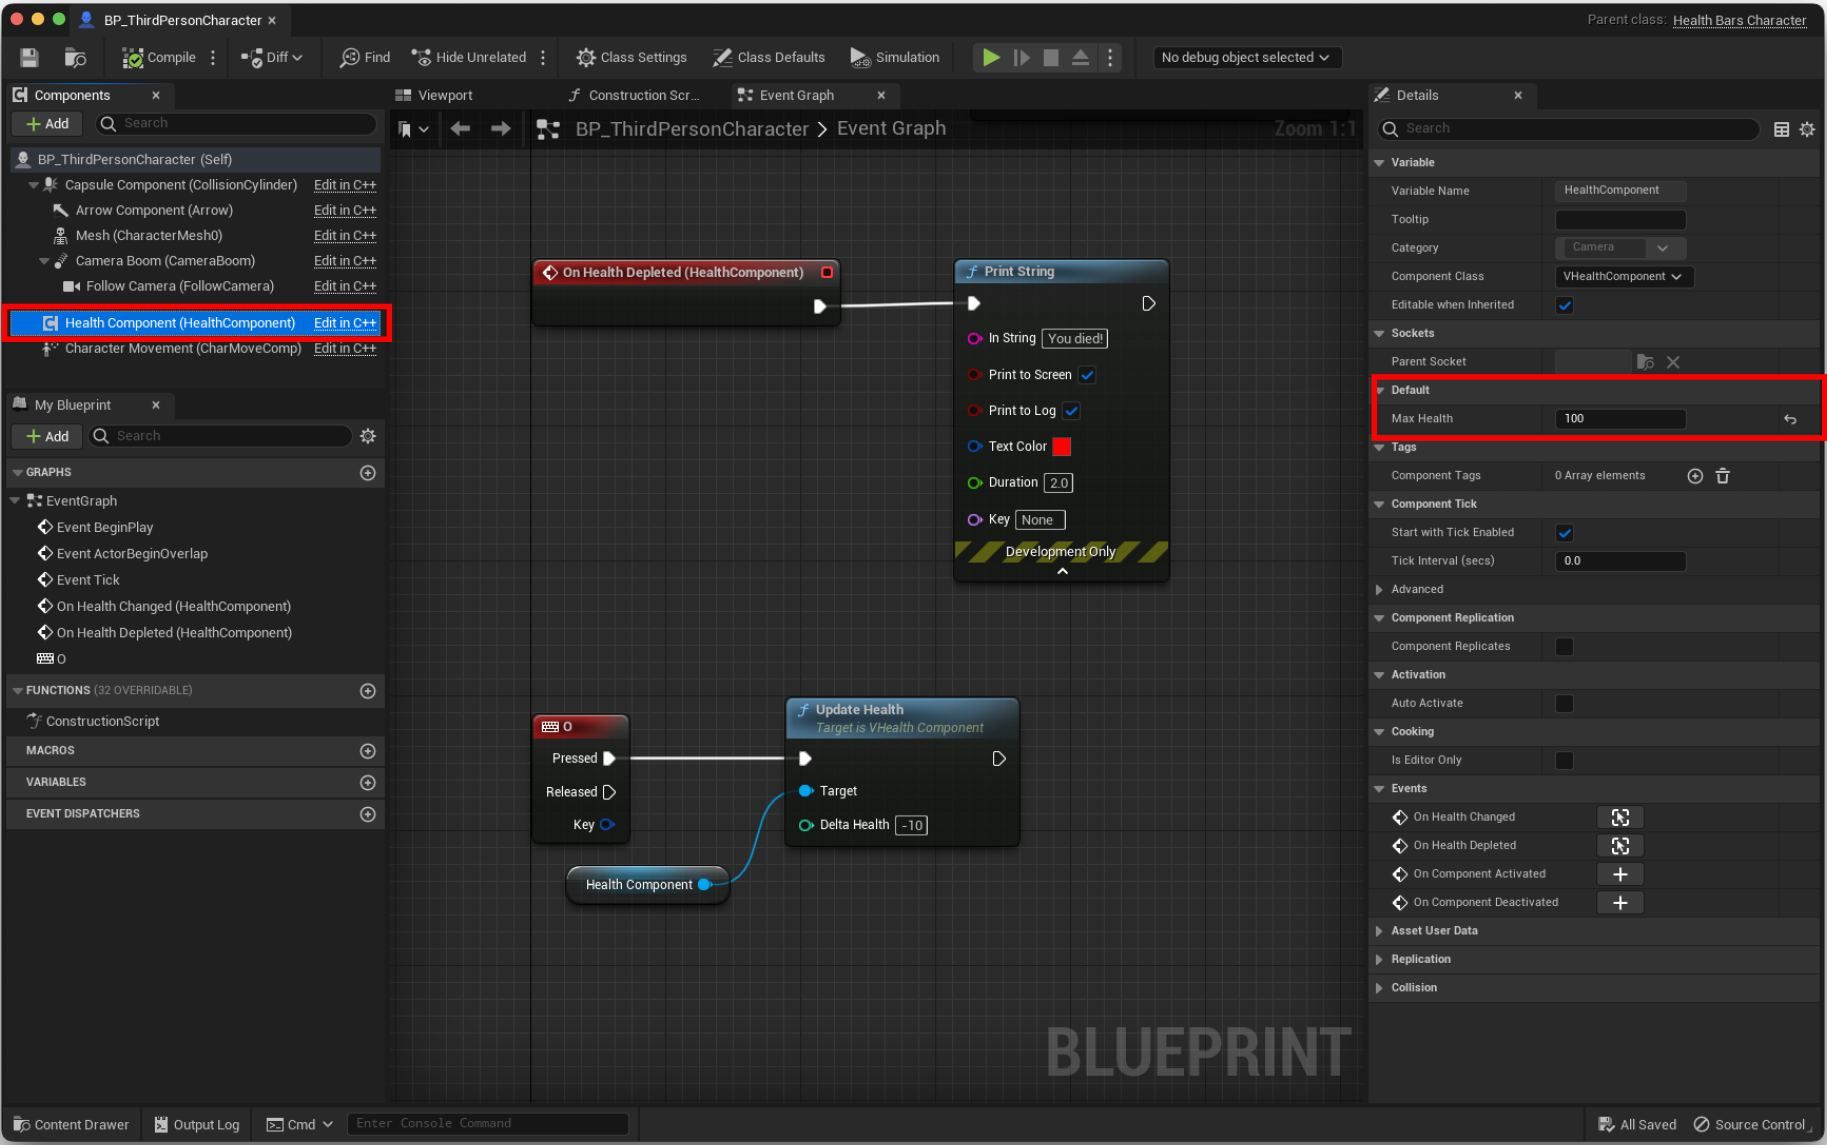
If you compile and reopen the project, you should be able to open the BP_ThirdPersonCharacter blueprint located at ThirdPerson/Blueprints/BP_ThirdPersonCharacter (which inherit from our AHealthBarsCharacter C++ class) and see our new Health Component attached to it. Like in this screenshot:
Before creating our visuals for the health bar, let’s test if everything works properly in blueprints (faster iteration while prototyping). First, let’s bind some custom events to our delegates OnHealthChanged and OnHealthDepleted. To do that, you can select the Heath Component and click the “+” for each of them in the Details Panel under the Event Section:

Testing C++ code in blueprints is a common practice due to its iteration speed. To better understand when to use C++ and/or Blueprints, check this post.
Next, let’s add a print for each of them to ensure that our character gets notified every time the health component changes. It should look similar to this:
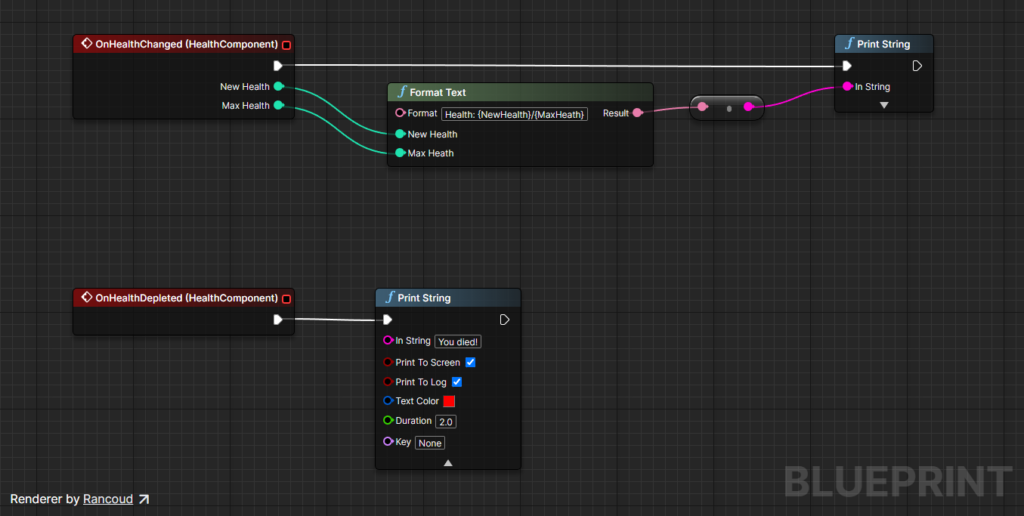
Note that I’m using the Format Text node to construct the text for the OnHealthChanged event. This node will create an input pin for each wildcard between {} that you add in the format text parameter. In our case, {NewHealth} and {MaxHealth}. To better understand how it works, you can watch this tutorial and check the documentation here.
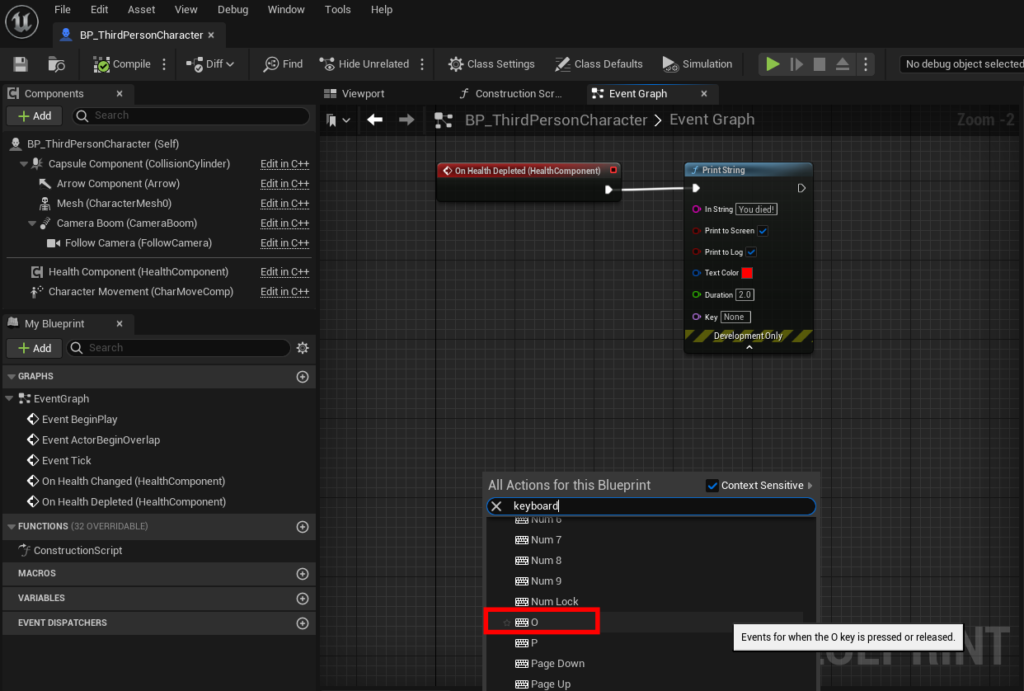
To deal damage to our character, let’s add an event to the O key by right-clicking in the event graph editor, typing “keyboard” and looking for the letter “O“:
Then, call the UpdateHealth function that we created for our Health Component by dragging the component to the event graph as a get node, and from the get node, call the UpdateHealth. Set the Delta Health parameter as -10 to decrease the health by 10 every time we call the function. Also, make sure that the execution pin (white pin) from the O key event is connected to the function:

The last thing that we need to do for the test is to set the initial value for the Max Health property from our Health Component in the details panel:
Running the Game
Compile and save. Now, run the game and press the O key a couple of times. If everything goes well, you should see the prints on the screen with the changes in the Health Component until the health is depleted and you get the “You died!” message!

Now, you can easily add the component to any Actor that should have health and can be damaged. As an exercise, you can try to create a crate that can also be destroyed!
In the next part of this tutorial, we will add a health bar to the HUD and link it to our Health Component. Thank you for reading, and I hope to have you back in the next part!
Thank you for starting this series of tutorials.
Everything is well explained, the code is clear and consistent.
In particular, I love the external references you added; It allows the readers to extend their knowledge.
A quick suggestion would be to explain why you are disabling the ticking for the HealthComponent. I think I know the reason, but some readers may not.
Finally, I have a question regarding the BlueprintGetter.
I understand the importance of encapsulating properties, but I don’t get the benefit compared to calling the GetHealth method directly inside the Blueprint.
For me, the GetHealth looks very clear that I’m calling a method and that it may do other things.
While calling Health may look like I’m publically accessing/exposing a property I shouldn’t.
What is the benefit of going with one instead of the other?
Keep up the great work.
Cheers
Hi Thiago! Thank you for the feedback!
I’ve added a note to explain why I’m disabling the ticking. Regarding BlueprintGetter, that is a personal preference. I’m used to work with people who only have experience with Blueprints, and most tutorials/examples use publicly accessible variables. So, I like to use the BlueprintGetter to keep consistency for them, and if you code in C++, you see that it is a getter for sure. Also, If you check some C++ examples, it is very common to find the specifier ‘AllowPrivateAccess = “true”‘ in the UPROPERTY, making that specific property publicly accessible in Blueprints, not in C++, which I don’t like that much. I use it just when I’m declaring components in actors.
I hope that it is clear now 🙂